


Saving and Using Templates During Import
Last modified: October 23, 2019
A template is a set of import settings stored in a file.
It’s no use wasting your time on selecting the same settings each time you import data. Select once, save multiple settings to a file, and use it to have customized import without efforts.
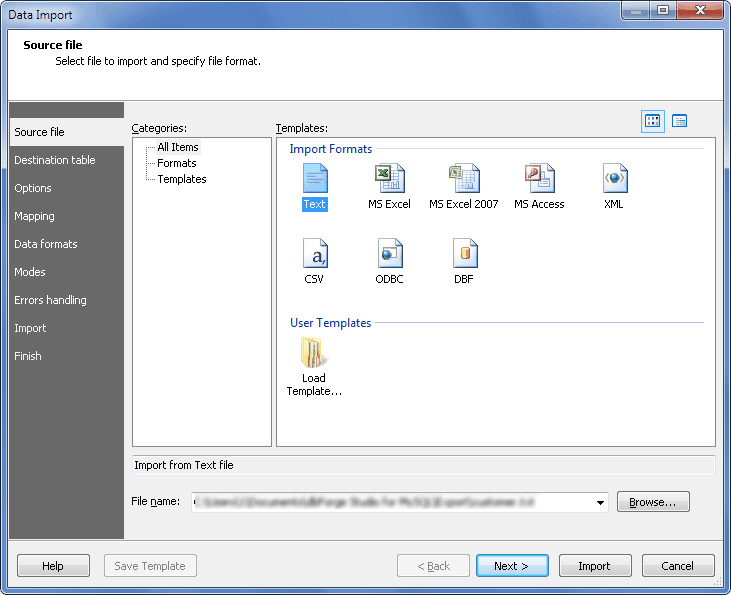
For example, you need to import data stored in text format into an existing table once a day. You can set up the import options once, and next time all you need to do is to select Text import format and a location of Source data and click Import. To illustrate the case, let’s import .txt Source file to an existing table create a template, and then use it.
Creating Template
-
Open the Data Import wizard, and select Text import format and a path to .txt Source file.
-
Move to the Destination table wizard page, and select a Target Microsoft SQL Server connection and a database. Select Existing table and in the drop-down list select the table.
-
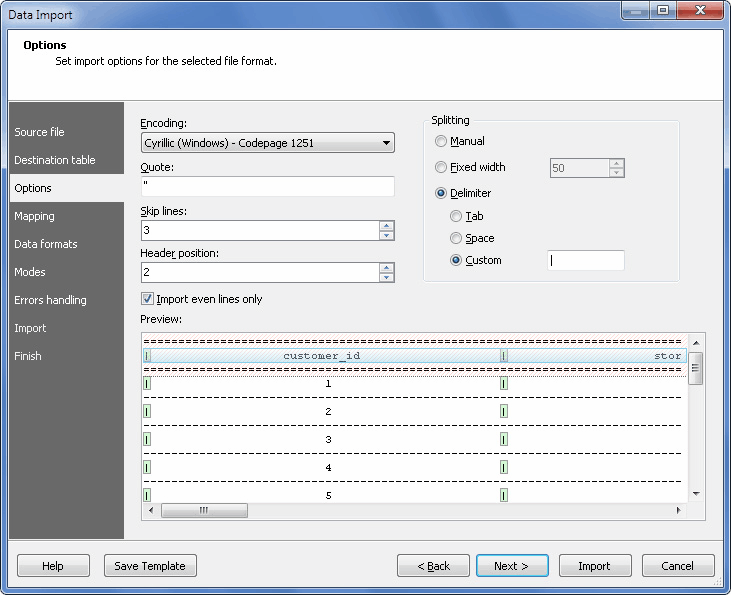
On the Options wizard page in the Skip lines field, enter 3 to start importing the Source data from the 4th line. As there is a header in the Source with column names, let’s specify its position, otherwise the imported columns will get default names - column1, column2. Enter 2 in the corresponding field. Select to import only even lines and Fixed width type of splitting for the Source data.
-
On the Mapping wizard page, you can see that dbForge Fusion for SQL Server has mapped all the Source and Target columns, as all of them have the same names.
-
One more thing is left. Let’s set Universal sortable date\time format for the Source data. On the Data formats wizard page, clear the Autodetect Date **and Time format **checkbox and select the format from the drop-down list.
-
Everything is appropriate, so click Import to start importing the data.
-
Click Save Template at the bottom and specify a name and a location of a template file in the Save As dialog box. Call it _txt_template. This template will appear in the User templates section.
Loading Template:
-
Click _txt_template, which was created following the aforementioned steps, in the Templates section on the first page of the Data Import wizard.
-
Select Text import format and a location of Source data.
-
On the Destination table wizard page, select the Target connection and database. Select Existing table and in the drop-down list select the table.
-
Move to the Options wizard page and see the Skip lines and Header position fields and Fixed width splitting type already selected. The same happens with mapping and a date\time format on the other wizard pages.
'%3e%3cpath%20id='thumb_up_2'%20d='M15%2017H5.5V7L11.5%201L12.1667%201.45833C12.4028%201.625%2012.5833%201.83681%2012.7083%202.09375C12.8333%202.35069%2012.8681%202.61806%2012.8125%202.89583L12.7917%203L12%207H17.5C17.9167%207%2018.2708%207.14583%2018.5625%207.4375C18.8542%207.72917%2019%208.08333%2019%208.5V9.6875C19%209.79861%2018.9896%209.89931%2018.9688%209.98958C18.9479%2010.0799%2018.9167%2010.1736%2018.875%2010.2708L16.3944%2016.0875C16.2703%2016.3625%2016.0833%2016.5833%2015.8333%2016.75C15.5833%2016.9167%2015.3056%2017%2015%2017ZM7%2015.5H15L17.5%209.6875V8.5H10.1667L11.1875%203.4375L7%207.625V15.5ZM5.5%207V8.5H2.5V15.5H5.5V17H1V7H5.5Z'%20fill='%2327282C'/%3e%3c/g%3e%3c/g%3e%3c/svg%3e) Yes
Yes'%3e%3cpath%20id='thumb_down_2'%20d='M5%203H14.5V13L8.5%2019L7.83333%2018.5417C7.59722%2018.375%207.41667%2018.1632%207.29167%2017.9062C7.16667%2017.6493%207.13194%2017.3819%207.1875%2017.1042L7.20833%2017L8%2013H2.5C2.08333%2013%201.72917%2012.8542%201.4375%2012.5625C1.14583%2012.2708%201%2011.9167%201%2011.5V10.3125C1%2010.2014%201.01042%2010.1007%201.03125%2010.0104C1.05208%209.92014%201.08333%209.82639%201.125%209.72917L3.60417%203.91667C3.71528%203.63889%203.89931%203.41667%204.15625%203.25C4.41319%203.08333%204.69444%203%205%203ZM13%204.5H5L2.5%2010.3125V11.5H9.83333L8.8125%2016.5625L13%2012.375V4.5ZM14.5%2013V11.5H17.5V4.5H14.5V3H19V13H14.5Z'%20fill='%2327282C'/%3e%3c/g%3e%3c/g%3e%3c/svg%3e) No
No
