Building Query in Visual Mode
In this walkthrough you will learn how to use Query Builder in generating SELECT statements.
Retrieving Data from Tables Using Query Builder
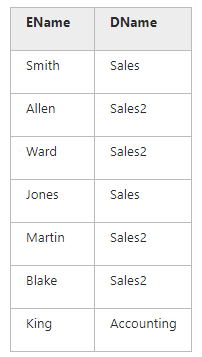
Suppose you need to know what department the employee belongs to. To accomplish this task, it is needed to get employee’s name and department internal code from one table (Emp) and name of the department from another table (Dept).
Creating Inner Join between Two Tables
- In the Database Explorer make sure that connection to your server containing the base (“Demobase”) is active.
- On the Fusion menu, click New Query.
- Drag the table Emp from the Database Explorer onto the query diagram of the document. A table shape should appear containing a list of table’s columns. Do the same for Dept.
- Select the EName check box field in the Emp table shape and the DName check box field in the Dept table shape to include them into the SELECT list. These fields appear in the Selection tab of the tabbed editor below the query diagram.
- Drag the field DeptNo from the Emp table shape onto the same field at the Dept table shape. A connector between two tables appear, indicating the relation has been established.
- Switch to the Joins tab of the tabbed editor to make sure the relation has been established properly. You can see “Emp.DeptNo=Dept.DeptNo” string.
- Click the Execute button on the Devart-Query toolbar to perform the query.
Creating an Outer Join Between Two Tables
Now when data from several tables can be retrieved at the same query, let’s have a closer look at the SQL statement that was just composed. A distinctive feature of the INNER JOIN is that if an employee has DeptNo, which is never encountered in the Dept table, then this employee will not be listed in the query result. You can set value of DeptNo to other than 10, 20 or 30 to make sure that after performing the same query the corresponding entry disappears from the returned data. An OUTER JOIN should be used to save the situation.
To create OUTER JOIN:
- Right-click the connector between two tables. The shortcut menu appears.
- Estimate the position of table shapes on the query diagram. If the table shape representing table Emp is to the left of the connector, choose Select all rows from “Emp” from the popup menu. Notice that the middle of the connection has changed its form.
- Switch to the Joins tab of the tabbed editor to see the changes. To click the red-colored join kind and to choose Left Outer Join from the popup menu is an alternative way to set up the relation.
- Click the Execute button on the Devart-Query toolbar to execute the query.
The result of this query should be exactly as of previous. To see how the outer join works, change a value of DeptNo in either of the tables to a unique value and re-execute the query.
Customizing a Query Using Query Builder
There are six clauses in the SELECT statement and for every clause there is a tab in the tabbed editor. The tabbed editor is the easiest way to adjust a query to your needs. Now the previous query should become a bit more complex. Suppose it is needed to find out how much money employees earn in each department. Let’s exclude a president from the list and sort it by money amount in descending order.
- Switch to the Design view of the query that was built in the previous part of the walkthrough.
- In the Emp table shape, clear the EName field to exclude it from SELECT list.
- Switch to the Selection tab of the tabbed editor. Click the first empty cell and select Emp.Sal (SAL (emp)) field from the drop-down list.
- In the same row, click the column Alias and enter a pseudonym for the field. Let it be “Money”.
- In the same row, click the Function column and choose Sum from the drop-down list. Pay attention to the changes that occurred in the table shape related to the Emp table.
- On the Where tab of the tabbed editor, click the Add button.
- Click the left enter a value field, then select Emp.Job from the drop-down list.
- Click the condition operator (‘=’) and choose does not equal from the drop-down list.
- Click the right enter a value field and type ‘President’.
- On the Group By tab, select the field Dept.DName and click the right arrow button. Use up arrow and down arrow buttons to change order of columns. If you have missed and added a wrong field to the Group By list, select it and click on the left arrow button. You should not do anything at the Having tab. It is absolutely similar to the Where tab.
- On the Order By tab, click Money, then click the RightArrowButton right arrow button.
- Select this field in the Ordered By list and click the Change Order button. Notice what happened to table shapes after all these manipulations.
- At any moment you can switch to the Text view of a document to inspect a query you have built using Query Builder. To do it, click on the Text button at the bottom part of a document. If the Text button is not visible, use a corresponding item in the popup menu. Another way to change document’s view is to use commands from the View menu.
- In either Design or Text view, click the the Execute button. If you have followed the instruction correctly and used source data provided in the previous topic, the following table should appear:
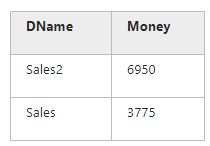
If you have made changes to the tables involved in the query, your results may differ.