This topic describes how to customize environment in Entity Developer.
The functionality of environment customization differs in the standalone version of the Entity Developer application and in the Visual Studio add-in.
Environment customization in the standalone version covers the following two areas:
| • | General - allows customizing the general behavior of the application; |
| • | Keyboard - allows customizing keyboard shortcuts used in the application. |
The corresponding procedures are described below.
To customize the general behavior of the application, perform the following sequence of actions:
| 1. | From the application's main menu, select Tools and then select Options. |
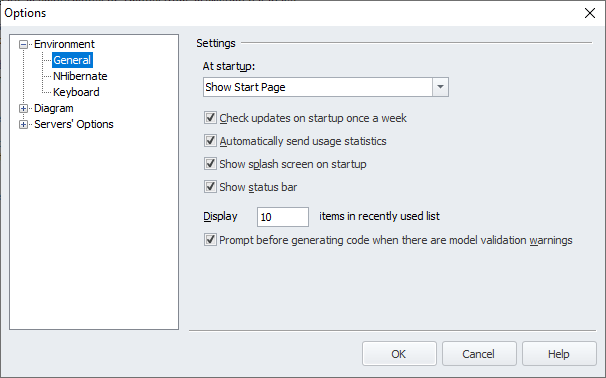
The Options dialog box is displayed:

| 2. | From the At startup drop-down list, select the way the application behaves at startup. The following three options are available: |
| a. | Show Start Page (the startup page is displayed on the application launch), |
| b. | Load Last Model (the last project is loaded on the application launch), |
| c. | Show Empty Environment (the empty environment is loaded on the application launch). |
| 3. | If you do not want the check for new Entity Developer version to be performed once a week, clear the Check updates on startup once a week check box. |
| 4. | If you do not want the splash screen to be displayed, clear the Show splash screen on startup check box. |
| 5. | If you do not want Entity Developer to share your Anonymous Usage Statistics with us, clear the Automatically send usage statistics check box. |
| 6. | If you do not want the status bar to be displayed, clear the Show status bar check box. |
| 7. | To change the number of files displayed in the File -> Recent Files menu, enter the required number in the Display XX items in recently used list. Note that the maximum number of files is 24. |
| 8. | If you don't want to see a warning message every time when you generate code and there are warnings in the model, clear the Prompt before generating code when there are model validation warnings check box. |
| 9. | When all the required changes have been made, click OK. |
|
|
In case you work with NHibernate models, the Environment node also contains the NHibernate sub-node, that allows you to configure the path to NHibernate assemblies.
|
|
|
Environment customization in the Visual Studio add-in allows customizing only the general behavior of the application and provides the following options: Check updates on startup once a week and Refactoring renamed model objects.
If you choose to refactor renamed model objects, all the references in code to the property or entity will be renamed in the whole solution. The update is performed when saving the model.
|
|
Customizing keyboard shortcut keys involves modifying, removing, and creating new shortcuts. It is also possible to reset shortcuts to their default settings.
To customize keyboard shortcut keys, perform the following sequence of actions:
| 1. | From the application's main menu, select Tools and then select Options. The Options dialog box is displayed. |
| 2. | Under the Environment node in the navigation pane, select Keyboard. |
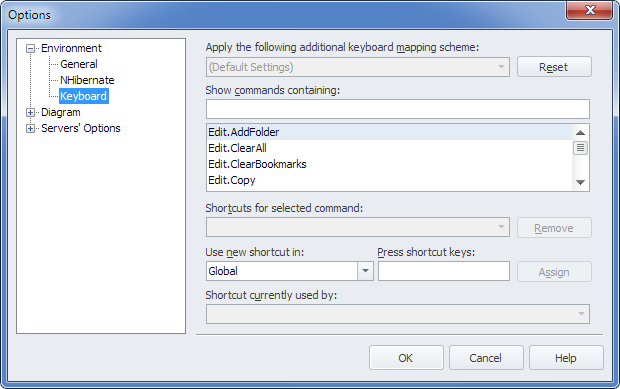
The following page is displayed:

| 3. | (Optional) From the Apply the following additional keyboard mapping scheme drop-down list, select an additional keyboard mapping scheme. |
| 4. | Using the Show commands containing box and/or the list of the commands under the box, select the command, for which you want to set shortcut keys. If there are shortcuts keys defined for the selected command, they are displayed in the Shortcuts for selected command drop-down list. |
| 5. | (Optional) To remove the available shortcut keys for the selected command, click Remove. |
| 6. | To set new shortcut keys for the selected command, from the Use new shortcut in, select the area of the application, where the new shortcut keys are to used, and in the Press shortcut keys box enter the new shortcut keys by pressing them in the right sequence on the keyboard. If the entered combination of shortcut keys is already in use, the corresponding information is displayed in the Shortcut currently used by drop-down list. |
| 7. | To assign the new shortcut keys, click Assign. |
| 8. | (Optional) To reset all the shortcuts to their default values, click Reset. |
|
Send feedback on this topic
© 2008 - 2026 Devart. All rights reserved.
 General Environment Customization
  Keyboard Shortcut Customization
 See also
