How to deploy static data
Deploying static data involves transferring and integrating non-changing data, such as reference tables, configuration settings, or predefined lists, from one environment to another.
Static data can be deployed with the help of dbForge Data Compare for SQL Server. However, the option to choose a version control scripts folder as a source is not available in dbForge Data Compare. Therefore, first, we’ll fetch the latest changes to the static data to a local scripts folder from a source control system. Second, we’ll compare and synchronize this scripts folder as a source and with a database as a target.
Step 1: Create a local repository clone using the command line
1. Create an empty folder on the disk of your computer where the local repository will be stored. For example, D:\git_clone\AdventureWorks2022.
2. Start Windows Command Prompt (CMD).
3. Execute the git clone command to create a cloned copy of the repository.
git clone //sctest/git/AdventureWorks2022 D:\git_clone\AdventureWorks2022
where:
//sctest/git/AdventureWorks2022is a path to the repository.D:\git_clone\AdventureWorks2022is a local copy of the repository.
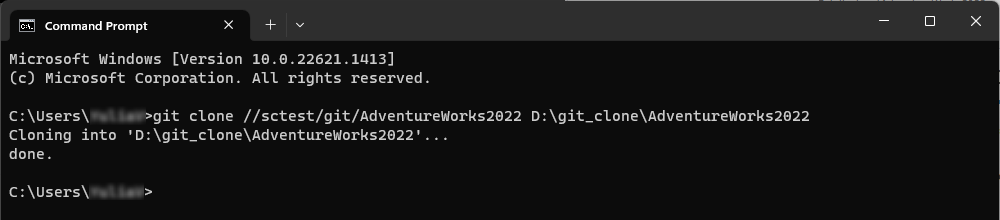
After the cloning process is complete, the folder with a cloned repository contains actual database objects and static data.

Now, we can proceed with comparing the local scripts folder with the database.
Step 2: Compare a local repository with the database
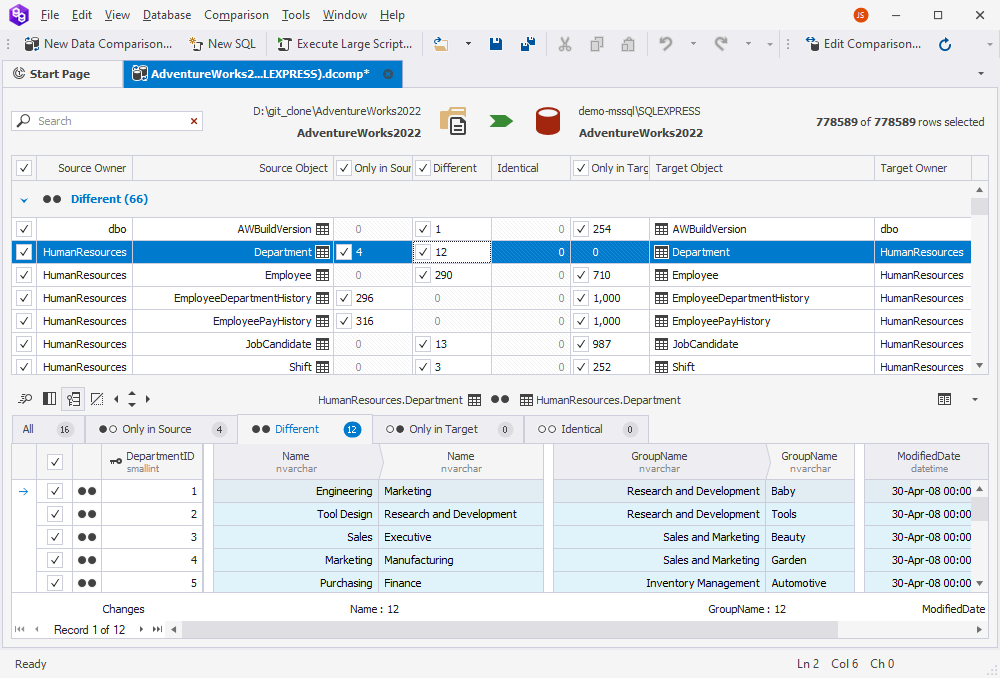
1. Open dbForge Data Compare and click New Data Comparison on the toolbar.
2. On the New Data Comparison wizard > Source and Target page, select the source and target connections and specify objects to compare as follows:
- Under Source:
- Type: Select Scripts Folder as a source type
- Database Scripts Folder: Click
 Browse to choose a scripts folder whose data you want to compare to the target database.
- Under Target:
- Type: Select Database as a target type
- Connection: Select the server connection on which the target database is located
- Database : Select the database to be compared with the scripts folder

3. Optional: On the Options page, customize the default comparison options.
4. Click Compare to run the comparison process.
The comparison document opens where you can view the result of comparing two data sources - a scripts folder and a database. The lower grid displays the differences in the static data you select from the Different group of the upper grid.
Now, we can proceed with updating the data by synchronizing the database.
Step 3: Synchronize data
1. On top of the comparison result document, click Synchronize data to the target database to initiate the synchronization.

2. On the Data Synchronization Wizard > Output page, select the Execute the script directly against the target database output option and click Synchronize.
After synchronization is complete, the data will be deployed to the target database.