Connect with Microsoft Entra Authentication
Microsoft Entra ID is a Microsoft solution with a single or multi-factor authentication that ensures more secure access to the database.
dbForge Data Compare for SQL Server allows connecting to an Azure database with Microsoft Entra ID authentication of the following types:
- Connect to an Azure database with Microsoft Entra MFA
- Connect to an Azure database with Microsoft Entra Password
- Connect to an Azure database with Microsoft Entra Integrated
When connecting with the Microsoft Entra MFA authentication, dbForge Data Compare for SQL Server should be registered as a Microsoft Entra ID application. During the registration, an application ID will be generated which you need to specify to connect to the Azure database with the Microsoft Entra MFA authentication. For more information, see How to register Data Compare as a Microsoft Entra ID application.
Connect to an Azure database with Microsoft Entra MFA
1. On the Database menu, click New connection.
2. In the Database Connection Properties dialog, select Microsoft Entra MFA as an authentication type.
3. Enter the following details:
-
Server: URL of the Azure SQL Server instance.
-
User name: Microsoft Entra ID user with Azure SQL database permissions.
4. Select Use common MFA options and click Change Common Options to enter the Application ID and Redirect URL generated during the registration of dbForge Data Compare for SQL Server.
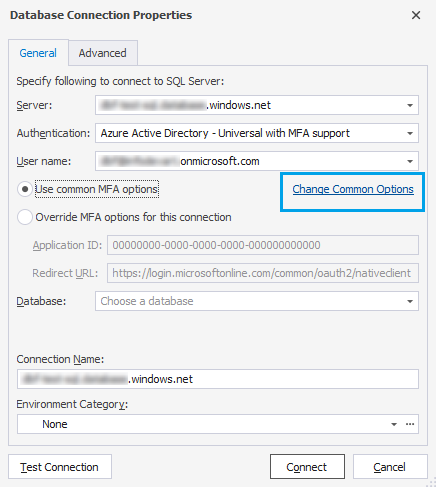
Note
If you want to insert an alternative application ID, select Override MFA options for this connection and enter the application ID and Redirect URL.
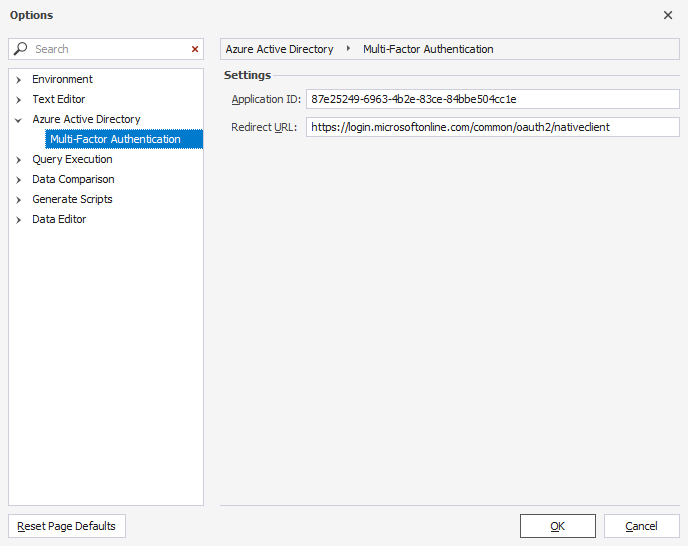
5. In the Options window that opens, enter the application ID and click OK.
6. Click Connect.
7. In the Sign in to your account window that opens, enter the password for the specified Microsoft Entra ID account. After a successful login, a set of databases for the specified Azure SQL instance becomes available.
Note
The Sign in to your account window also opens when you click Test connection or try to choose a database in the Database field.
When the connection is successful, the Database Connection Properties is closed and the connection appears in Connection Manager and on the Connection tab of the New Data Comparison window.
If you first click Test Connection, the information you’ve entered is being validated. After that, in the pop-up window informing about a successful connection, click Connect so that the connection is displayed in Connection Manager and on the Connection tab of the New Data Comparison window.
Note
When you create a new connection for the same SQL Server but on another instance or another standalone dbForge SQL tool, the Application ID and Redirect URL are automatically pulled in from the corresponding values of the Options dialog.
Connect to an Azure database with Microsoft Entra Password
1. On the Database menu, click New connection.
2. In the Database Connection Properties dialog, select Microsoft Entra Password as an authentication type.
3. Enter the following details:
-
Server: URL of the Azure SQL Server instance.
-
Login: Microsoft Entra ID user with Azure SQL database permissions.
-
Password: Password for the specified user.
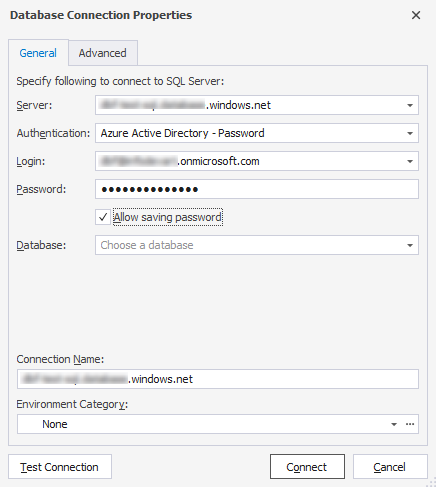
4. Click Connect.
When the connection is successful, the Database Connection Properties is closed and the connection appears in Connection Manager and on the Connection tab of the New Data Comparison window.
If you first click Test Connection, the information you’ve entered is being validated. After that, in the pop-up window informing about a successful connection, click Connect so that the connection is displayed in Connection Manager and on the Connection tab of the New Data Comparison window.
Note
When you create a new connection for the same SQL Server but on another instance or another standalone dbForge SQL tool, the Application ID and Redirect URL are automatically pulled in from the corresponding values of the Options dialog.
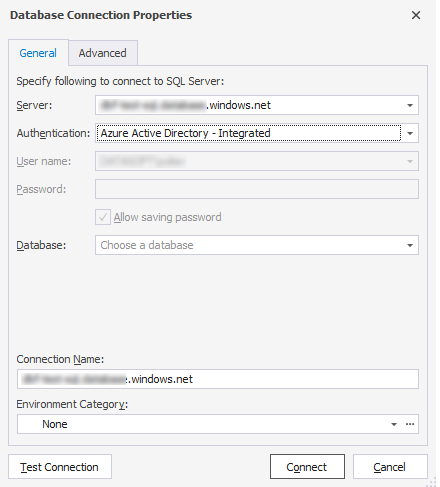
Connect to an Azure database with Microsoft Entra Integrated
1. On the Database menu, click New connection.
2. In the Database Connection Properties dialog, select Microsoft Entra Intergrated as an authentication type.
3. In the Server field, enter a URL of the Azure SQL Server instance and click Connect.
When the connection is successful, the Database Connection Properties is closed and the connection appears in Connection Manager and on the Connection tab of the New Data Comparison window.
If you first click Test Connection, the information you’ve entered is being validated. After that, in the pop-up window informing about a successful connection, click Connect so that the connection is displayed in Connection Manager and on the Connection tab of the New Data Comparison window.