


Synchronizing Data
Last modified: October 23, 2019
Note
Data synchronization can not be rolled back! It may change or delete data in your target database. It is highly recommended to backup target database before synchronizing data.
Synchronizing databases
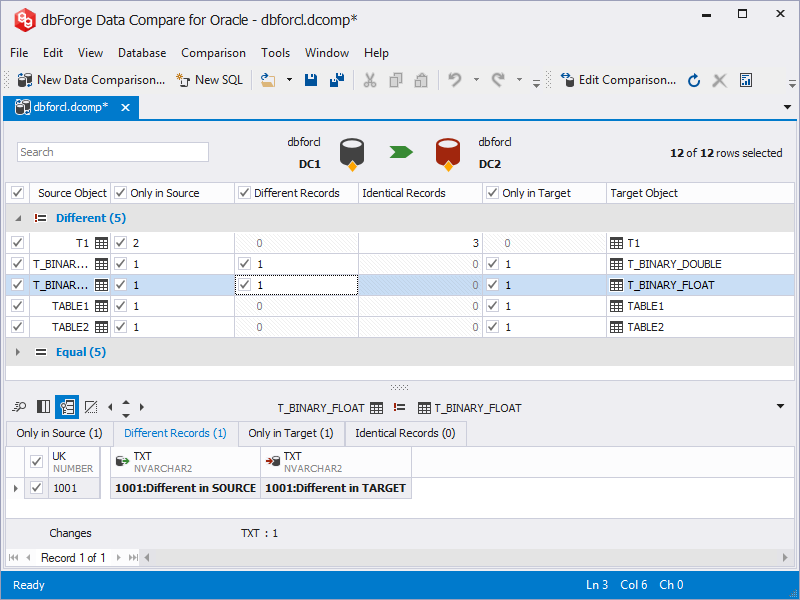
To start synchronizing data of two databases:
-
Select data to synchronize. For this, select check boxes in the column with check boxes for the tables (or views) you want to synchronize. You may also click a separate table and select check boxes in the column with check boxes on the Only in Source, Only in Target, and Different Records tabs for individual records to determine which records to synchronize. Use the check box in the header of the grid to apply settings to all the grid rows.
Note
Incorrectly mapped objects are displayed with
 icon instead of check box in the Data Comparison document. Objects with no data to synchronize (with only identical records or with no records at all) are displayed without check boxes. You cannot select them for synchronization.
 - On the Comparison document, click
 . The Data Synchronization Wizard opens.
 - Select whether to back up target database and backup files location. Then select whether to execute a script as a single transaction. You may click the Synchronize button and skip next steps to open the synchronization script in the editor, but this is not recommended if the script is too large.
- Select action for the synchronization script - open in the editor, save for the future execution, or immediately execute it.
- You may either click the Synchronize button to generate the update script or click the Next button to set synchronization options and view the synchronization action plan and synchronization warnings if any exist, and then click the Synchronize button.
'%3e%3cpath%20id='thumb_up_2'%20d='M15%2017H5.5V7L11.5%201L12.1667%201.45833C12.4028%201.625%2012.5833%201.83681%2012.7083%202.09375C12.8333%202.35069%2012.8681%202.61806%2012.8125%202.89583L12.7917%203L12%207H17.5C17.9167%207%2018.2708%207.14583%2018.5625%207.4375C18.8542%207.72917%2019%208.08333%2019%208.5V9.6875C19%209.79861%2018.9896%209.89931%2018.9688%209.98958C18.9479%2010.0799%2018.9167%2010.1736%2018.875%2010.2708L16.3944%2016.0875C16.2703%2016.3625%2016.0833%2016.5833%2015.8333%2016.75C15.5833%2016.9167%2015.3056%2017%2015%2017ZM7%2015.5H15L17.5%209.6875V8.5H10.1667L11.1875%203.4375L7%207.625V15.5ZM5.5%207V8.5H2.5V15.5H5.5V17H1V7H5.5Z'%20fill='%2327282C'/%3e%3c/g%3e%3c/g%3e%3c/svg%3e) Yes
Yes'%3e%3cpath%20id='thumb_down_2'%20d='M5%203H14.5V13L8.5%2019L7.83333%2018.5417C7.59722%2018.375%207.41667%2018.1632%207.29167%2017.9062C7.16667%2017.6493%207.13194%2017.3819%207.1875%2017.1042L7.20833%2017L8%2013H2.5C2.08333%2013%201.72917%2012.8542%201.4375%2012.5625C1.14583%2012.2708%201%2011.9167%201%2011.5V10.3125C1%2010.2014%201.01042%2010.1007%201.03125%2010.0104C1.05208%209.92014%201.08333%209.82639%201.125%209.72917L3.60417%203.91667C3.71528%203.63889%203.89931%203.41667%204.15625%203.25C4.41319%203.08333%204.69444%203%205%203ZM13%204.5H5L2.5%2010.3125V11.5H9.83333L8.8125%2016.5625L13%2012.375V4.5ZM14.5%2013V11.5H17.5V4.5H14.5V3H19V13H14.5Z'%20fill='%2327282C'/%3e%3c/g%3e%3c/g%3e%3c/svg%3e) No
NoWant to find out more?
'%3e%3cpath%20id='Vector'%20d='M4%204V24H24V4H4ZM22%2022H6V9H22V22ZM19%2019H9V18H19V19ZM19%2016H9V15H19V16ZM19%2013H9V12H19V13ZM21%202H2V21H0V0H21V2Z'%20fill='%230071CE'/%3e%3c/g%3e%3cdefs%3e%3cclipPath%20id='clip0_676_40052'%3e%3crect%20width='24'%20height='24'%20fill='white'/%3e%3c/clipPath%3e%3c/defs%3e%3c/svg%3e)
Overview
Take a quick tour to learn all about the key benefits delivered by Data Compare for Oracle.

All features
Get acquainted with the rich features and capabilities of the tool in less than 5 minutes.

Request a demo
If you consider employing this tool for your business, request a demo to see it in action.

