Comparing Files
Comparison implementation in Code Compare is based on the assumption that the left pane of the document area contains an earlier version and the right pane contains a later version of a file.
In case of a three-way comparison, the latest version of a file is considered to be the result. Besides, during a regular three-way comparison (without the base file), at first the left pane is compared with the middle pane, and then the right pane is compared with the middle pane.
The file comparison window contains two open files (two revisions) in two panes - the source pane and the target pane. The editor allows you to change any of the panes. You don’t need any third party software to compare and merge revisions.
Difference Highlighting
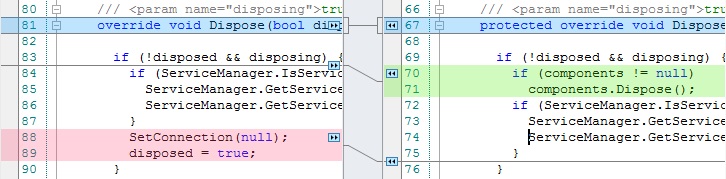
The difference between files is shown with the help of the following colors:
- Missing blocks (by default highlighted in red) - this means that the piece code is not presented in the target pane.

- Inserted blocks (by default highlighted in green) - this means that the piece of code is not presented in the source pane.

- Modified blocks (by default highlighted in blue) - this means that the piece of code was modified the previous time.

Special lines link related blocks, while convenient merge buttons allow you to join versions easily.
Navigation Between Differences
Navigation between differences can be performed by means of the Previous/Next Change buttons either in the Code Comparison toolbar, or in the bottom outer corners of the documents. For more information about navigation between differences, see the Keyboard Shortcuts article.
Unchanged Blocks Display
Unchanged blocks of code can be collapsed and expanded using the Toggle unchanged regions option either in the Code Comparison toolbar or in the Changes menu. This option works if files being compared have outlining, and does not work if the Language option is set to Text.
Comparison Customization
For the sake of convenience, you can customize comparison options to ignore white space, comments, line breaks or case. This can be done using the corresponding Comparison menu items. To set the default values for these options, in the Tools menu select Options, in the tree area of the Options dialog box expand the Code Compare node and go to the File page.
To make every line fit in the viewable window and thus allow text to be read from top to bottom without horizontal scrolling, use the Word Wrap option that can be accessed either from the View menu or from the Text toolbar.