Work with tabs and documents
The topic describes how to work with tabs and documents in dbForge Studio.
Manage documents
With the Windows dialog, you can:
- Switch between documents.
- Save documents.
- Activate the selected document.
- Close documents.
Open the Windows dialog
To open the Windows dialog, select Window > Windows.

Save a document
To save a document, select it and click Save.
Close documents
To close a specific document, select it and click Close Window(s).
To close multiple documents, hold down the Ctrl key and click the documents you want to close, then click Close Window(s).
To close all documents, press Ctrl+A to select all documents, then click Close Window(s).
To close an open document, click the document title with the middle mouse button (mouse wheel button).
Activate a document
To activate a document, select it and click Activate.
Cycle through document views
To cycle through document views, press the F7 key.
You can change the shortcut for cycling through available document views. To do this:
1. In the top menu, select Tools > Options.
2. In the Options dialog, go to Environment > Keyboard.
3. In the Show commands containing field, enter Window.NextDocView.
4. Click the Press shortcut keys field and press the required keys on your keyboard.
5. Click Assign.
6. Click OK to save the changes.
Work with document tab groups
You can arrange multiple documents in horizontal or vertical tab groups to work with them side by side. To create a new tab group, either drag a document tab to the required location or select New Horizontal Tab Group or New Vertical Tab Group from the document tab shortcut menu.
You can move documents between tab groups by dragging them or by selecting a required option from the shortcut menu.
Restore tabs
If you accidentally close the application or it stops responding and closes, document tabs will be saved to cache and restored when you open dbForge Studio again.
To configure restore settings:
1. In the top menu, select Tools > Options.
2. Go to Environment > Documents > Restore.
3. Adjust the settings:
- General – The time interval where the restored information is saved automatically.
- Restorable File Types – The types of files to be saved and restored.
4. Click OK to save the changes.
Document header shortcut menu
The table provides document header shortcut menu options.
| Name | Description |
|---|---|
| Save | Saves the current SQL document. |
| Close | Closes the current document. |
| Close All But This | Closes all documents except the selected one. |
| Copy Full Path | Copies the full path to the document. |
| Open Containing Folder | Opens the folder containing the document. |
| Float | Detaches the window. |
| New Horizontal Tab Group | Creates a horizontal tab group. |
| New Vertical Tab Group | Creates a vertical tab group. |
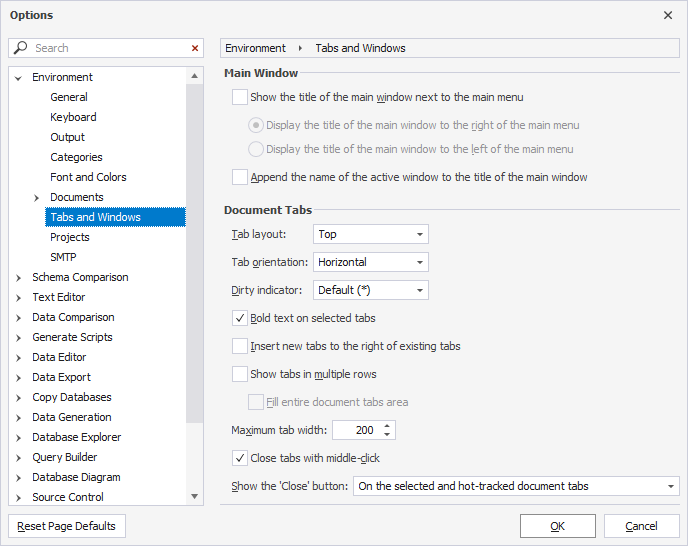
Adjust the layout and appearance of windows and document tabs
In the Options dialog, you can configure how main windows and document tabs are arranged and displayed.
To adjust window and tab display:
1. In the top menu, select Tools > Options.
2. Go to Environment > Tabs and Windows.
3. Configure the settings.
4. Click OK to save the changes.
Show the title of the main window next to the main menu
Select the checkbox to add a window title to the main menu. The available options are:
- Display the title of the main window to the right of the main menu (default) – Adds the title to the right of the main menu.
- Display the title of the main window to the left of the main menu – Adds the title to the left of the main menu.
Note
The Show the title of the main window next to the main menu option is available only for Windows. When the option is disabled, the window title is available in the Task Manager.
In CrossOver or Wine, the option is hidden and disabled. The main window title is always visible, and the main menu appears below the title bar.
Append the name of the active window to the title of the main window
Select the checkbox to add the active window name to the main window title. The option is disabled by default.
Tab layout
Defines where the tabs are displayed relative to the main content area. The available values are Top (default), Bottom, Left, and Right.
Tab orientation
Determines whether the tabs are displayed horizontally (default) or vertically.
Dirty indicator
Defines a symbol indicating unsaved changes. The available options are default (*), dot (.). You can also enter a custom symbol in the Dirty indicator field.
Insert new tabs
Reorders tabs within a group and defines where a new document tab is positioned.
The table provides the available options for Insert new tabs.
| Name | Description |
|---|---|
| First in the active group | Opens a new tab at the far left in a horizontal orientation or at the top of the tab group in a vertical orientation. |
| Before the active tab | Opens a new tab to the left in a horizontal orientation or above the current tab in a vertical orientation. |
| After the active tab | Opens a new tab to the right in a horizontal orientation or below the current tab in a vertical orientation. |
| Last in the active group | Opens a new tab at the far right in a horizontal orientation or at the bottom of the tab group in a vertical orientation. |
Bold text on selected tabs
Displays the active tab title in bold.
When the option is disabled, tab fonts are defined by the skin style.
Show tabs in multiple rows
Displays the tabs of open windows in multiple rows when they do not fit into a single row. By default, the option is disabled.
Fill entire document tabs area
Expands the tabs in the last row equally to fill the entire tab area.
By default, the option is disabled.
Note
The Fill entire document tabs area option is available only when Show tabs in multiple rows is enabled.
Maximum tab width
Defines the maximum tab width. The default value is 200.
Close tabs with middle-click
Closes the tabs using the mouse wheel or middle button. By default, the option is enabled.
Show the ‘Close’ button
Configures the visibility and placement of the close (x) button. You can specify where and when the button should appear.
The table provides the available options for Show the ‘Close’ button.
| Name | Description |
|---|---|
| On the selected and hot-tracked documents tab (default) | Displays the close (x) button only on the currently active tab and the tab the user is hovering over. |
| On all document tabs and in the document well | Displays the close (x) button on every document tab, as well as inside the document well. |
| On the selected document tab and in the document well | Displays the close (x) button on the active tab only and within the document well. |
| On all document tabs | Shows the close (x) button on every tab, regardless of selection or hover state. |
| On the selected document tab only | Restricts the close button to the currently active tab. |
| In the document well only | Hides the close (x) button from individual tabs and displays it only in the document well. |
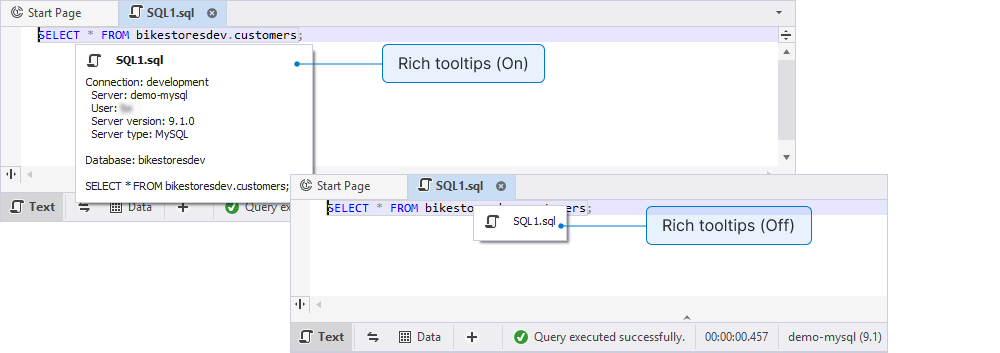
View information on a document header tab
You can configure whether the document header tab should show only the file name or all content associated with the document.
To view a tooltip, hover over the document header tab.
Turn the full tooltip display off
By default, the full tooltip display is enabled. To turn it off:
1. In the top menu, select Tools > Options.
2. Navigate to Environment > Tabs and Windows.
3. Select Display rich tooltips for documents.
4. Click OK to save the changes.
Note
When a file is inactive or restored, the tooltip shows the standard information and the following message:
This information is from an earlier session. To ensure it's up-to-date, please activate the document.After you activate the file, the message no longer appears.
Tooltip details
The details in the tooltip vary by document type.
| Document type | Tooltip information |
|---|---|
| Object editor |
|
| SQL Document Database Diagram Master-Detail Database Report |
|
| Text documents Project documents (.ddoc, .dgen, .dcomp, .scomp, .ssp, and .tlp) |
|
Note
The tooltip for a non-empty SQL document also shows the first 200 characters.