Scheduling Database Backup
You can schedule an automated database backup that will recur periodically. To do this, you first need to configure and save the backup settings as a project or script. After that, you can create a Windows task in Task Scheduler that will run at a specified time or after a specific event.
Save the Backup Settings
You can use a backup project (.backup file) or a script (.bat file) to schedule automated backups. A project allows you to configure the content of the backup and additional options. A script creates a backup of all objects in the database with default options, but you can specify a project to use to meet your preferences.
Create a Backup Project
1. On the Database menu, select Tasks > Backup Database.
The Database Backup Wizard opens.
2. Optional: Click Open to load a previously saved project.
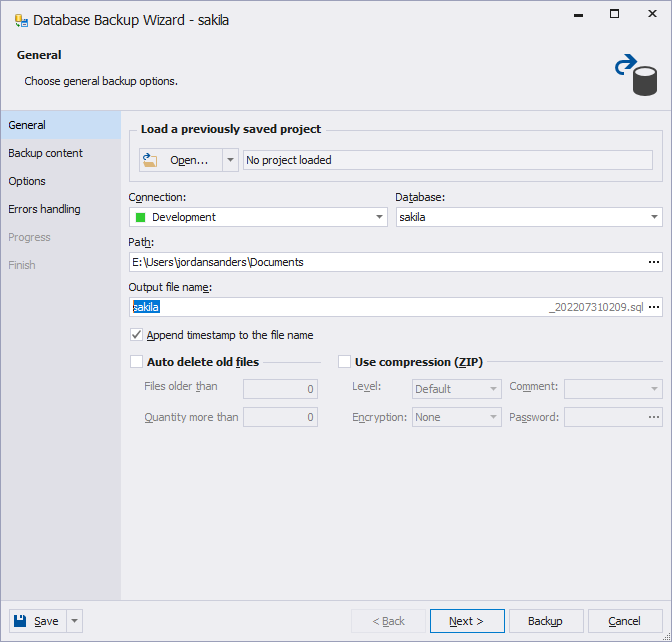
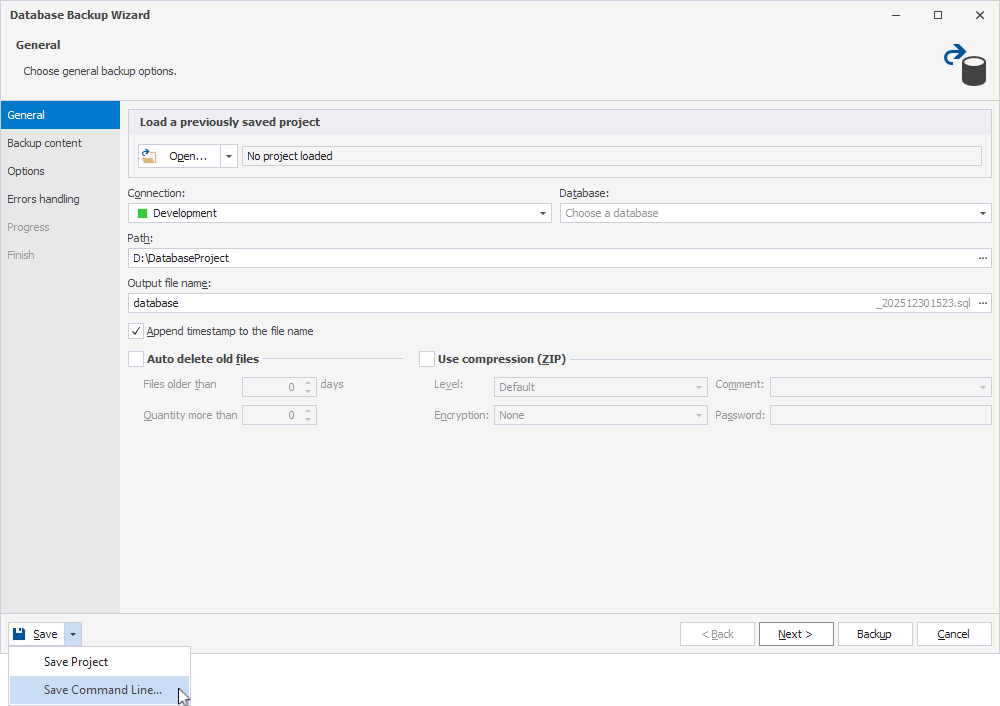
3. On the General page, fill out the fields:
- Connection – Select the server.
- Database – Select the database.
- Path – Specify the folder to save the database backup. To browse for a location, click the ellipsis (…).
- Output file name – Enter a name for the database backup.
4. Optional: Configure additional options:
- Append timestamp to the file name – Adds date and time to the file name. By default, this option is selected.
-
Auto delete old files – Automatically removes old backups based on the specified parameters. By default, this option isn’t selected.
- Files older than – Deletes files that are older than the specified number of days. For example, if you set 7 days, any file older than 7 days will be removed.
- Quantity more than – Deletes files when the total number of files exceeds the specified limit, starting with the oldest ones. For example, if you set 10, and there are already 10 files, the oldest file will be deleted when a new one is created.
-
Use compression (ZIP) – Compresses the backup file based on the specified parameters. By default, this option isn’t selected.
- Level – Sets the level of compression.
- Comment – Adds the comment you enter in this field to the archive.
- Encryption – Specifies the type of encryption.
- Password – Sets a password for opening or extracting the encrypted file.
5. Click Next.
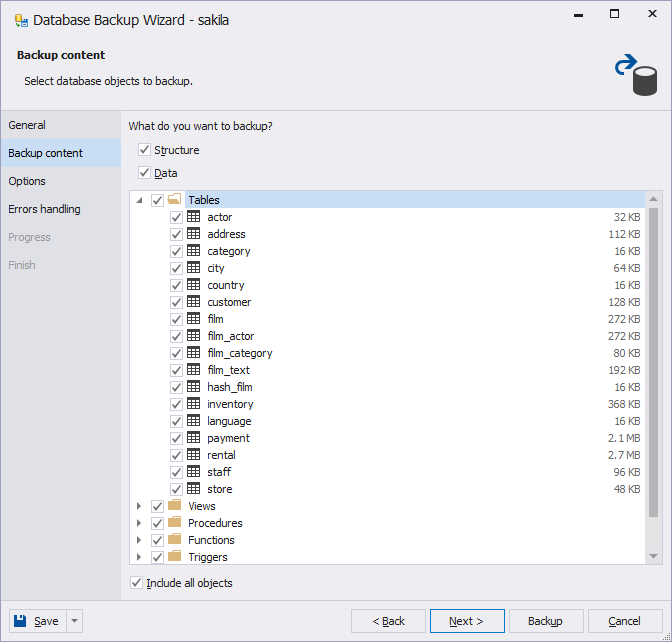
6. On the Backup content page, choose what you want to include in the backup:
- Structure – Includes the database schema and object definitions.
- Data – Includes the table data.
By default, both options are selected.
7. Select specific database objects to include in the backup. By default, all objects are selected.
Tip
To cancel the selection for all objects, clear the Include all objects checkbox. To select all objects, select the Include all objects checkbox.
8. Click Next.
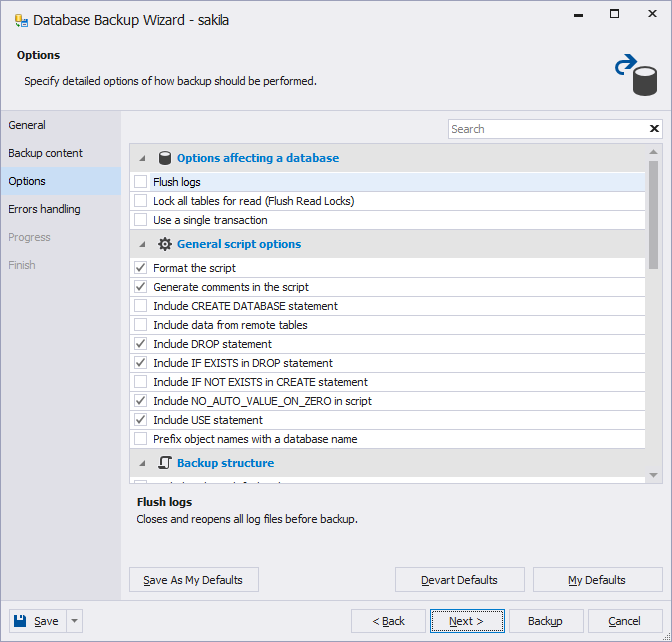
9. On the Options page, configure the backup process according to your preferences, then click Next. For the list of options and their descriptions, see Backup Options.
Tip
To save your configuration to be used by default, click Save As My Defaults. Alternatively, you can set up your custom configuration in Tools > Options > Generate Scripts > General > Database Backup Wizard.
To restore the out-of-the-box configuration, click Devart Defaults.
To apply your custom configuration, click My Defaults.
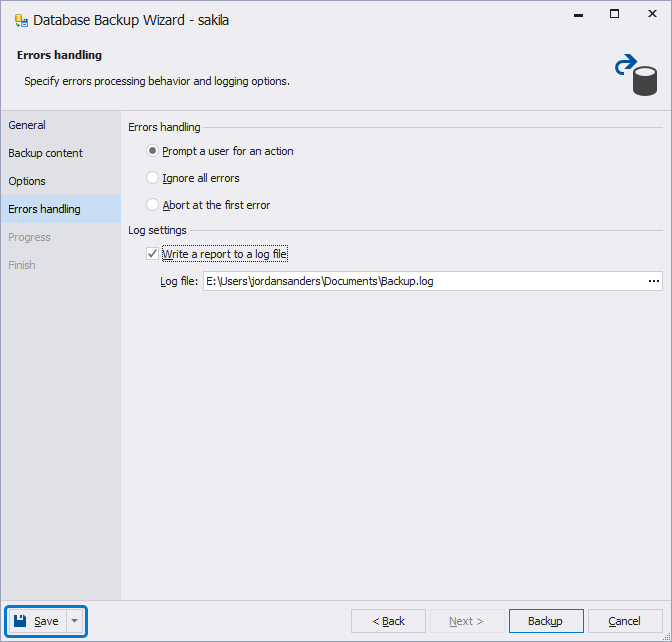
10. On the Errors handling page, define how the backup process should respond to errors:
- Abort at the first error – Stops the process immediately when the first error occurs. This option is selected by default.
- Prompt a user for an action – Pauses the process and prompts the user to choose how to proceed when an error occurs.
- Ignore all errors – Continues the process, skipping any errors without interruption.
11. Optional: To have a log file generated, select Write a report to a log file and enter the full path of the file in Log file. By default, this option isn’t selected.
12. Click the arrow next to Save, then select Save Project.
Now you can create a Windows task that will use this project.
Backup Options
On the Options page of the Database Backup Wizard, you can configure backup creation using the following options.
Common
| Option | Description | Default state |
|---|---|---|
| Flush logs | Closes and reopens all log files before backup. | Not selected |
| Format the script | Formats the query script. | Selected |
| Generate comments in the script | Inserts comments into the script. | Selected |
| Include CREATE DATABASE statement | Includes the CREATE DATABASE statement at the beginning of the script. |
Not selected |
| Include DEFINER clause | Adds the DEFINER clause to the script. |
Selected |
| Include DROP statement | Adds DROP statements to the script. |
Selected |
| Include IF EXISTS in DROP statement | Includes IF EXISTS in DROP statements in the script. Depends on the Include DROP statement option. |
Selected |
| Include IF NOT EXISTS in CREATE statement | Includes IF NOT EXISTS in CREATE TABLE, CREATE DATABASE, and CREATE USER statements in the script. |
Not selected |
| Include NO_AUTO_VALUE_ON_ZERO in script | Includes statements to set SQL_MODE to NO_AUTO_VALUE_ON_ZERO and restore it at the end of the script. |
Selected |
| Include security permissions | Adds security permissions to the script. | Not selected |
| Include SQL SECURITY clause | Adds the SQL SECURITY clause to the script. |
Selected |
| Include the display width of integer data types in statements | Scripts the integer datatypes display width. Doesn’t affect int(1), bigint(1), etc. |
Selected |
| Include USE statement | Includes the USE statement at the beginning of the script. Depends on the Include CREATE DATABASE option. |
Selected |
| Lock all tables for read (Flush Read Locks) | Locks all tables with FLUSH READ LOCKS. This option enables you to create a consistent snapshot of your MyISAM tables. |
Not selected |
| Prefix object names with a database name | Adds the database name to object names as a prefix. If you select this option, you won’t be able to import this script to another database. | Not selected |
| Quote Identifiers | Encloses all identifiers in the script in quotes. | Not selected |
| Reset timestamp to CURRENT_TIMESTAMP for events | Resets the event start time to CURRENT_TIMESTAMP in the script. Doesn’t include the end time. |
Not selected |
| Use a single transaction | Executes the backup in a single transaction. This option enables you to create a consistent snapshot of your InnoDB tables. | Not selected |
Tables and views
| Option | Description | Default state |
|---|---|---|
| Exclude column default values | Excludes column default values from the script. | Not selected |
| Include application-time periods | Adds application-time periods to the script. | Selected |
| Include auto increment table option | Includes the auto increment table option. | Selected |
| Include average row length | Includes the average row length table option. | Selected |
| Include check constraints | Adds CHECK constraints to the script. |
Selected |
| Include constraints | Includes PRIMARY KEY and FOREIGN KEY constraints in the script. |
Selected |
| Include ENGINE | Adds the ENGINE clause to the script. |
Selected |
| Include indexes | Adds indexes for tables to the script. | Selected |
| Include object comments | Adds comments of objects to the script. | Selected |
| Include partition clause | Adds the PARTITION clause to the script. |
Selected |
| Include partition ENGINE | Adds the partition engine to the script. Depends on the Include partition clause option. | Not selected |
| Include ROW_FORMAT | Includes the ROW_FORMAT table option. |
Selected |
| Include SYSTEM VERSIONING | Adds system-time period versioning—WITH SYSTEM VERSIONING or WITHOUT SYSTEM VERSIONING—to the CREATE TABLE statements. |
Selected |
| List individual hash partitions | Lists individual hash partitions in the script. Depends on the Include partition clause option. | Selected |
| Use CREATE OR REPLACE | Uses the CREATE OR REPLACE statement instead of the CREATE statement for object script generation. |
Not selected |
Data
| Option | Description | Default state |
|---|---|---|
| Disable constraints | Adds an ALTER TABLE ... DISABLE statement before an INSERT statement. |
Not selected |
| Disable foreign keys | Sets the value of the FOREIGN_KEY_CHECKS session variable to 0. |
Selected |
| Include column names into INSERT statements | Adds column names to INSERT statements in the script. |
Selected |
| Include data from remote tables | Includes data from tables with engines (CONNECT, SPIDER, FEDERATED, JDBC, CSV, etc.). |
Not selected |
| Include virtual columns data into INSERT statements | Includes virtual columns data into INSERT statements in the script. |
Not selected |
| Insert COMMIT after every 100 statements | Inserts a COMMIT statement after each defined number of INSERT statements. |
Not selected |
| Lock tables | Locks a table for write before inserting data and unlocks it when the data is inserted. Depends on the Insert COMMIT option. | Not selected |
| Use bulk insert | Uses INSERT statements that insert more than one table row per statement. |
Selected |
| Use HEX for binary | Exports BINARY data in a hexadecimal form instead of text string. |
Selected |
Users and roles
| Option | Description | Default state |
|---|---|---|
| Include an encrypted password | Adds an encrypted password to the script. The password must be available in the server metadata. | Selected |
| Include roles | Adds the creation of roles and assignment of global privileges to the script. | Not selected |
| Include users | Adds the creation of users, granting user roles, and the assignment of global privileges to the script. | Not selected |
Create a .bat File via the Command Line Wizard
1. On the Database menu, select Tasks > Backup Database.
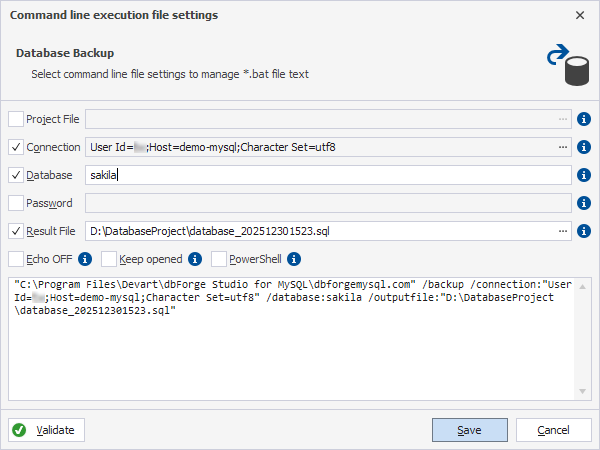
2. In the Database Backup Wizard, click the arrow next to Save, then select Save Command Line.
3. In the Command line execution file settings dialog, configure the settings to manage the .bat file content:
- Project File – Specifies the backup project (.backup file) to use. Some options defined in the backup project can be overridden by switches. To select a project, click the ellipsis (…).
- Connection – Specifies the connection string. To select another connection or edit the connection properties, click the ellipsis (…).
- Database – Specifies the database to back up, overriding the database specified in the backup project or in the connection string.
- Password – Specifies the server password, overriding the password specified in the connection string.
- Result File – Specifies the name of the file for storing the backup, overriding the file name specified in the backup project. To browse for a location, click the ellipsis (…).
- Echo OFF – Disables the display of commands from the .bat file: the .bat file content is enclosed in the
@Echo OFF ... @Echo ONcommand. By default, this option isn’t selected. - Keep opened – Leaves the command window open: a
pausecommand is added at the end of the .bat file content. By default, this option isn’t selected. - PowerShell – Makes the .bat file compatible with PowerShell: the
&symbol is added at the beginning of the .bat file content. By default, this option isn’t selected.
Tip
You can add command-line arguments manually.
4. Optional: To verify that the command-line settings are valid, click Validate.
5. To save the script as a .bat file, click Save.
Now you can create a Windows task to use the created .bat file.
Create a Backup Task Using Task Scheduler
After you create the backup project or script, you can create a backup task using Task Scheduler so that the computer can carry out the task automatically.
To create a Windows task:
1. Open Task Scheduler.
2. On the Action menu, select Create Basic Task.
3. In Name, enter a name for the task, then click Next.
4. On the Trigger page, select when you want the task to start, then click Next, and complete an additional step depending on your selection:
- Daily – Specify the start time and recurrence frequency, then click Next.
- Weekly – Specify the start time, days of the week, and recurrence frequency, then click Next.
- Monthly – Specify the start time, days, and months, then click Next.
- One time – Specify the start time, then click Next.
- When the computer starts – No additional step.
- When I log on – No additional step.
- When a specific event is logged – Specify the log, source, and event ID, then click Next.
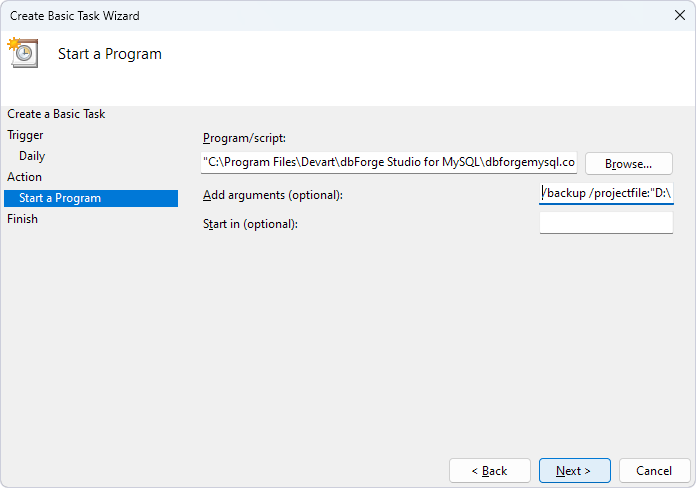
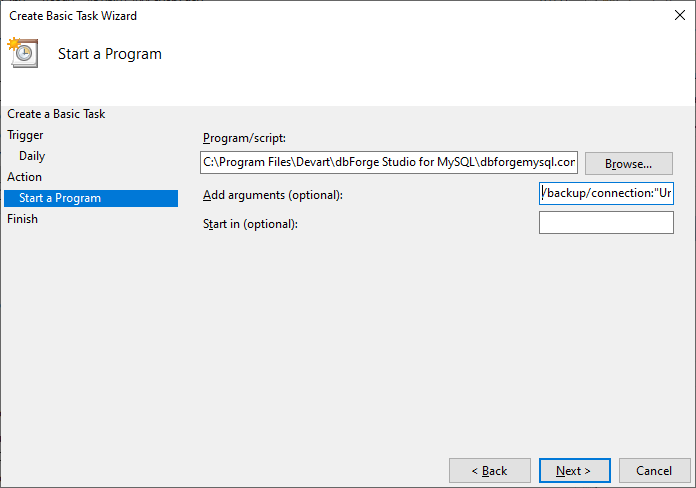
5. On the Action page, select Start a Program, then click Next.
6. Under Program/script, specify a file depending on whether you want to use a backup project or script:
-
Use a backup project
Enter the full path of the
dbforgemysql.comfile. Depending on the way you’ve installed the Studio, the default path is:- Standalone tool:
"C:\Program Files\Devart\dbForge Studio for MySQL\dbforgemysql.com". - Part of the dbForge Edge bundle:
"C:\Program Files\Devart\dbForge Edge\dbForge Studio for MySQL\dbforgemysql.com".
Then, in Add arguments, specify the command-line arguments. For example:
/backup /projectfile:"D:\Project\sakila.backup" - Standalone tool:
-
Use a script
Enter the full path of the .bat file.
7. Click Next.
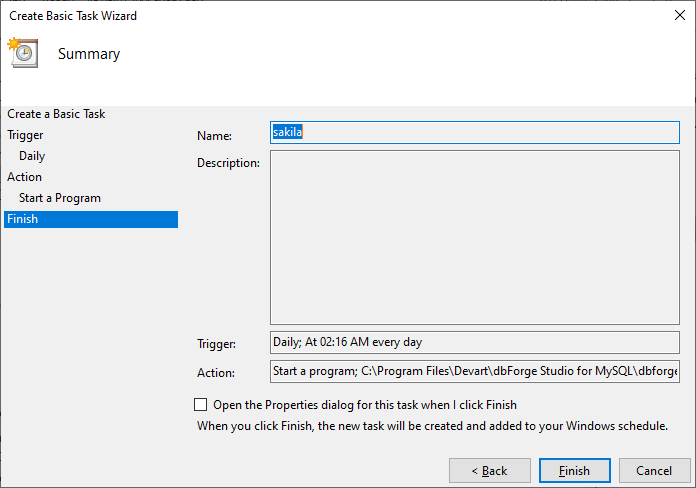
8. Review all settings. If everything is correct, click Finish. To make changes, click Back to adjust the configuration.
The task appears in Task Scheduler Library.