Execute SQL statements
Schema Compare for SQL Server enables you to execute SQL scripts in various ways, including running entire scripts, selected blocks of text, or individual statements.
Entire script
To execute an entire script, click Execute on the toolbar or press F5. Alternatively, navigate to the SQL menu and select Execute.
Selected block of text
To execute an arbitrary text block:
1. Select the text block using a mouse or a keyboard.
2. On the toolbar, click  Execute to execute the selected block of code.
Alternatively, select Execute Selection from the shortcut menu of the SQL Editor.
Current statement
To execute the current statement, click  Execute Current Statement on the toolbar or press F8. Alternatively, right-click the required statement and select Execute Current Statement.
Execute to Cursor
To execute a script to the current position of the cursor:
1. Move the cursor to the required position.
2. Right-click the code and select Execute To Cursor or press Ctrl+Shift+F10.
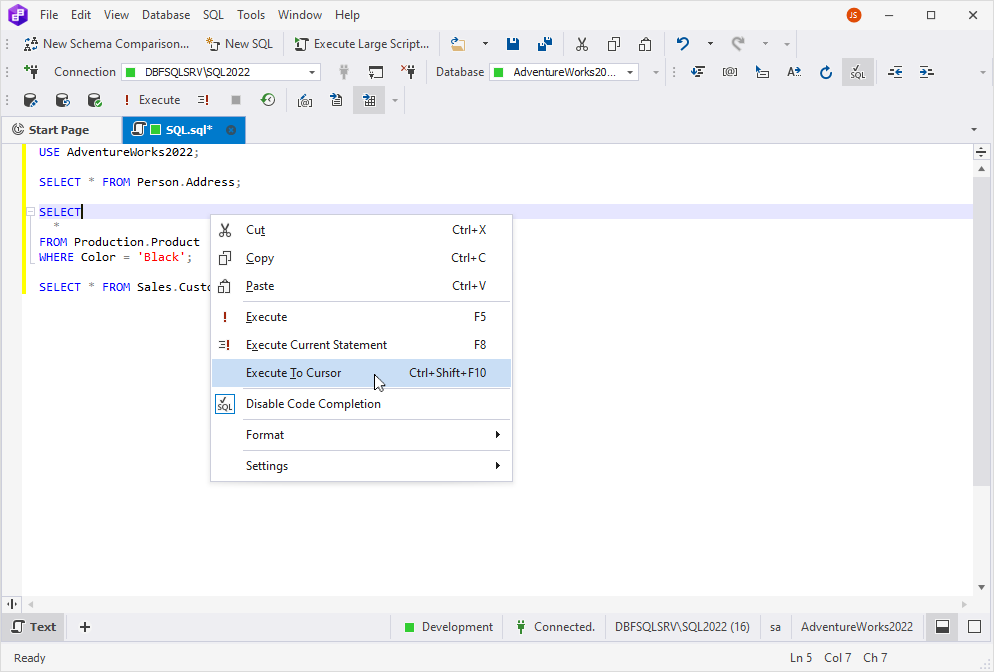
If the statement is complex and contains multiple queries or T-SQL commands, the Execute To Cursor option will execute all statements above the cursor, including the statement where the cursor is placed. All statements that are below the cursor will not be executed.
Note
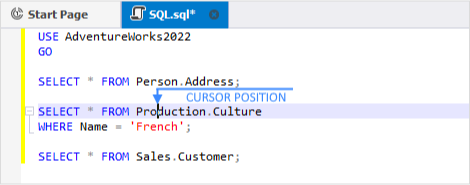
To better understand the Execute To Cursor option, study the following examples:
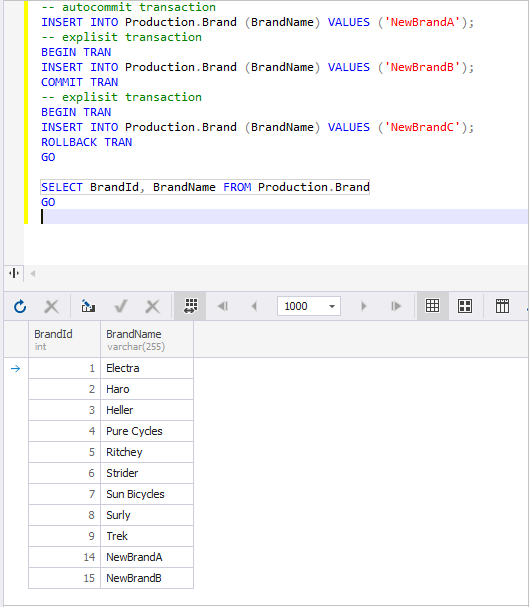
Example 1.
In this worked example, the SELECT Address and SELECT Culture queries will be executed. Please note, that the WHERE clause of the SELECT Culture query will also be executed. The SELECT Customer query won’t be executed.
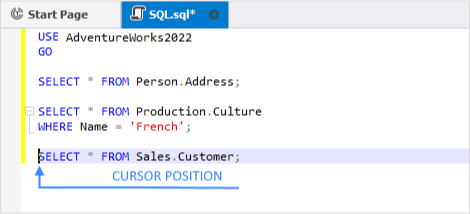
Example 2.
In this case, the SELECT Address, SELECT Culture, and SELECT Customer queries will be executed.
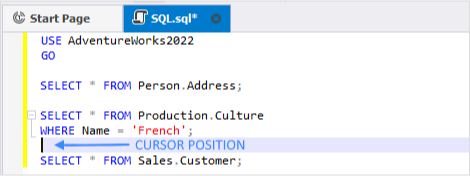
Example 3.
In this case, the SELECT Address and SELECT Culture queries will be executed whereas the SELECT Customer query won’t be executed.
Stop execution
To stop SQL execution, click Stop Execution on the toolbar or press Alt+Pause.
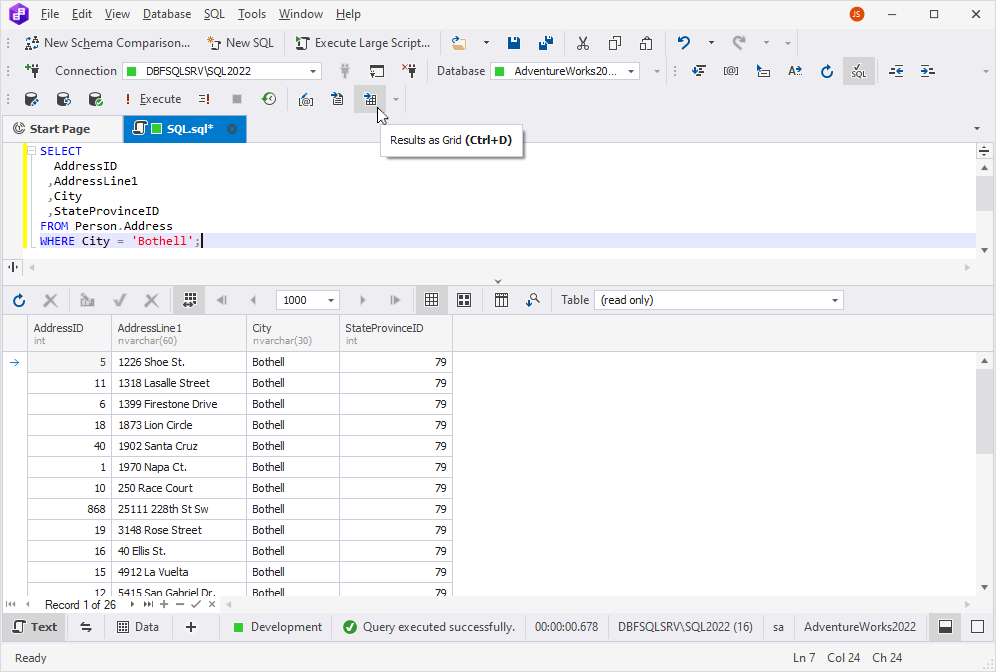
Query execution results
The query execution results can be represented in two ways - in text and grid formats.
To represent results as a text, click Results as Text on the toolbar before query execution.

To represent results as a grid, click Results as Grid on the toolbar before query execution.
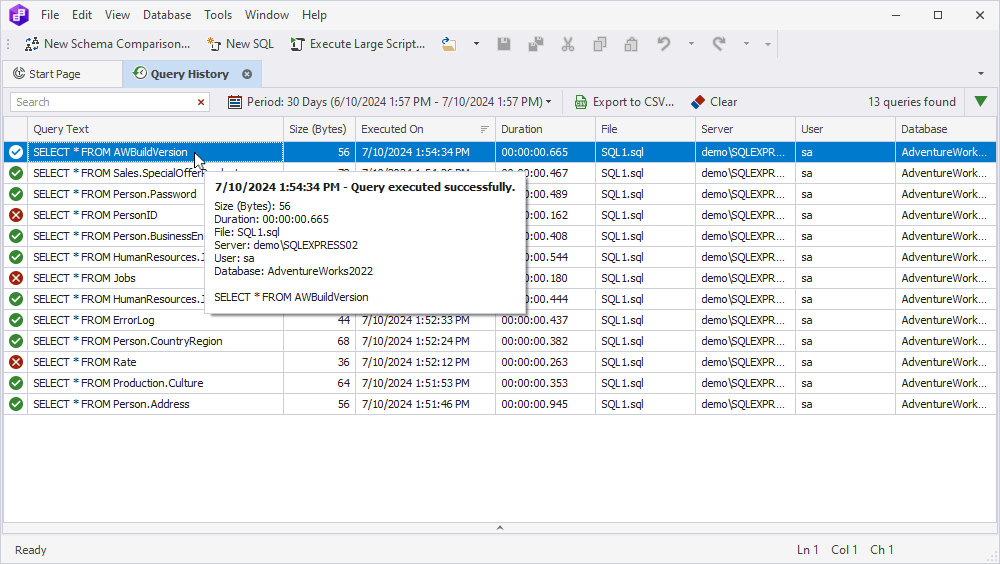
Query History
Query History stores the main information about executed SQL statements within a specific timeframe. Additionally, it is possible to identify the user who executed the query along with the time of execution, and to provide other valuable information.
You can open the Query History feature in the following ways:
- On the toolbar, click
 Query History or press Ctrl+Alt+H
 - On the View menu, select Other Windows > Query History.
If you point to the Query Text column, you’ll see the text of the executed script.
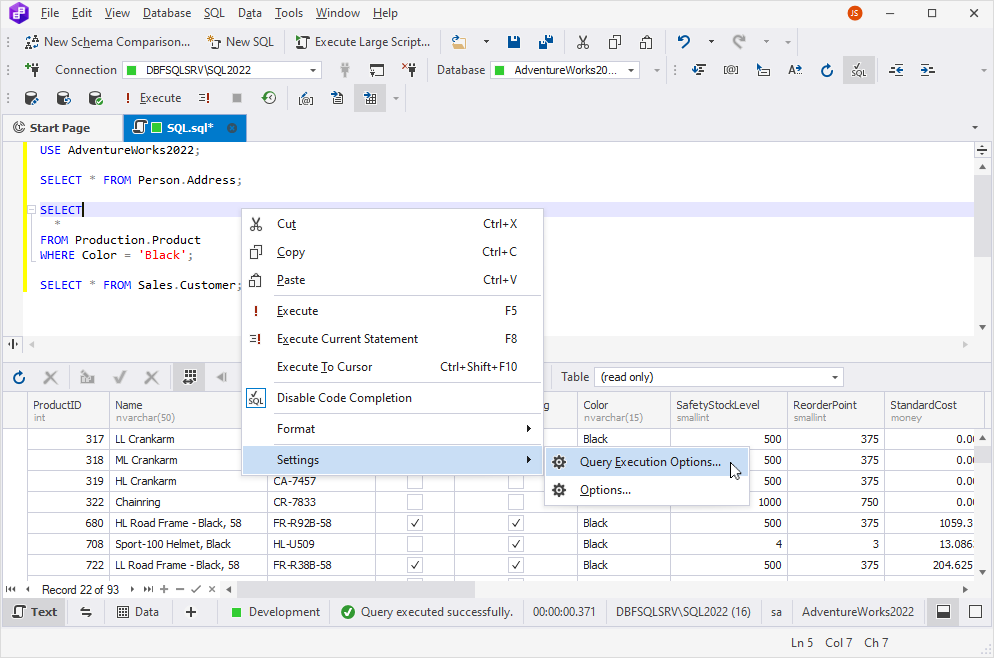
Query execution options
To customize the default behavior, right-click a SQL query and select Settings > Query Execution Options.
The Options window contains the following options and option groups:
| Option Group | Option Name | Description |
|---|---|---|
| General | ROWCOUNT | Causes SQL Server to stop processing the query after the specified number of rows are returned. |
| General | TEXTSIZE | Specifies the size of varchar(max), nvarchar(max), varbinary(max), text, ntext, and image data returned by a SELECT statement. |
| Advanced | ARITHABORT | Terminates a query when an overflow or divide-by-zero error occurs during query execution. |
| Advanced | CONCAT_NULL_YIELDS_NULL | Controls whether concatenation results are treated as null or empty string values. |
| Advanced | DEADLOCK_PRIORITY | Specifies the relative importance that the current session continues processing if it is deadlocked with another session. |
| Advanced | FMTONLY | Returns only metadata to the client. Can be used to test the format of the response without actually running the query. |
| Advanced | LOCK_TIMEOUT | Specifies the number of milliseconds a statement waits for a lock to be released. A value of -1 (default) indicates no time-out period (that is, wait forever). When a wait for a lock exceeds the time-out value, an error is returned. A value of 0 means to not wait at all and return a message as soon as a lock is encountered. |
| Advanced | NOCOUNT | Stops the message that shows the count of the number of rows affected by a Transact-SQL statement or stored procedure from being returned as part of the result set. |
| Advanced | NOEXEC | Complies with each query but does not execute it. |
| Advanced | PARSEONLY | Examines the syntax of each Transact-SQL statement. |
| Advanced | QUERY_GOVERNOR_COST_LIMIT | Overrides the currently configured query governor cost limit value for the current connection. Specifying 0 (the default) for this option turns off the query governor, and all queries are allowed to run indefinitely. The query governor disallows execution of any query that has an estimated cost exceeding that value. |
| Advanced | SHOWPLAN_TEXT | Causes Microsoft SQL Server not to execute Transact-SQL statements. Instead, SQL Server returns detailed information about how the statements are executed. |
| Advanced | STATISTICS IO | Causes SQL Server to display information regarding the amount of disk activity generated by Transact-SQL statements. |
| Advanced | STATISTICS TIME | Displays the number of milliseconds required to parse, compile, and execute each statement. |
| Advanced | TRANSACTION ISOLATION LEVEL | Controls the locking and row versioning behavior of Transact-SQL statements issued by a connection to SQL Server. |
| ANSI | ANSI_NULL_DFLT_ON | Modifies the behavior of the session to override default nullability of new columns when the ANSI null default option for the database is false. |
| ANSI | ANSI_NULLS | Specifies ISO compliant behavior of the Equals (=) and Not Equal To (<>) comparison operators when they are used with null values in SQL Server. |
| ANSI | ANSI_PADDING | Controls the way the column stores values shorter than the defined size of the column, and the way the column stores values that have trailing blanks in char, varchar, binary, and varbinary data. |
| ANSI | ANSI_WARNINGS | Specifies ISO standard for several error conditions. |
| ANSI | CURSOR_CLOSE_ON_COMMIT | Controls the behavior of the Transact-SQL COMMIT TRANSACTION statement The default value for this setting is off. This means that the server will not close cursors when you commit a transaction. |
| ANSI | IMPLICIT_TRANSACTION | Sets implicit transaction mode for the connection. |
| ANSI | QUOTED_IDENTIFIER | Causes SQL Server to follow the ISO rules regarding quotation mark delimiting identifiers and literal strings. Identifiers delimited by double quotation marks can be either Transact-SQL reserved keywords or can contain characters not generally allowed by the Transact-SQL syntax rules for identifiers. |
These settings will be applied only to the current SQL document. All the other documents will comply with the general application settings Tools > Options > Query Execution > General.
Note
Unless the query execution settings are explicitly declared in the script, the default values will be set to the ones from the Options window. For example, if SET NOEXEC OFF is explicitly declared at the beginning of the script, NOEXEC will be turned off regardless of its state specified in the options.
Transactions
A transaction is a single logical unit of work that accomplishes a particular database operation. Each transaction begins with a specific task and ends when all the tasks are successful. In this case, all the changes are committed to the database. If the transaction fails, is canceled or rolled back, the database changes are discarded.
In SQL Server, there are several types of transactions:
- AutoCommit: A default transaction in SQL Server. Each statement is considered to be a transaction and is either committed (if it is successful) or rolled back (if it fails).
- Explicit: A transaction starts with the BEGIN TRANSACTION command and ends with the COMMIT or ROLLBACK commands.
- Implicit: SQL Server launches an implicit transaction for each statement after the previous transaction is complete. The implicit transaction is running until you explicitly add the ending statement, either COMMIT or ROLLBACK.
The dbForge tool allows managing transactions through the statements in a SQL document and with the help of menu commands.
Manage transactions through SQL statements
You can manage transactions with the help of two SQL statements BEGIN TRANSACTION and COMMIT/ROLLBACK TRANSACTION. If neither BEGIN TRANSACTION nor COMMIT/ROLLBACK TRANSACTION are specified, statements are executed in the autocommit mode.
To use explicit transactions, first, you need to open a transaction with the BEGIN TRANSACTION statement and then declare the required DMLs. If you execute the above-mentioned statements without COMMIT/ROLLBACK TRANSACTION, the transaction will be open. In this case, no matter what other statements you run, data cannot be added, modified, or deleted in the table.
To use DML statements in the open transaction, you need to run the COMMIT TRANSACTION statement. If, for some reason, you need to cancel the executed statements in the open transaction, you should run the ROLLBACK TRANSACTION statement.
As you can see, the first two INSERT statements were applied. Though the latter INSERT statement was executed but was not applied to the table.
Manage transactions with the help of menu commands
In the dbForge tool, you can execute the following operations on the transactions:
- Begin Transaction: Defines the starting point of the explicit transaction.
- Rollback: Reverts the database changes to the original state.
- Commit: Applies the changes to the database.
To use transactions, prior to executing a DDL statement from the SQL document, click Begin Transaction on the Transaction toolbar or on the main SQL menu. Then, click Execute.
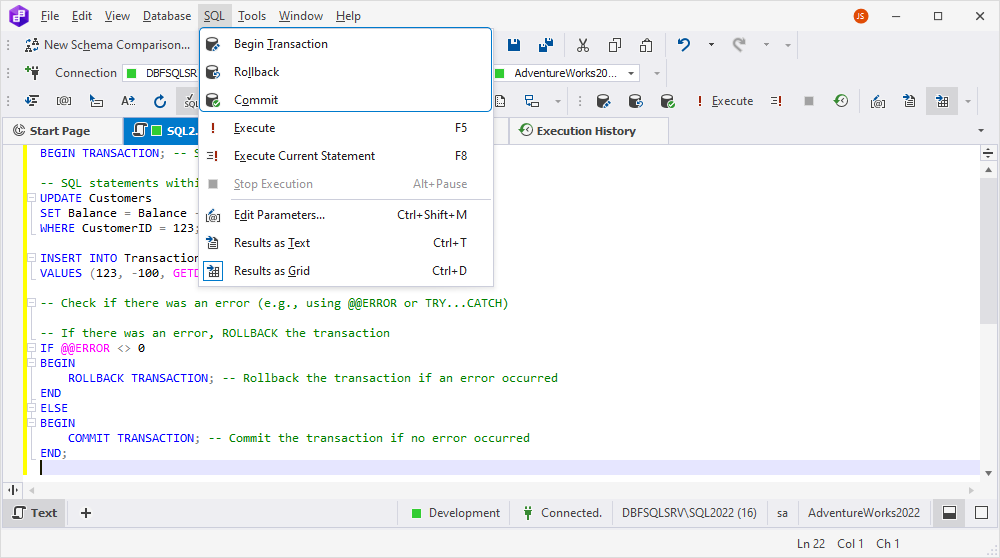
After that, the transaction remains open. You can keep on executing SQL statements or roll back all the statements executed earlier by clicking Rollback on the Transaction toolbar or on the main SQL menu. Then, the transaction is closed. Alternatively, instead of the rollback, you can click Commit to apply all the previously executed statements to the database and complete the transaction.
Note
Menu commands define behavior only when executing a SQL document.