Entities and mapping generation
This topic covers the generation of entities and mapping in Entity Developer for Telerik Data Access.
Entity Developer provides one Data Access template for generating Telerik Data Access entities and mapping, and this template is available only for C#. There is no Visual Basic code generation available for Telerik Data Access. Entity Developer generates fluent mapping for Telerik Data Access.
The topic explains how to generate entities and mapping for Telerik Data Access.
To generate entities, perform the following steps:
1. In the Model Explorer window, under Templates, select Data Access. The properties of the selected template are displayed in the Properties window.
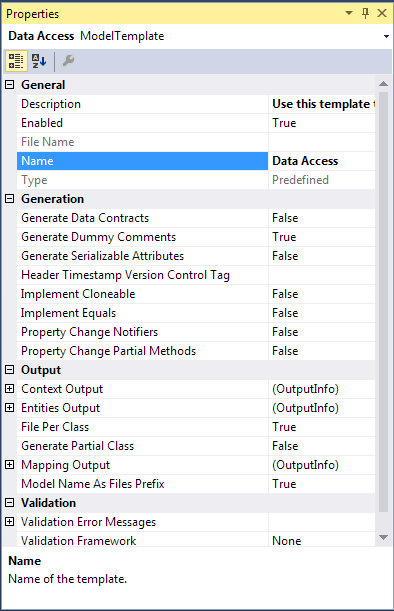
2. Optional: To generate the Data Contract / Data Member attributes used to serialize entities, in the Generation section of the Properties window, set the Generate Data Contracts parameter to True.
3. Optional: To replace the standard date/time stamp in the file header with another tag (for example, a version control tag for Subversion, Git, and so on), in the Generation section of the Properties window, set the Header Timestamp Version Control Tag parameter.
4. Optional: To implement individual Equals and GetHashCode methods for each entity class, in the Generation section of the Properties window, set the Implement Equals parameter to True.
5. Optional: To implement the IValidatable interface for each entity class, in the Generation section of the Properties window, set the Implement Validatable parameter to True.
6. Optional: To implement the INotifyPropertyChanging and INotifyPropertyChanged interfaces for each model class, in the Generation section of the Properties window, set the Property Change Notifiers parameter to True.
7. Optional: To generate the extensibility partial void On<PropertyName>Changing and partial void On<PropertyName>Changed methods that handle changes to each object property, in the Generation section of the Properties window, set the Property Change Partial Methods property to True.
8. Optional: To change the destination folder for generated entity classes, click the ellipsis (…) in the Entities Output field and, in the Browse for Folder dialog box, navigate to the required folder. If no destination folder is specified, generated entity classes are stored in the folder where the model currently resides. The value of this property is taken into account during generation only if the File Per Class property is set to True.
9. Optional: To place each model class in a separate file during code generation, in the Output section of the Properties window, set the File Per Class parameter to True.
10. Optional: To generate a partial class for each class in the model, in the Output section of the Properties window, set the Generate Partial Class parameter to True.
11. Optional: Use the Validation Error Messages properties to specify error messages to associate with a validation control if validation fails. To avoid hardcoded error messages (for example, for internationalization), you can use error messages stored in the application resources. To do this, specify the name of the resource type for error messages in the following format: ResourceType=<type name>. The resource name for your error message for the corresponding validator must match the name of a property from the ValidationErrorMessages property.
12. Optional: To specify the validation framework for validating property values of generated classes, in the Validation section of the Properties window, set the Validation Framework parameter.
13. Save the model to generate entity and mapping files.
Note
If you use Entity Developer as an add-in to Microsoft Visual Studio, in step 8 you can select the solution project and project folder to add generated entities, instead of a file system folder.