This section provides descriptions of basic operations that can be performed on templates in Entity Developer.
Entity Developer enables the user to:
| • | add one or more templates to a model for code generation; |
| • | open the selected template for the purpose of viewing and editing (if applicable); |
| • | rename an existing template; |
| • | share the selected template so that it can be used in another model; |
| • | view the properties of the selected template; |
| • | enable and disable the selected template; |
| • | delete the selected template from the model. |
The procedures for performing each of these actions are detailed below.
How to Add a Template
| 1. | Depending on whether you are using the Entity Developer add-in to Visual Studio or the Entity Developer stand-alone application, do one of the following: |
| • | In the Model Explorer window of your Visual Studio project that contains a model, right-click the Templates node and select the New Template command from the context menu. |
| • | In your model within the Entity Developer stand-alone application, either select Model --> New Template, or use the combination of ALT+T, or, in the Model Explorer window, right-click the Templates node and select the New Template command from the context menu. |
In either case, the following dialog box is displayed:
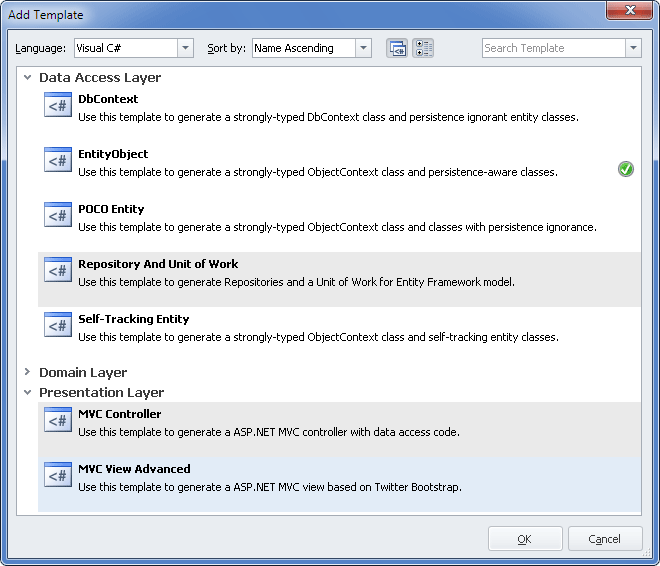
| 2. | In the Language drop-down list, select either Visual C# or Visual Basic. |
| 3. | (Optional) Press the Highlight dependencies button in the upper part of the dialog box. This will highlight the templates connected with the template selected in the list. In the screenshot above the selected MVC View Advanced template is related to the MVC Controller and Repository and Unit of Work templates. These related templates, if currently absent in the model, will be added to the model together with the selected template. |
|
|
You can group or ungroup templates by software architecture layers using the Categorized button.
|
| 4. | Select the appropriate template in the templates list. |
|
|
Green check marks in the list indicate templates that are already present in the model. Shared templates are placed in a special category.
|
| 6. | (Optional) Repeat steps 1-5 to add another template to the model. |
|
|
To add a blank template, right-click the Templates node in the Model Explorer window and select New Blank Template in the context menu.
To locate and add a user template stored elsewhere on your machine, right-click the Templates node in the Model Explorer window and select New Template From File in the context menu.
|
To open a template for viewing and, if applicable, editing, in the Model Explorer area, expand the Templates node and double-click the required template. Alternatively, select and right-click the required template and select the Open command from the drop-down menu.
|
| 1. | To rename a template, in the Model Explorer area, expand the Templates node, select and right-click the required template and select the Rename command from the drop-down menu. |
| 2. | In the box around the name of the template, enter a new name for the template and press ENTER. |
|
To use a predefined template as a basis for a custom template, perform the following actions:
| 1. | In the Model Explorer area, expand the Templates node and right-click the required template. |
| 2. | In the drop-down menu, select the Copy to Model Folder command. |
|
To share a template, i.e. to make it available for the use in more than one model, perform the following actions:
| 1. | In the Model Explorer area, expand the Templates node and right-click the required template. |
| 2. | In the drop-down menu, select the Make Shared command. |
|
To enable or disable a template, perform the following actions:
| 1. | In the Model Explorer area, expand the Templates node and right-click the required template. |
| 2. | In the drop-down menu, select the appropriate command: Disable for an enabled template, or Enable for a disabled template. |
Or
| 1. | In the Model Explorer area, expand the Templates node and right-click the required template. |
| 2. | In the drop-down menu, select the Properties command. |
| 3. | In the Properties window, locate the Enabled property and set the appropriate value for it. |
|
| 1. | To delete a template, in the Model Explorer area, expand the Templates node and right-click the required template. |
| 2. | In the drop-down menu, select the Delete command. |
| 3. | In the displayed confirmation message box, click Yes. |
| 4. | If the template being deleted is custom or shared, one more dialog box will be displayed offering you do delete the template file from disk. Click Yes. |
|
| 1. | To view and edit template properties, in the Model Explorer area, expand the Templates node and right-click the required template. |
| 2. | In the drop-down menu, select the Properties command. |
| 3. | The Properties window will be displayed allowing you to view and edit template properties. |
|
Send feedback on this topic
© 2008 - 2026 Devart. All rights reserved.
 How to Open a Template