Remove specific table column properties from Markdown documentation using PowerShell
The guide provides a step-by-step procedure for removing table column properties from the generated documentation in the Markdown file format. This can be achieved using the PowerShell script.
The script helps you modify the Markdown files generated with the help of dbForge Documenter. When you run the script, it opens a user interface, displaying a list of tables in the Markdown format from a specified folder, with all column properties pre-selected by default. Then, you have two options to exclude the column properties:
- Select the file, clear the checkboxes next to the column properties you want to exclude, and select Save to apply the modifications to the selected file.
- Clear the checkboxes next to the column properties you want to exclude and select Apply to All to apply the changes to all files in the list.
The script extracts column information from Markdown files, alters it based on the selected options, and saves the updated content to new files with _modified added to the filename. Finally, it displays a message box indicating successful modification.
Workflow
- Step 1: Generate documentation in the Markdown format
- Step 2: Create a PowerShell script file to run the job
- Step 3: Run the script
Step 1: Generate documentation in the Markdown format
1. Open the Database Documenter project by using one of the following ways:
- On the toolbar, select New documentation.
- On the Start Page, select New documentation.
2. In the Select Connections dialog that opens, select one or several existing connections and then click Select.
Note
You can create a new connection or modify the existing one. To do this, select Manage in the Select Connections dialog. In the Connection Manager dialog, select New to create a new connection or Edit to modify the connection. For more information, see Connecting to a Database.
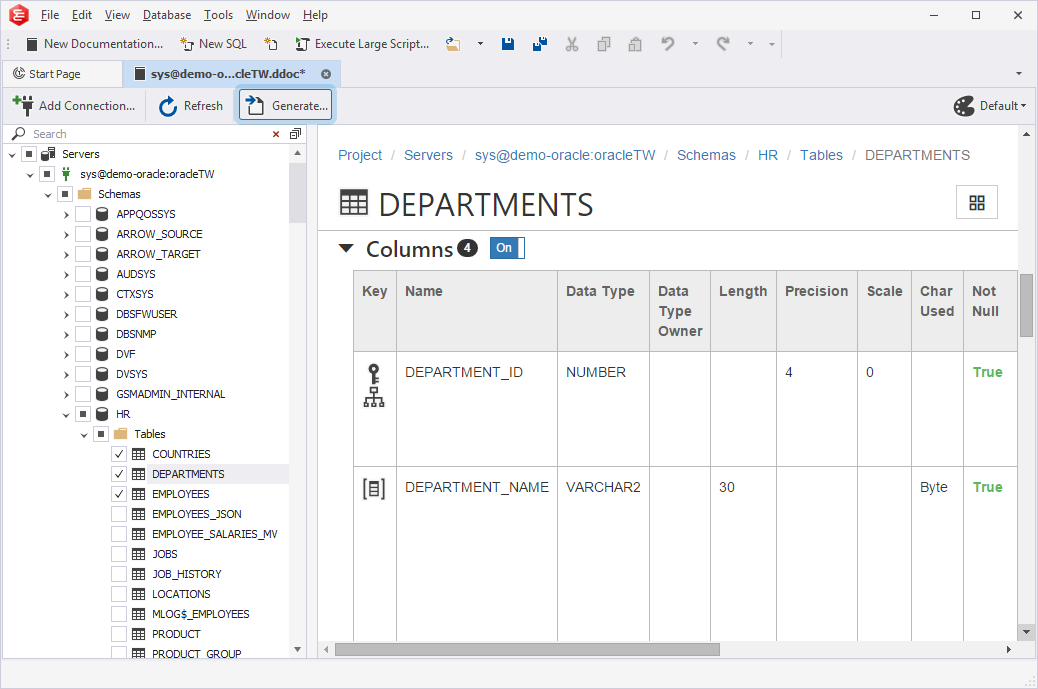
3. In the database documentation tree, select the tables you want to document.
4. In the Database Documenter project, all sections are turned on by default. To exclude specific sections and properties from documentation, turn off the corresponding sections and properties.
5. On the toolbar of the Database Documenter project, select Generate to run the documentation generation.
6. In the Generate Documentation dialog that appears, do the following:
- Choose Markdown as a documentation file format.
- In the Save in box, specify the path to the folder to store the generated documentation.
- In the Folder name box, specify the name of the folder.
Note
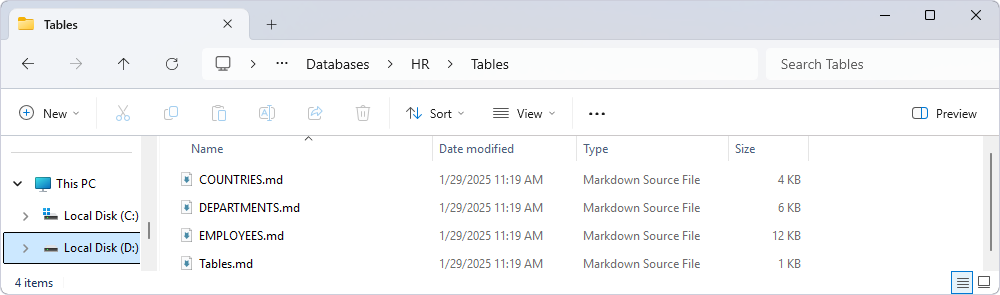
The documentation in the Markdown file format is generated as a set of files located in the folder.
7. Optional: By default, date and time are added to the folder name. To remove them from the name, clear the Append timestamp to the folder name checkbox.
8. Optional: By default, the generated documentation will open after it is generated. To close the documentation after generating, clear the Open documentation after generation checkbox.
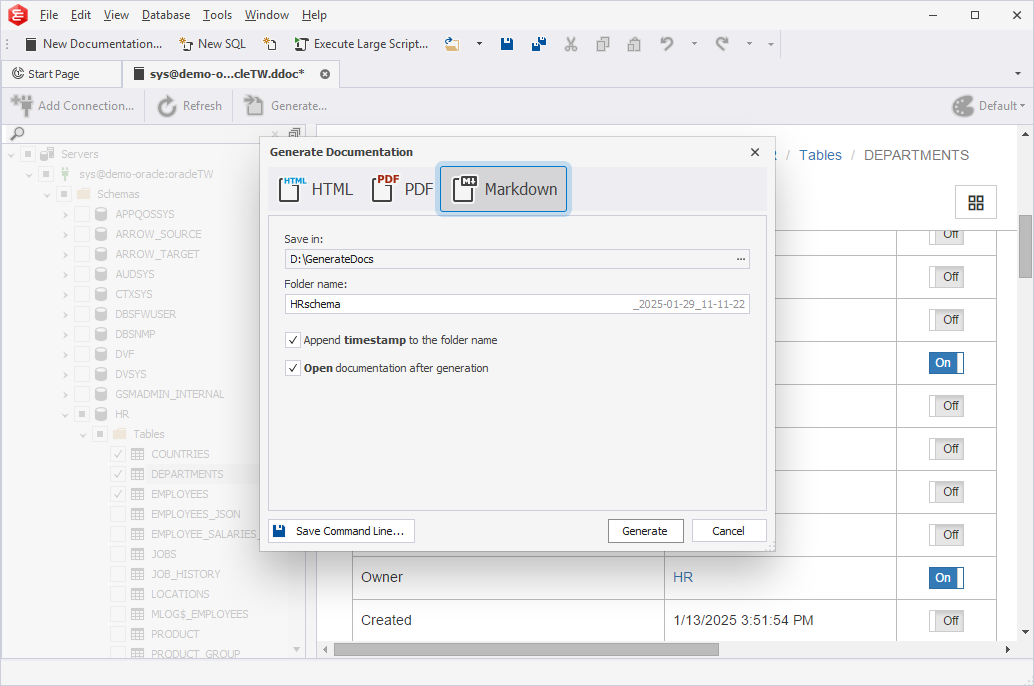
9. To generate the documentation, select Generate. The specified tables appear as individual files in the destination folder in the directory: D:\GenerateDocs\HRschema__2025-01-29_11-19-38\Servers\ServerName\Databases\HR\Tables.
Step 2: Create a PowerShell script file to run the job
1. In the PowerShell Integrated Scripting Environment (ISE), enter the following script:
Note
Specify the variables according to your actual data.
 Click to open the PowerShell script example
Add-Type -AssemblyName System.Windows.Forms

# Define the form
$form = New-Object System.Windows.Forms.Form
$form.Text = 'Markdown File Modifier for Oracle'
$form.Size = New-Object System.Drawing.Size(960, 600)
$form.StartPosition = 'CenterScreen'

# Define the ListView
$filesListView = New-Object System.Windows.Forms.ListView
$filesListView.View = [System.Windows.Forms.View]::Details
$filesListView.FullRowSelect = $true
$filesListView.MultiSelect = $false
$filesListView.Dock = [System.Windows.Forms.DockStyle]::Fill
$filesListView.Columns.Add('File Name', -2, [System.Windows.Forms.HorizontalAlignment]::Left)
$form.Controls.Add($filesListView)

# Populate the ListView with Markdown files
$folderPath = 'path_to_the_markdown_files_with_database_objects' # Set your folder path
$files = Get-ChildItem -Path $folderPath -Filter '*.md'
foreach ($file in $files) {
    $item = New-Object System.Windows.Forms.ListViewItem($file.Name)
    $filesListView.Items.Add($item)
}

# Define the options
$options = @('Key', 'Name', 'Data Type', 'Data Type Owner', 'Length', 'Precision', 'Scale', 'Char Used', 'Not Null', 'Default', 'Default On Nulls', 'Nested Table', 'Reference', 'Virtual', 'Description|')
# Create a checkboxes panel
$checkboxPanel = New-Object System.Windows.Forms.FlowLayoutPanel
$checkboxPanel.Dock = [System.Windows.Forms.DockStyle]::Top
$checkboxPanel.AutoSize = $true
$form.Controls.Add($checkboxPanel)

# Create checkboxes for each option
foreach ($option in $options) {
    $checkbox = New-Object System.Windows.Forms.CheckBox
    $checkbox.Text = $option
    $checkbox.Checked = $true
    $checkboxPanel.Controls.Add($checkbox)
}

# Add Save button to the form
$saveButton = New-Object System.Windows.Forms.Button
$saveButton.Text = 'Save'
$saveButton.Dock = [System.Windows.Forms.DockStyle]::Bottom
$form.Controls.Add($saveButton)

# Add Apply to All button to the form
$applyAllButton = New-Object System.Windows.Forms.Button
$applyAllButton.Text = 'Apply to All'
$applyAllButton.Dock = [System.Windows.Forms.DockStyle]::Bottom
$form.Controls.Add($applyAllButton)

# Save button click event
$saveButton.Add_Click({
    ProcessFiles -SelectedFile $filesListView.SelectedItems[0].Text
})

# Apply to All button click event
$applyAllButton.Add_Click({
    ProcessFiles -All $true
})

# Function to process files
function ProcessFiles {
    param (
        [string]$SelectedFile,
        [switch]$All
    )

    $filesToProcess = if ($All) { $filesListView.Items } else { $filesListView.Items | Where-Object { $_.Text -eq $SelectedFile } }

    foreach ($item in $filesToProcess) {
        $selectedFilePath = Join-Path -Path $folderPath -ChildPath $item.Text
        $content = Get-Content -Path $selectedFilePath -Raw

        # Define the block start and end markers
        $blockStart = '## <a name="#Columns"></a>Columns'
        $blockEnd = '##'

        # Extract content within the block
        $blockContent = $content -replace "(?ms)(.*${blockStart}\s*`n)(.*?)(\s*${blockEnd}.*)", '$2'

        # Remove any existing headers and separators from the block content
        $blockContent = $blockContent -replace '^\|\s*Key.*\n\|\:---.*\n', ''

        # Recreate the header based on checked options
        $header = '|'
        $dashLine = '|'
        foreach ($option in $options) {
            $checkbox = $checkboxPanel.Controls | Where-Object { $_.Text -eq $option }
            if ($checkbox.Checked) {
                $header += "$option|"
                $dashLine += "---|"
            }
        }

        # Prepend the header and separator to the block content
        $newBlockContent = $header + "`n" + $dashLine + "`n" + $blockContent

        # Replace the modified block content in the original content
        $content = $content -replace "(?ms)(.*${blockStart}\s*`n)(.*?)(\s*${blockEnd}.*)", "`$1$newBlockContent`$3"

        # Define the modified file path
        $modifiedFilePath = $selectedFilePath -replace '\.md$', '_modified.md'

        # Save the modified content to a new file
        $content | Set-Content -Path $modifiedFilePath

        [System.Windows.Forms.MessageBox]::Show("File '$($item.Text)' modified and saved as '$($modifiedFilePath | Split-Path -Leaf)'.")
    }
}


# Show the form
$form.ShowDialog() | Out-Null
2. Save the file with a .ps extension.
Step 3: Run the script
1. Run the Windows PowerShell ISE as an administrator and open the created .ps file.
2. The Markdown File Modifier for Oracle window opens. By default, all column properties are selected. To exclude the column properties, clear the corresponding checkboxes. The window also displays a list of source and modified tables.
3. Select Apply to All to run the job.
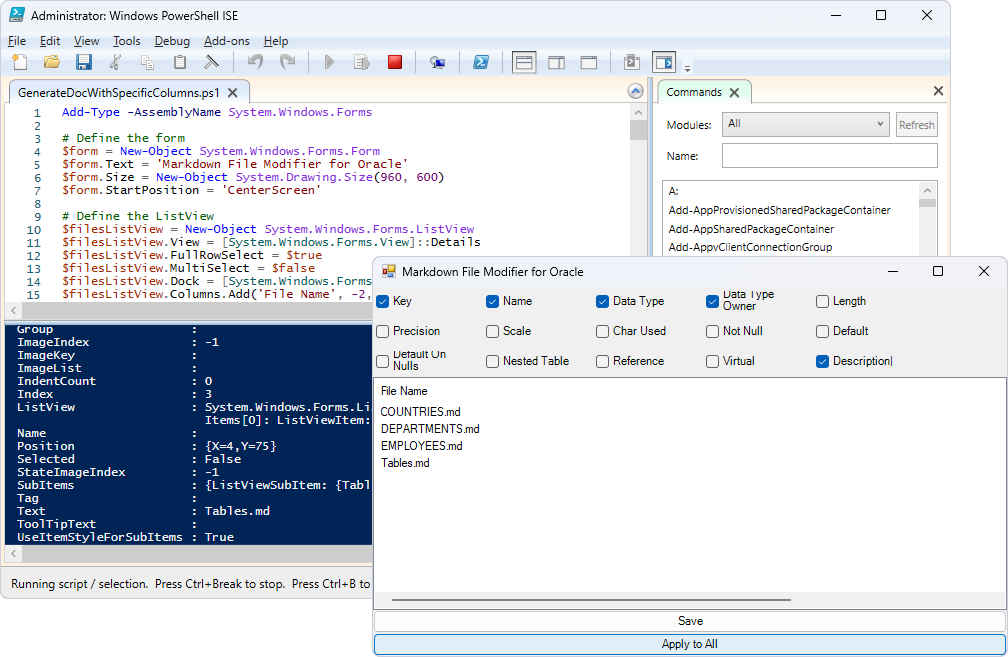
4. The process iterates for each table in the folder, repeating until all tables have been processed. A message box for each table appears - File ‘filename.md’ modified and saved as new_filename.md. Select OK to close it.
Note
The tables are stored to the Tables folder with the source tables. In our example, it is *D:\GenerateDocs\HRschema__2025-01-29_11-19-38\Servers\ServerName\Databases\HR\Tables.*.
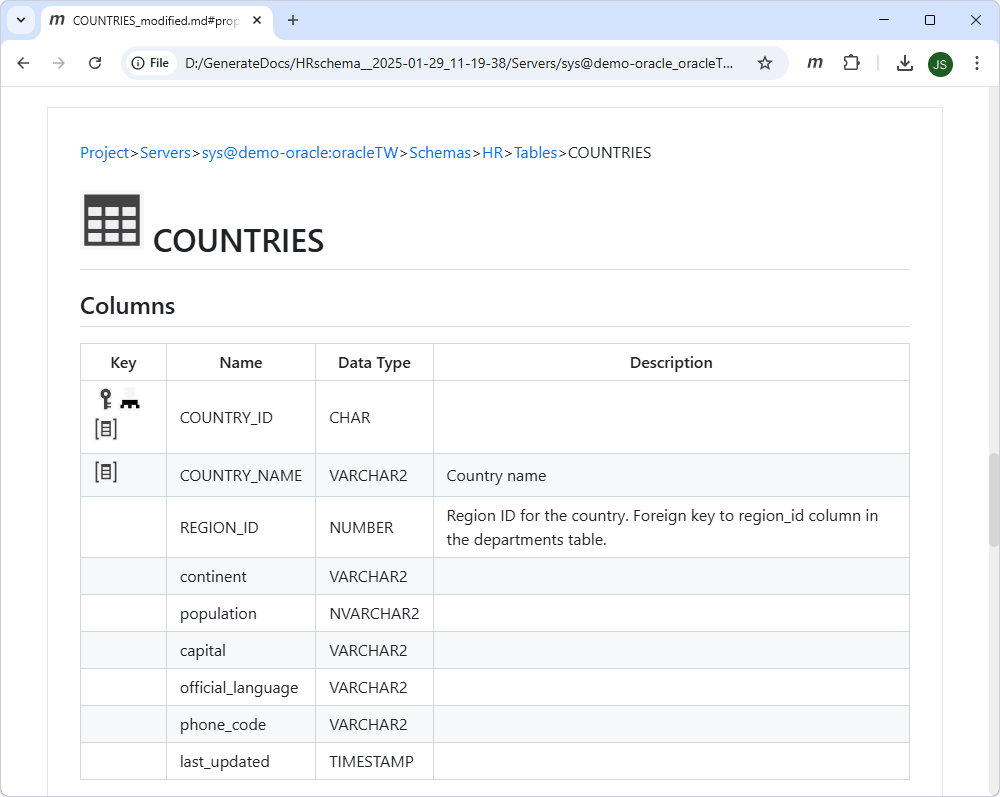
5. Navigate to the folder with the modified tables and double-click the required table. The result may be as follows: