Customization options
To customize the default behavior of dbForge Transaction Log and make it best suit your needs, select Tools > Options on the ribbon.
The Options window contains the following options and option groups:
| Option Group | Option Name | Description |
|---|---|---|
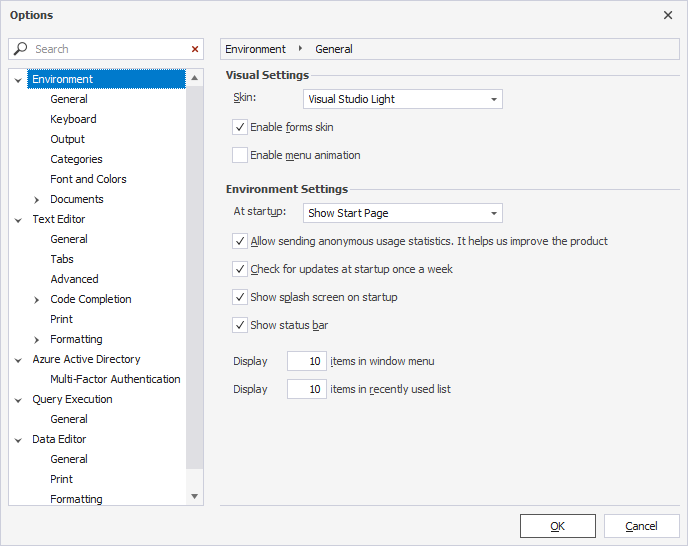
| Environment | General | Select a skin and activate the forms skin and menu animation in the Visual Settings section. Select a page to show at startup (Start Page, Create New Query, or Empty Environment) in the Environment Settings section. Additional options include auto-check for updates, display of the splash screen on startup, display of the status bar, and a specifiable number of items to be shown in the window menu and on the Recently Used list. |
| Environment | Keyboard | Apply an additional keyboard mapping scheme and assign custom shortcuts to selected commands. |
| Environment | Output | Select whether to show time for output events, write queries sent by the program to the SQL log, or log application errors. In addition, users can delete an application log after closing (the option is selected by default). |
| Environment | Categories | Environment Categories Modify the environment category by specifying the server, database, and environment. In addition, users can create or remove color matches. Category Settings Modify the environment category name or shape, assign the tab color and shape to the environment, and add or remove the environment. |
| Environment | Font and Colors | Configure fonts and item foreground/background colors in Text Editor and Data Editor. |
| Environment | Documents > SQL documents | Set up the layout for a SQL document, and select whether to show the data view for every SQL document and whether to activate the Data Editor after the query execution. |
| Environment | Documents > Restore | Specify the period in minutes to save restore information and select the formats for the file to be restored. By default, all formats are selected. |
| Environment | Documents > Query History | Customize the query history: Enable history: Turn on the query history. Store executed queries within 60 days: Set the number of days to store executed queries. 60 days are set by default. The maximum interval you can specify to store the executed queries is 365 days. After the specified period has ended, the history is automatically deleted. You can also upload the file with the history data by copying it from the folder on your computer to the required place. The default folder to store is C:\Users\Username\AppData\Roaming\Devart\dbForge Transaction Log\ExecutedQueries. Note that the file cannot be later viewed from the dbForge tool because the old data will be auto-deleted. Max script size to store 1024 KB: Specify the maximum script size to store. 1024 KB is set as default. Show history at startup from (time period): Displays the query history at startup beginning from the specified period. Last week is set as default. Folder to store: Specify the path to the folder where the query history is stored. If a user wants to erase the query history, use the Clear Query History option. |
| Text Editor | General | Customize the Text Editor options such as virtual white space, line numbers, etc. |
| Text Editor | Tabs | Specify indenting and tabs options. |
| Text Editor | Advanced | Customize outlining and syntax highlighting options such as collapsing or expanding region blocks when files are opened, as well as underlining errors in the editor, etc. By default, all the options are selected. |
| Text Editor | Code Completion> General | Activate the code completion features. The sub-options include: Auto List Members: Suggest object names for use at a certain position of the code. Auto Parameter Info: Display a tooltip with information on function parameters when calling a function in a query. The options are selected by default. Automatically trigger after 200 ms: Trigger code completion after a specified number of milliseconds (200 is set as default). |
| Text Editor | Code Completion > Advanced | Qualify column name with table alias: Automatically qualify a column name in the SELECT statement with table alias. The option is selected by default. Qualify column name (no table alias): Automatically qualify a column name in the SELECT statement with no table alias. The options include: With table name: Qualify a column name with a table name separated by a dot With schema and table name: Qualify a column name with a schema and table name separated by a dot With database, schema, and table name: Qualify a column name with the database, schema, and table name separated by a dot. Include default schema in object names: Include a default schema in object names. |
| Text Editor | Code Completion > List Members | Cyclic movement through the suggestion list: If users select items in the suggestion list with a keyboard, the selection jumps to the first item when reaching the last item in the list. Filtering Rule: Filter the object names and keywords in the list by matching words (By Matching) and camel-case words in the name (Camel Case). Both options are selected by default. Commit Selection: Insert the item from the suggestion list by pressing Tab (selected by default) or Whitespace, or using the characters specified in the Following characters option (a set of characters can be modified). In addition, users can add a new line on pressing Enter at the end of the fully typed word if they want to add a new empty line when pressing Enter. When the Select items in the list even if user input is expected option is selected, any match the user inputs with the keywords in the Completion list highlights the keyword regardless of context. When the option is cleared, any match the user inputs with the keywords in the completion list frames the relevant context-based keyword from the list. |
| Text Editor | Code Completion > Suggestions | Ping the SQL Server to validate the status of the open connection. If the connection is closed, a notification will be displayed to prompt the user to reconnect. By default, the option is selected. |
| Text Editor | Set up printing options, such as print headers (the option is selected by default), line numbers, and/or white space. | |
| Text Editor | Formatting > General | Formatting: Configure formatting options that include: Automatically format on paste: Automatically format expressions inserted into the SQL document from the clipboard Automatically format completed statement on delimiter: Automatically format SQL statements after a semicolon is inserted at the end of the statement Right Margin: Specify the right margin. The default value is set to 80. Notifications: Set up query execution notifications: Put syntax errors to Output window Show syntax error notification window. Both options are selected by default. |
| Text Editor | Formatting > Profiles | Customize a predefined set of formatting profiles (grouped as Devart Profiles) or create custom formatting profiles by using the following options: Create New: Create a new formatting profile and specify its name, the Devart profile from which the settings will be copied, and a path to store a profile, and make the profile active. Add Existing: Import a file with the formatting profile. Open Selected: Open the active formatting profile. Set as Active: Activate the selected formatting profile, which will then be displayed in bold. |
| Azure Active Directory | Multi-Factor Authentication | Specify Application ID and Redirect URL for multi-factor authentication. |
| Query Execution | General | Configure both general and advanced query execution settings. |
| Data Editor | General | General settings include auto-adjustment of column width, the use of the cached updates mode, paginal mode, and auto-search mode by default, the display of row numbers, and the display of datatypes in the column headers of Data Editor. The Data Editing options also allow Fswitching between the editing and read-only modes. |
| Data Editor | Turn on/off the options for printing horizontal and vertical lines in the Grid View mode, printing card captions and empty fields in the Card View mode, and general settings of auto-width, paper size, and orientation. | |
| Data Editor | Formatting | Apply predefined formats for various data types. |
If you need to reset all options, it is recommended to use the corresponding option in Importing and exporting settings.