Table Designer tab - General
On the General tab, you can define table columns and configure their properties such as data types, nullability, default values, and identity settings.
Columns grid
The Columns grid displays existing columns and lets you add or remove columns, change the column order, or find a column.

Add columns
To add a column, right-click the Columns grid and select one of the following options:
- New column – Adds a new column to the table. Alternatively, press Ins. The column is inserted at the end of the column list. The default name is column1. If a column with this name already exists, dbForge Studio assigns the next available name, such as column2, column3, and so on.
- Insert column – Inserts a new column above the selected column.
Configure general column properties
In the Columns grid, you can configure the following general column properties:
 – Marks the column as the primary key of the table. Select the checkbox to define the column as a primary key.
- Name – Specifies a column name. Double-click the cell and enter a new name or update the existing one.
- Data Type – Indicates the data type of the column. Double-click the cell and select a data type from the list.
- Not Null – Indicates whether the column requires a value in every row. Select the checkbox to enforce
NOT NULLvalues for the column. - Identity – Defines the column as an identity column. Select the checkbox to generate a unique numeric value for each new row.
- Default – Specifies a default value for the column. Double-click the cell and enter a default value.
- Description – Specifies a column description. To add a description, enter the text and click OK.
Note
- Not Null is unavailable for columns defined as primary keys.
- Identity is available only for columns with the
SMALLINT,INT, andBIGINTdata types.- You can set or modify a default value only for supported data types.
Remove columns
To remove a column, select it in the Columns grid, right-click it, then select Remove column. Alternatively, press Ctrl+Del.
Change column order
To change the column order, right-click the Columns grid and select one of the following options:
- Move column up – Moves the selected column one position higher. Alternatively, drag the column upward or press Ctrl+Up.
- Move column down – Moves the selected column one position lower. Alternatively, drag the column downward or press Ctrl+Down.
Find a column
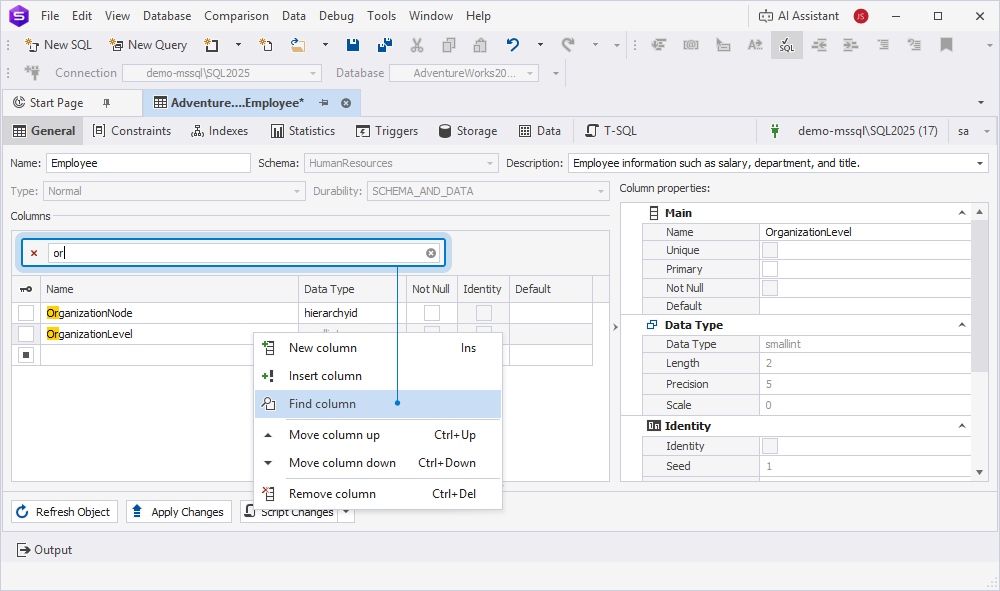
1. Right-click the Columns grid and select Find column.
2. In the search box, enter the name of the column you want to find.
Search behavior:
- Matching text is highlighted in yellow.
- The number of matches appears in the search box.
- The search is case-insensitive. For example, searching for Or matches Or and or.
- If the query contains multiple words, each word is matched separately, and all matches are highlighted.
- To clear the search results, click
 in the search box.
Delete the text in the search box
To delete the text, in the search box, click  .
Remove the search box
To remove the search box from the Columns grid, click  next to the search box.
Rename a column
In the Name column, double-click the cell and enter a new name.
Assign a column data type
1. In the Data Type column, double-click the cell for the column whose data type you want to set or modify.
2. From the list, select the required data type.
dbForge Studio can automatically assign a data type for certain column names based on predefined naming heuristics. By default, a new column is set to varchar. If you name the column ID or id, the tool automatically changes the data type to INT.
Note
Data types are assigned automatically only during table creation, not during editing.
The following table lists the naming heuristics used to infer data types during table creation.
| Group | Name | Inferred data type |
|---|---|---|
| Identifier | id, user_id, order_id, product_id, customer_id, supplier_id, employee_id, invoice_id, transaction_id, category_id, department_id, session_id, record_id, log_id, event_id, message_id, token_id, reference_id, doc_id, file_id, image_id, video_id, article_id, note_id, comment_id, tag_id, item_id, row_id, uuid, guid | INT |
| Financial | cost, price, amount, amt, total, subtotal, balance, credit, debit, fee, charge, commission, tax, vat, gst, net, gross, margin, discount, rate, salary, wage, income, expense, payment, payout, refund, revenue, profit, loss | MONEY |
| Date | date, created_date, modified_date, updated_date, start_date, end_date, due_date, birth_date, hire_date, expiry_date, expiration_date, issue_date, shipment_date, delivery_date, payment_date, invoice_date, order_date, arrival_date, departure_date, release_date, close_date, report_date, transaction_date, activation_date, deactivation_date, anniversary_date, renewal_date, update_dt, event_date, log_date | DATE |
| Time | time, start_time, end_time, created_time, modified_time, updated_time, due_time, arrival_time, departure_time, event_time, schedule_time, timestamp, login_time, logout_time, checkin_time, checkout_time, execution_time, elapsed_time, response_time, processing_time, completion_time, runtime, uptime, downtime, access_time, send_time, receive_time, birth_time, death_time, alarm_time | DATETIME2 |
| Count | qty, quantity, count, total_count, number_of_items, items_count, attempts, clicks, views, hits, likes, shares, followers, following, friends, subscribers, messages, posts, comments, votes, downloads, uploads, instances, occurrences, rows, columns, cells, pages, records, entries, segments | INT |
| Measurement | weight, mass, size, length, height, width, depth, thickness, distance, radius, diameter, volume, area, speed, velocity, temperature, pressure, altitude, latitude, longitude, x_coord, y_coord, z_coord, score, rating, grade, percentage, probability, percent, ratio, index | DECIMAL(8, 2) |
| Text | name, first_name, last_name, full_name, middle_name, short_name, display_name, username, screen_name, nickname, alias, title, company_name, organization_name, institution_name, description, summary, caption, label, category | VARCHAR(100) |
| Metadata | code, status, state, zip, postal, postal_code, zip_code, phone, phone_number, fax, email, email_address, website, link, homepage, path, filename, filepath, mimetype, content_type, currency, unit, department, role | VARCHAR(50) |
| Miscellaneous | password, token, hash, signature, checksum, etag, uuid_text, guid_text, session_key, api_key, secret, note, comment, remarks, message, content, blob, data, info, details, metadata, config, settings, preferences, profile, avatar, image_url, thumbnail, icon, picture, photo, documentation, manual, guide, instruction, procedure, policy, rule, regulation, law, version, revision, build, release, environment, platform, device, browser | VARCHAR(150) |
Column detail panel
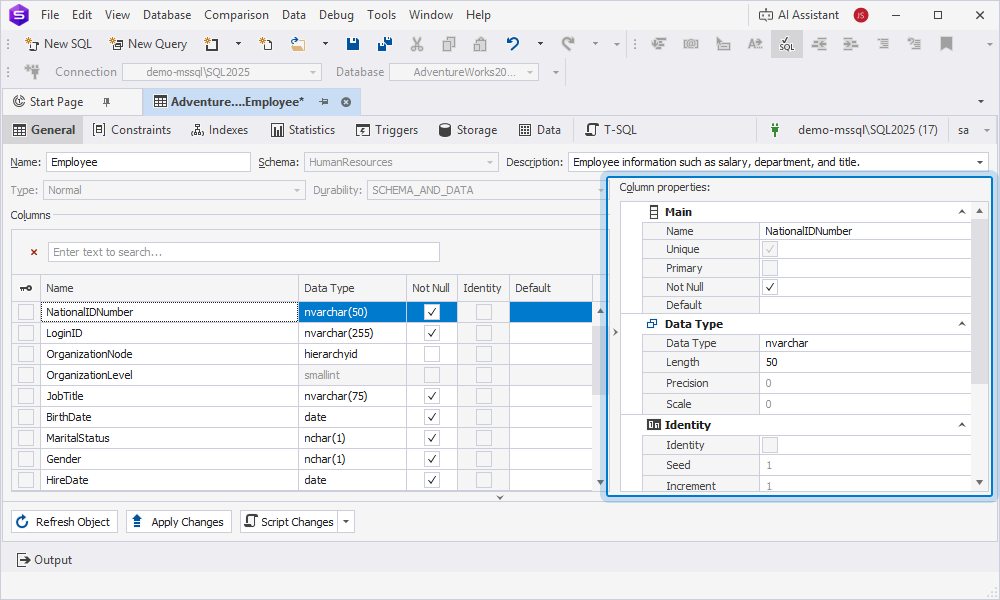
In the column detail panel, you can configure properties for the column selected in the Columns grid.
Properties are grouped in collapsible categories.
Main
The following table describes the available properties.
| Name | Description |
|---|---|
| Name | Specifies the column name. |
| Unique | Requires all values in the column to be unique. This property is set automatically when the column is defined as a primary key. |
| Primary | Marks the column as the primary key of the table. Select the checkbox to define the column as a primary key. |
| Not Null | Indicates whether the column requires a value. To enforce NOT NULL for the column, select the checkbox. |
| Default | Specifies a default value for the column. Double-click the cell to enter a value. |
Data Type
The following table describes the available properties.
| Name | Description |
|---|---|
| Data Type | Specifies the column data type. To change the data type, double-click the cell and select the data type. |
| Length | Indicates the maximum number of characters or bytes the column can store. The default value is set depending on the selected data type. To change the length, double-click the cell and enter a new value. |
| Precision | Indicates the maximum number of digits in a numeric value, including digits to the right of the decimal point. To change the precision, double-click the cell and enter a new value. |
| Scale | Indicates the number of digits to the right of the decimal point in a numeric value. To change the scale, double-click the cell and enter a new value. |
Note
Length, Precision, and Scale are unavailable for data types that don’t support these parameters.
Identity
The following table describes the available properties.
| Name | Description |
|---|---|
| Identity | Generates a unique numeric value for each new row inserted into the table. To define the column as an identity column, select the checkbox. |
| Seed | Defines the starting value for the sequence. |
| Increment | Indicates the value added to the previous identity value for each new row. The default value is 1. To specify a value, enter it in the box or use the up and down arrows to select one. |
| Not for Replication | Turns on or off an IDENTITY constraint for data inserted by a replication process. |
Computed
The following table describes the available properties.
| Name | Description |
|---|---|
| Computed | Defines the column as a computed column. Select the checkbox to define the computed column. |
| Persisted | Indicates whether the column can store the computed value in the table. When the checkbox is cleared, the value is calculated when queried. |
| Expression | Defines the expression for the computed column. Enter the expression used to calculate the column value. |
Miscellaneous
The following table describes the available properties.
| Name | Description |
|---|---|
| Collation | Defines the rules for storing, sorting, and comparing text data. |
| Description | Specifies a column description. In the dropdown box, enter the description. Click OK to save the description, or click Cancel to discard the change. |
Tip
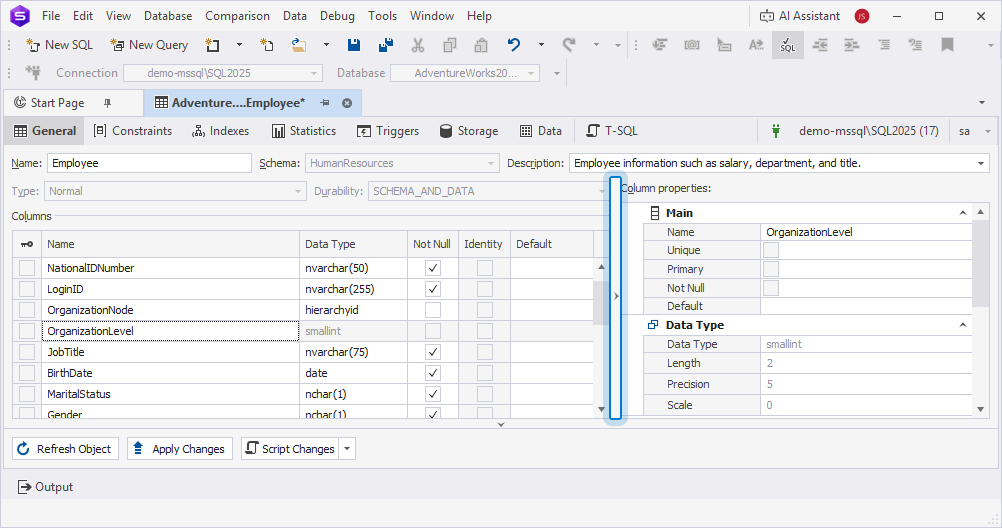
To hide the column properties panel, click the vertical splitter or drag it to the right.
Save the changes
An asterisk (*) on the Table Designer tab indicates unsaved changes.
To save and apply them, in the bottom panel, click Apply Changes.
Note
To discard all changes made since Table Designer was opened or last saved, on the standard toolbar, click
. The object is reloaded from the server, and all unsaved changes are permanently lost. You can’t redo changes after an undo operation for database objects.