How to migrate data from other servers
Data import from a data source
Note
Data Import Wizard pages can slightly differ due to the product you have been using.
-
- Decide what table to import the data to:
For a new table:
- On the Database menu, click Import Data. The Data Import wizard opens.
For an existing table:
-
Right-click a table in Database Explorer and select Import Data from the shortcut menu. The Data Import wizard opens with predefined parameters: a Microsoft SQL Server connection, a database, and a table to import the data to.
-
Alternatively, on the Database menu click Import Data, and select a required table on the Destination table wizard page.
- Select the ODBC import format and click Next.
- Specify ODBC data provider options for import: select a system or a user data source name from the drop-down list or specify a connection string by clicking Build and selecting a required data source. Enter a user name and a password if the selected data source requires them. Click Next.
- Select a Source table or view. To quickly find them in the list, enter characters of a required name into the Filter field. The list will be filtered to show only those that contain such characters in their names. You can use a query for a partial data import. Click the Custom Query button and edit the query. Click OK to save the changes.
- Specify a SQL Server connection, a database, a schema and a table to import the data to. If you selected a table in Database Explorer before opening the Data Import wizard, the wizard will open with the predefined connection parameters of the selected table. To create or edit Microsoft SQL Server connections, click the corresponding buttons.
- Specify data formats for the Source data and click Next.
-
Map the Source columns to the Target ones. If you are importing the data into a new table, dbForge Studio will automatically create and map all the columns. If you are importing into an existing table, only columns with the same names will be mapped, the rest should be mapped manually. (If no columns with the same name are found, they are mapped in succession - the 1st column in Source with the 1st column in Target, etc.)
See the Target columns in the top and the Source columns at the bottom of the wizard page. Click Source column fields and select required columns from the drop-down list. (For more information about mapping, go to Mapping, Data Import Wizard topic.)
Note
To cancel mapping of all the columns, click Clear Mappings on the toolbar. To restore it, click Fill Mapping.
- If you are importing to a new table, you can edit the Target column properties by double-clicking them in the top grid. Select the Key check box for a column with a primary key and click Next. Note you should select at least one column with a primary key, otherwise some of import modes on the Modes wizard page will be disabled.
- Select an import mode to define how dbForge Studio should import the data. Click Next.
- Select how dbForge Studio should handle errors during import and whether you want to get a log file with details about the import session.
- Click Import and see the import progress. dbForge Studio will notify you whether the import completed successfully or failed. Click the Show log file button to open the log file.
- Click Finish to finish the import and close the wizard.
Note
You can save the import settings as a template for future uses. Click the Save Template button on any wizard page to save the selected settings. Next time you should only select a template and specify a location of the Source data - all the settings will be already set. For more information, go to Saving and Using Templates.
Bulk import using a PowerShell script
You can use a PowerShell script to import data from multiple tables into new tables. If a table name contains a dot, it is replaced with an underscore after the bulk import.
1. Select the required ODBC driver download, and install it:
2. Configure the installed driver. Open ODBC Data Source Administrator and click Add.
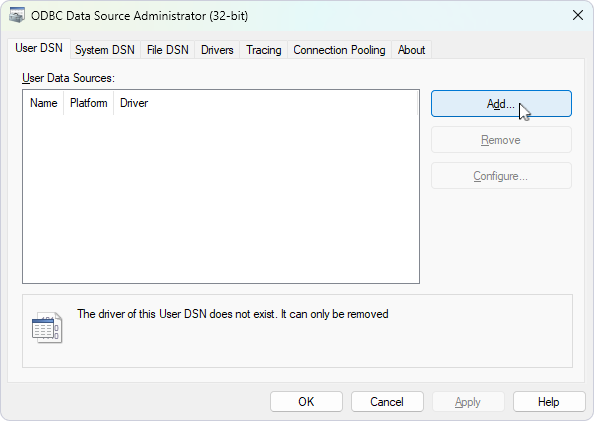
3. Select the driver and click Finish.
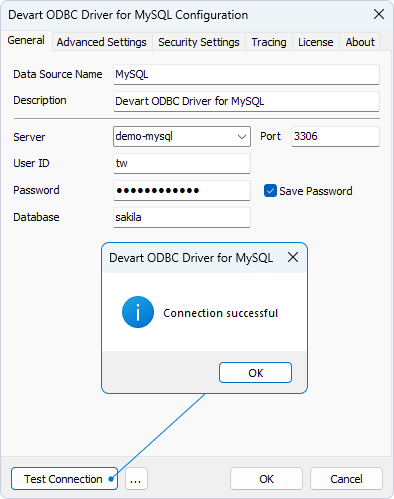
4. Fill in the driver configuration fields and click Test Connection.
5. Create a config file with the connection properties for the source database. It must contain the following data: DSN,User,Password
Where:
-
DSN – The data source name.
-
User – The login of the source database.
-
Password – The password of the source database.
6. Create a config file with the connection properties for the target database. It must contain the following data: Server,Database,Authentication,Login,Password
Where:
-
Server – The server name where the target database is located.
-
Database – The name of the target database.
-
Authentication – False for SQL Server authentication, and True for Windows authentication.
-
Login – The SQL Server login name.
-
Password – The SQL Server login password.
7. Create the import template file. In dbForge Studio for SQL Server, navigate to Database > Tasks > Import Data.
8. Select ODBC and click Next.
9. Click Save and select Save Template.

10. Open Windows PowerShell.
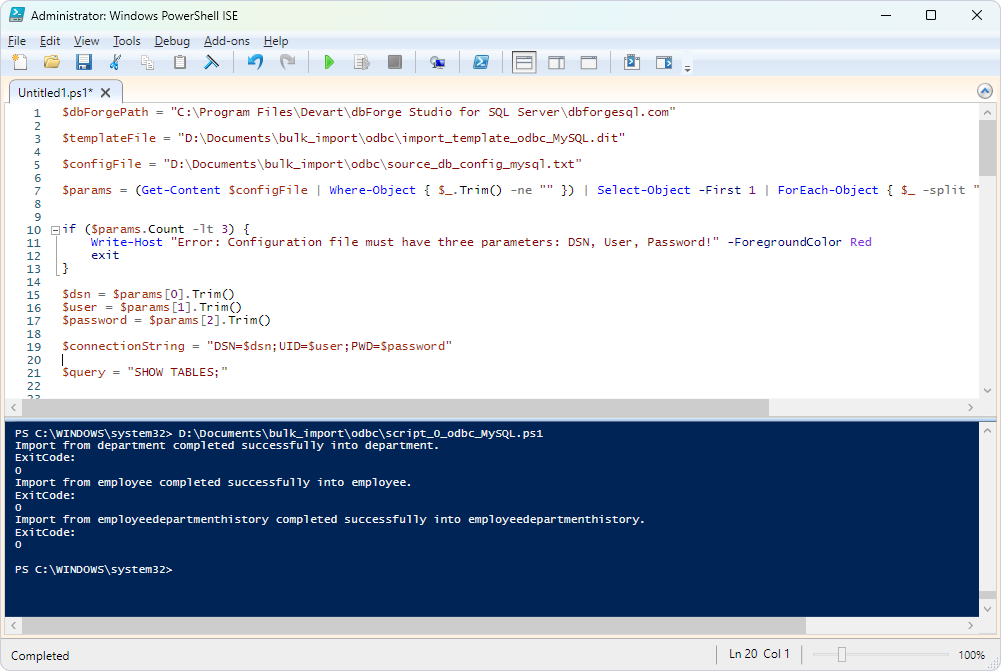
11. In the editor, enter the following script. Replace the parameters with your actual values.
- For MySQL:
$dbForgePath = "<path_to_dbforge_studio_for_sql_server_file>"

$templateFile = "<path_to_import_template_file>"

$configFile = "<path_to_config_file_with_source_database_connection_properties>"

$params = (Get-Content $configFile | Where-Object { $_.Trim() -ne "" }) | Select-Object -First 1 | ForEach-Object { $_ -split "," }

if ($params.Count -lt 3) {
    Write-Host "Error: Configuration file must have three parameters: DSN, User, Password!" -ForegroundColor Red
    exit
}

$dsn = $params[0].Trim()
$user = $params[1].Trim()
$password = $params[2].Trim()

$connectionString = "DSN=$dsn;UID=$user;PWD=$password"

$query = "SHOW TABLES;"

$conn = New-Object System.Data.Odbc.OdbcConnection($connectionString)
$conn.Open()
$cmd = $conn.CreateCommand()
$cmd.CommandText = $query
$reader = $cmd.ExecuteReader()

$tables = @()
while ($reader.Read()) {
    $table = $reader.GetString(0)
    $tables += @{ Table = $table }
}
$reader.Close()
$conn.Close()

$configFile = "<path_to_config_file_with_target_database_connection_properties>"

$databases = Get-Content $configFile | ForEach-Object {
    $fields = $_ -split ","
    [PSCustomObject]@{
        Host     = $fields[0]
        Database = $fields[1]
        Security = $fields[2]
        User     = $fields[3]
        Password = $fields[4]
    }
}

$MasterDB = $databases[0]

 foreach ($entry in $tables) {

    $CurrentTable = "$($entry.Table)"

    #$destinationTable = "$($entry.Table)"

    $process = Start-Process -FilePath $dbForgePath -ArgumentList "
              /dataimport
              /templatefile:`"$templateFile`"
              /connection:`"Data Source=$($MasterDB.Host);Initial Catalog=$($MasterDB.Database);Integrated Security=$($MasterDB.Security);User ID=$($MasterDB.User);Password=$($MasterDB.Password)`"
              /table:`"$CurrentTable`"
              /inputtable:`"$CurrentTable`"
              /errormode:abort
              /create
               " -PassThru -Wait  -windowstyle hidden


               if ($process.ExitCode -eq 0) {
                    Write-Output "Import from $CurrentTable completed successfully into $CurrentTable."
               } else {
                    Write-Output "Errors occurred while importing $CurrentTable."
               }
              Write-Output "ExitCode:" $process.ExitCode

}
<path_to_dbforge_studio_for_sql_server_file>– The path to the dbForge Studio for SQL Server configuration file.
The default path to this executable depends on where dbForge Studio for SQL Server is installed. If you installed dbForge Studio:
- As a standalone tool:
C:\Program Files\Devart\dbForge Studio for SQL Server. -
As a part of the dbForge Edge bundle:
C:\Program Files\Devart\dbForge Edge\dbForge Studio for SQL Server. <path_to_import_template_file>– The path to the import template file.<path_to_config_file_with_source_database_connection_properties>– The path to the configuration file that contains the source database connection properties.<path_to_config_file_with_target_database_connection_properties>– The path to the configuration file that contains the target database connection properties.
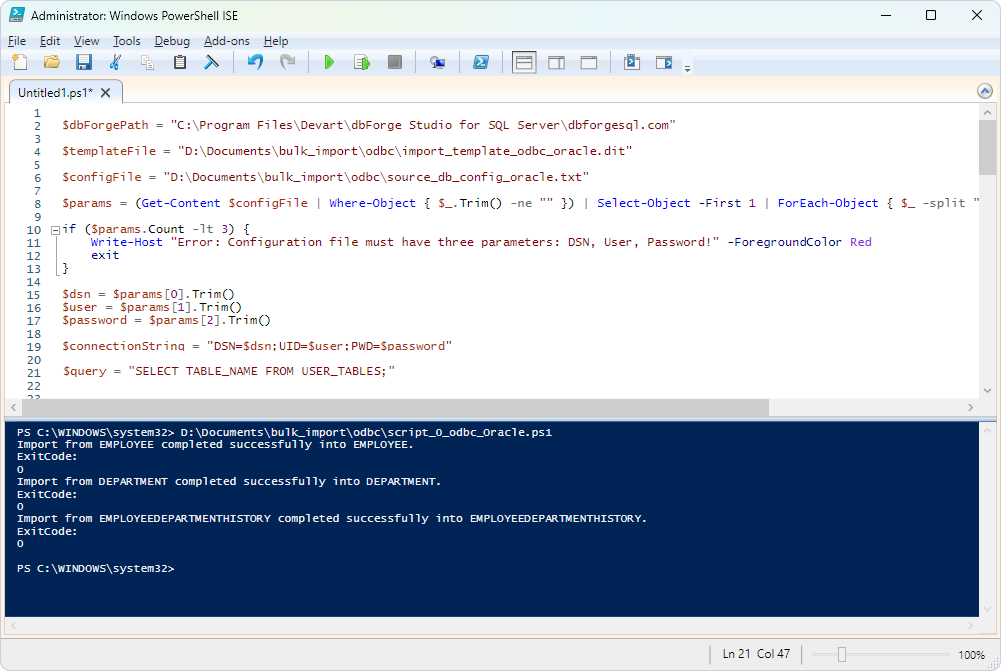
- For Oracle:
$dbForgePath = "<path_to_dbforge_studio_for_sql_server_file>"

$templateFile = "<path_to_import_template_file>"

$configFile = "<path_to_config_file_with_source_database_connection_properties>"

$params = (Get-Content $configFile | Where-Object { $_.Trim() -ne "" }) | Select-Object -First 1 | ForEach-Object { $_ -split "," }

if ($params.Count -lt 3) {
    Write-Host "Error: Configuration file must have three parameters: DSN, User, Password!" -ForegroundColor Red
    exit
}

$dsn = $params[0].Trim()
$user = $params[1].Trim()
$password = $params[2].Trim()

$connectionString = "DSN=$dsn;UID=$user;PWD=$password"

$query = "SELECT TABLE_NAME FROM USER_TABLES;"

$conn = New-Object System.Data.Odbc.OdbcConnection($connectionString)
$conn.Open()
$cmd = $conn.CreateCommand()
$cmd.CommandText = $query
$reader = $cmd.ExecuteReader()

$tables = @()
while ($reader.Read()) {
    $table = $reader.GetString(0)
    $tables += @{ Table = $table }
}
$reader.Close()
$conn.Close()

$configFile = "<path_to_config_file_with_target_database_connection_properties>"

$databases = Get-Content $configFile | ForEach-Object {
    $fields = $_ -split ","
    [PSCustomObject]@{
        Host     = $fields[0]
        Database = $fields[1]
        Security = $fields[2]
        User     = $fields[3]
        Password = $fields[4]
    }
}
$MasterDB = $databases[0]

 foreach ($entry in $tables) {

    $CurrentTable = "$($entry.Table)"

    #$destinationTable = "$($entry.Table)"

    $process = Start-Process -FilePath $dbForgePath -ArgumentList "
              /dataimport
              /templatefile:`"$templateFile`"
              /connection:`"Data Source=$($MasterDB.Host);Initial Catalog=$($MasterDB.Database);Integrated Security=$($MasterDB.Security);User ID=$($MasterDB.User);Password=$($MasterDB.Password)`"
              /table:`"$CurrentTable`"
              /inputtable:`"$CurrentTable`"
              /errormode:abort
              /create
               " -PassThru -Wait  -windowstyle hidden


               if ($process.ExitCode -eq 0) {
                    Write-Output "Import from $CurrentTable completed successfully into $CurrentTable."
               } else {
                    Write-Output "Errors occurred while importing $CurrentTable."
               }
              Write-Output "ExitCode:" $process.ExitCode

}
<path_to_dbforge_studio_for_sql_server_file>– The path to the dbForge Studio for SQL Server configuration file.
The default path to this executable depends on where dbForge Studio for SQL Server is installed. If you installed dbForge Studio:
- As a standalone tool:
C:\Program Files\Devart\dbForge Studio for SQL Server. -
As a part of the dbForge Edge bundle:
C:\Program Files\Devart\dbForge Edge\dbForge Studio for SQL Server. <path_to_import_template_file>– The path to the import template file.<path_to_config_file_with_source_database_connection_properties>– The path to the configuration file that contains the source database connection properties.<path_to_config_file_with_target_database_connection_properties>– The path to the configuration file that contains the target database connection properties.
- For PostgreSQL:
$dbForgePath = "<path_to_dbforge_studio_for_sql_server_file>"

$templateFile = "<path_to_import_template_file>"

$configFile = "<path_to_config_file_with_source_database_connection_properties>"

$params = (Get-Content $configFile | Where-Object { $_.Trim() -ne "" }) | Select-Object -First 1 | ForEach-Object { $_ -split "," }

if ($params.Count -lt 3) {
    Write-Host "Error: Configuration file must have three parameters: DSN, User, Password!" -ForegroundColor Red
    exit
}

$dsn = $params[0].Trim()
$user = $params[1].Trim()
$password = $params[2].Trim()

$connectionString = "DSN=$dsn;UID=$user;PWD=$password"

$query = "SELECT
  TABLE_NAME
FROM INFORMATION_SCHEMA.TABLES
WHERE TABLE_SCHEMA NOT IN ('pg_catalog', 'information_schema');"

$conn = New-Object System.Data.Odbc.OdbcConnection($connectionString)
$conn.Open()
$cmd = $conn.CreateCommand()
$cmd.CommandText = $query
$reader = $cmd.ExecuteReader()

$tables = @()
while ($reader.Read()) {
    $table = $reader.GetString(0)
    $tables += @{ Table = $table }
}
$reader.Close()
$conn.Close()

$configFile = "<path_to_config_file_with_target_database_connection_properties>"

$databases = Get-Content $configFile | ForEach-Object {
    $fields = $_ -split ","
    [PSCustomObject]@{
        Host     = $fields[0]
        Database = $fields[1]
        Security = $fields[2]
        User     = $fields[3]
        Password = $fields[4]
    }
}
$MasterDB = $databases[0]

 foreach ($entry in $tables) {

    $CurrentTable = "$($entry.Table)"

    #$destinationTable = "$($entry.Table)"

    $process = Start-Process -FilePath $dbForgePath -ArgumentList "
              /dataimport
              /templatefile:`"$templateFile`"
              /connection:`"Data Source=$($MasterDB.Host);Initial Catalog=$($MasterDB.Database);Integrated Security=$($MasterDB.Security);User ID=$($MasterDB.User);Password=$($MasterDB.Password)`"
              /table:`"$CurrentTable`"
              /inputtable:`"$CurrentTable`"
              /errormode:abort
              /create
               " -PassThru -Wait  -windowstyle hidden


               if ($process.ExitCode -eq 0) {
                    Write-Output "Import from $CurrentTable completed successfully into $CurrentTable."
               } else {
                    Write-Output "Errors occurred while importing $CurrentTable."
               }
              Write-Output "ExitCode:" $process.ExitCode

}
<path_to_dbforge_studio_for_sql_server_file>– The path to the dbForge Studio for SQL Server configuration file.
The default path to this executable depends on where dbForge Studio for SQL Server is installed. If you installed dbForge Studio:
- As a standalone tool:
C:\Program Files\Devart\dbForge Studio for SQL Server. -
As a part of the dbForge Edge bundle:
C:\Program Files\Devart\dbForge Edge\dbForge Studio for SQL Server. <path_to_import_template_file>– The path to the import template file.<path_to_config_file_with_source_database_connection_properties>– The path to the configuration file that contains the source database connection properties.<path_to_config_file_with_target_database_connection_properties>– The path to the configuration file that contains the target database connection properties.
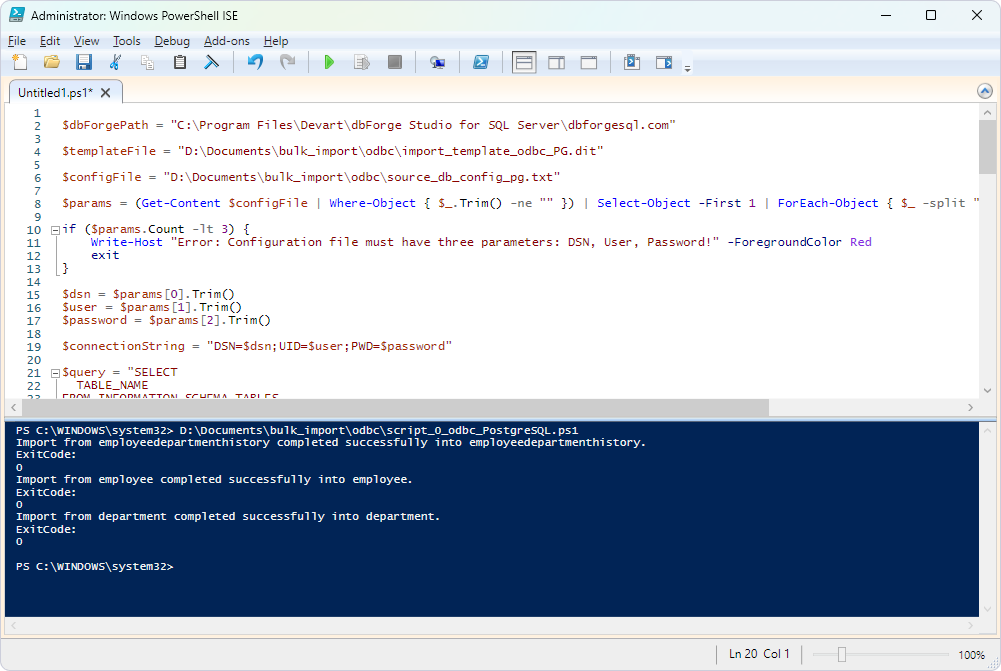
12. Run the script.