Operations with SQL Server graph databases
What is a graph database?
SQL Server supports graph databases that use two table types:
NODE– Stores entities in the graph and includes an implicit pseudocolumn$node_idthat uniquely identifies each row.EDGE– Stores relationships between nodes and includes the pseudocolumns$edge_id,$from_id, and$to_id.
These pseudocolumns are visible to the user in the table definition but are implemented using hidden internal columns that SQL Server manages automatically. You cannot reference these hidden columns directly.
For example, you can create an index on the $from_id and $to_id pseudocolumns in an EDGE table:
CREATE INDEX AnIndex ON Connections ($from_id, $to_id);
The index is defined on the two pseudocolumns $from_id and $to_id but, internally, SQL Server defines such an index on the hidden columns of an EDGE table:
Automatic index creation
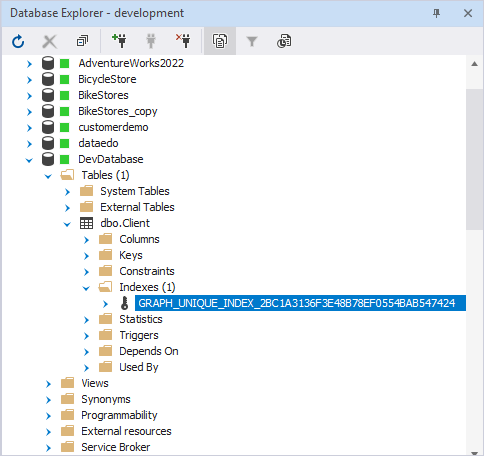
When you create or synchronize graph tables, SQL Server automatically adds unique, non-clustered indexes to ensure each node and edge is uniquely identifiable:
- NODE – An index is created on
$node_id. - EDGE – An index is created on
$edge_id. You can also create indexes on combinations like ($from_id,$to_id) for performance.
Although these indexes appear on pseudocolumns, internally SQL Server defines them on the hidden columns that store the graph identifiers.
Synchronize graph tables using dbForge Studio for SQL Server
With the built-in Schema Compare tool, you can:
- Compare and synchronize graph tables like regular tables.
- Preserve the pseudocolumn definitions.
- Create or update the necessary indexes on pseudocolumns.
Create the NODE and EDGE tables
To create a NODE table, run:
CREATE TABLE Client (
  Name NVARCHAR(MAX)
) AS NODE;
To create an EDGE table, run:
CREATE TABLE Connections AS EDGE;
Note
EDGEtables can be created without user-defined columns.
When creating or synchronizing NODE and EDGE tables, unique, non-clustered indexes are created automatically.
Synchronize graph tables
1. Open the New Schema Comparison wizard in one of these ways:
- In the top menu, select Database > New Schema Comparison.
- On the Start Page, select Database Sync > New Schema Comparison.
2. On the Source and Target page, select the source and target databases containing the graph tables you want to compare.
3. Click Compare.
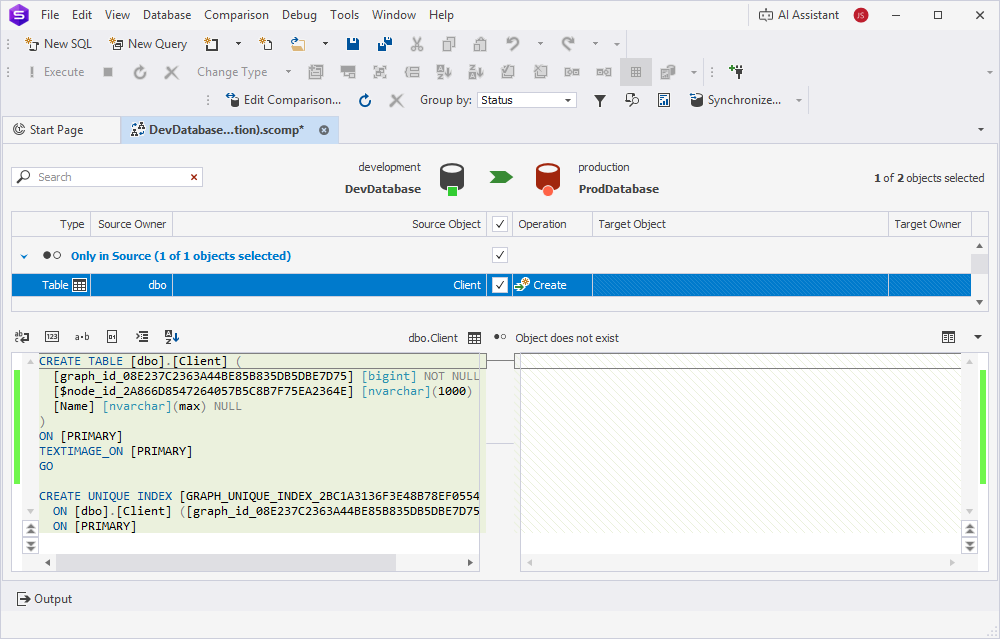
4. In the Schema Comparison document, NODE (Client) and EDGE (Connections) tables appear as regular tables.
The tables appear in the Only in Source section with the Create operation status. When you select the table, Text Compare displays the CREATE statement that will be used to create the selected table on the target database:
5. At the top of the document, click  to open the Schema Synchronization Wizard.
6. Select the output option to manage a synchronization script.
7. Click Synchronize.
Synchronize indexes on pseudocolumns
1. Open the New Schema Comparison wizard in one of these ways:
- In the top menu, select Database > New Schema Comparison.
- On the Start Page, select Database Sync > New Schema Comparison.
2. On the Source and Target page, select the source and target databases containing the graph tables you want to compare.
3. Click Compare.
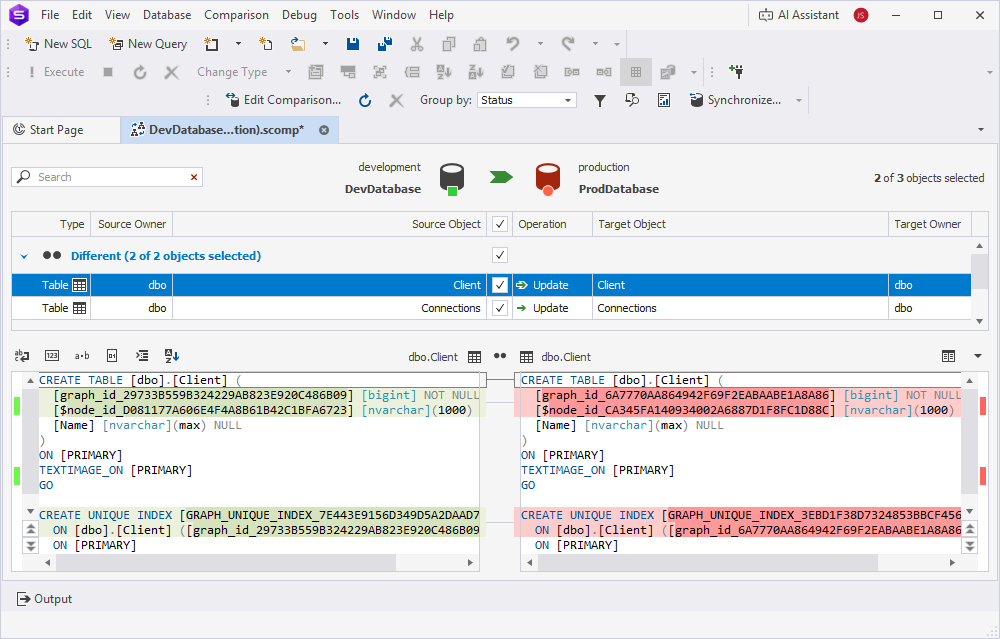
4. In the Schema Comparison document, NODE (Client) and EDGE (Connections) tables appear as regular tables.
The tables appear in the Different section, as their unique indexes differ. When you select the table, Text Compare displays differences in table definitions for indexes that will be synchronized:
5. At the top of the document, click to open the Schema Synchronization Wizard.
6. Select the output option to manage a synchronization script.
7. Click Synchronize.