Design conditions for JOIN clauses
A JOIN clause combines columns from one or more tables into a single result set. The type of JOIN determines how rows are matched between tables. It can produce different results even when using the same tables.
In Query Builder, you can create the following types of JOINs: INNER, LEFT OUTER, RIGHT OUTER, FULL OUTER, and CROSS JOIN.
You can also add JOIN conditions, change the JOIN type, group JOINs, or remove them using the Joins tab of Tabbed Editor.
Open Tabbed Editor
To open Tabbed Editor, do one of the following:
-
In the top menu, select Query > Show Tabbed Editor.
-
On the Query toolbar, click
 .
.
Create a JOIN
To create a JOIN between two tables, do one of the following:
- Drag a column from the source table to a column in the target table on the diagram.
- Go to the Joins tab of Tabbed Editor and add a
JOINwith a condition.
When you add two or more tables to a query, dbForge Studio automatically joins them using common data or relationships stored in the database. However, if the Studio does not automatically create a JOIN, or if you want to define additional join conditions, you can manually create joins between tables on the diagram.
Note
JOINs are automatically created when you drag a table with a foreign key and its referenced table onto the diagram.
For best performance, ensure the columns used in JOIN conditions are indexed. Joining on unindexed columns may slow down the query.
Create a JOIN manually
To manually create a JOIN between tables or table-valued objects:
1. From Database Explorer, drag the objects you want to join onto the diagram.
2. Drag a column from the source table to a column in the target table on the diagram.
Note
You can’t create joins between columns of type
textorimage.Make sure the columns used in join conditions have compatible data types. For example, a
datecolumn should be joined to anotherdatecolumn. Similarly, anintcolumn can be joined to another integer type, such assmallintorbigint.Query and View Designer does not validate data types during design time. If the data types are incompatible, the database engine will return an error when you run the query.
Create a JOIN using Tabbed Editor
1. Switch to the Joins tab and click ![]() .
.
2. In the JOIN template that opens, do the following:
2.1. Select the JOIN type (highlighted in red), and choose the required type from the list.
2.2. Click the enter table name placeholder and choose the tables you want to join.
2.3. Click the equals sign (=) (highlighted in green) and choose the filter operator, such as <= or <>.
2.4. Click the enter column name placeholder and choose the columns you want to use in the JOIN condition.

The JOIN clause is added, and the logical relationship between tables is displayed on the diagram.
3. To preview the query, click Text in the bottom panel of the Query Builder document.
Work with JOIN conditions and condition groups
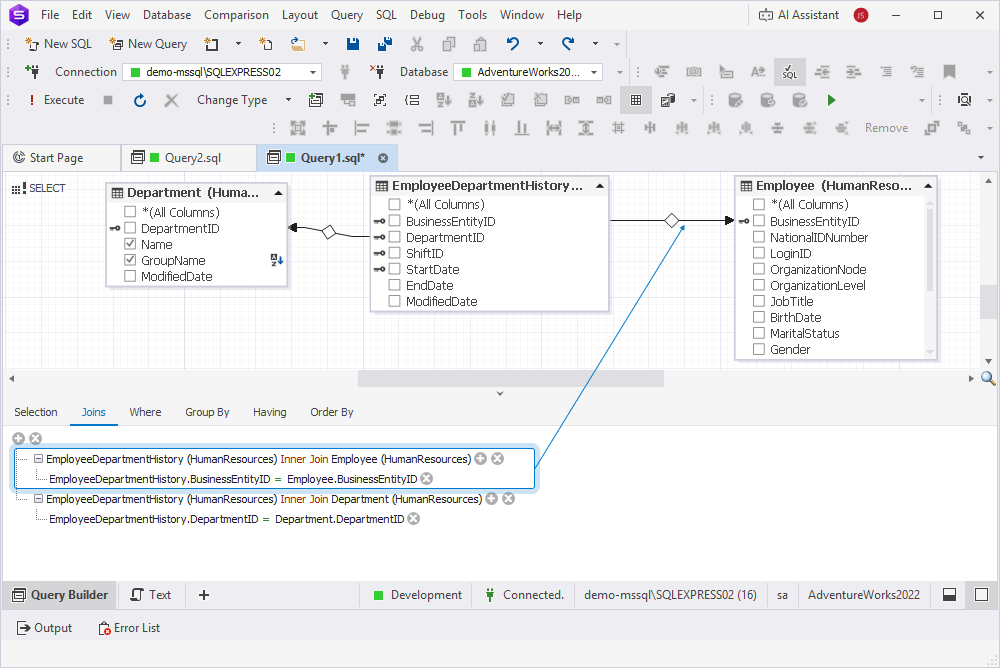
Tabbed Editor shows a JOIN clause as a tree with the JOIN type, condition, and condition groups. A group consists of several conditions or subgroups, combined with a logical operator.
Add conditions and groups in JOINs
To add a group, select the upper-level group operator or JOIN type, then select Add Group.

To add a filter condition:
1. Open the filter condition template by doing one of the following:
-
Click
 for the condition editor.
 -
Select the
JOINtype, then select Add Condition. -
Press Ctrl+Plus Sign.
2. Click the enter column name placeholder and choose a column.
3. Select the condition criteria operator, then select the logical operator you want to apply from the list.
4. If required, enter the operand value.
Remove conditions, groups, and JOINs
To remove a condition, click ![]() .
.
Alternatively, navigate to the condition and press Delete or Minus Sign.
To remove a group, do one of the following:
-
Click
 for the group.
 -
Select its logical operator, then select Remove Group.
-
Navigate to the group and press Delete or Minus Sign.
To remove a JOIN, do one of the following:
-
Click
for the join you want to remove. -
Select the
JOINtype, then select Remove Join.
To remove a JOIN from the diagram, right-click the selected connector on the diagram, then select Remove from Diagram.
Edit JOINs
To edit JOINs, do one of the following:
-
On the Query toolbar, click
 or
or  to change the JOIN type.
 -
On the diagram, right-click the selected relationship and select Select All rows from [table_name].
You can also copy, cut, and paste conditions and groups using Ctrl+C, Ctrl+X, and Ctrl+V.
Navigate between conditions and condition groups
To navigate between conditions and condition groups, do the following:
-
Use Up Arrow, Down Arrow, Left Arrow, and Right Arrow to navigate between conditions and groups.
-
Use Left Arrow and Right Arrow to navigate between criteria operator and operands.