Installation from the Command Line
dbForge tools can be installed from the command line with or without the interaction with the end user.
If you run the installer file from the command line, the standard Installation wizard will be displayed, where you can select the installation configurations. For this, open Command Prompt, navigate to the installation file, and run the installer to launch the Installation Wizard. For example:
cd C:\Downloads
dbforgeoracle.exe
By default, the platform independent version of the Studio is installed, so it is run as 64-bit process on the corresponding Windows versions. If you want to work with a 32-bit Oracle client on 64-bit Windows, you can install the 32-bit executable of dbForge Studio for Oracle and its dependencies by selecting the corresponding option during the installation. This feature is available starting from dbForge Studio for Oracle v6.0. Please note that the 32-bit version of the Studio cannot be installed independently - only alongside the 64-bit version.
Note
To run the Command Line in Windows 10:
From the Desktop Mode
- Move the mouse cursor to the exact lower left corner until the desktop keyboard shortcut menu appears.
- Right-click to see the shortcut menu and then select Run.
From the Charms Bar
- Move your mouse to the upper right corner until the Charms Bar appears.
- Select Apps from the list and enter ‘run’ in the Search box.
- Select Run from the search results.
Use Windows + R
- In desktop mode, press Windows + R to show the Run command line.
- In the window that opens, enter cmd and press Enter.
Install the 32-bit version of the tool from the command line
You can install the 32-bit version of dbForge Studio for Oracle using the settings file. Before you begin, save the following predefined settings in a .txt file:
[InstallSettings]
install32bitModules = 1
NGenInstallationMode = 0
where:
install32bitModules = 1ensures that the 32-bit version of dbForge Studio for Oracle will be installed.NGenInstallationMode = 0prevents the generation of native images for .NET assemblies during installation or in the background.
To install the 32-bit version of the Studio from the command line:
1. In the Command Prompt, navigate to the folder where the dbforgeoracle.exe file is stored.
2. Run the following command:
dbforgeoracle.exe /settings="D:\Settings.txt"
where:
/settingsis the parameter that specifies a settings file.D:\Settings.txtis the full path to the .txt file with the predefined settings.

3. In the installation wizard that opens, select the Install 32-bit executable modules checkbox to install the 32-bit version of the Studio. If the checkbox is not selected, only the 64-bit version is installed.
4. Follow the setup steps from the installation wizard.
Unattended installation
The tool can also be installed without the interaction with the end user. Here, two modes can be used:
- Silent: The user can see that the installation has started, and the installation progress window is displayed.
- Very Silent: The installation is running in the background.
Note
To view information on all dbForge installer parameters, you need to run the dbforgeoracle.exe setup file with the
/helpor/?commands in the Command Prompt.Parameter values with spaces require quotation marks around them.
Silent mode
To install the tool in the Silent mode, you need to run the installation file from the command line and use the /silent command:
dbforgeoracle.exe /silent
Under the Silent installation mode, the Installation wizard does not appear, and the application is installed automatically. Only the installation progress window is displayed.
Very silent mode
To install the tool in the Very Silent mode, run the installation file from the command line with the /verysilent command:
dbforgeoracle.exe /verysilent
The installation in both modes - Silent and Very Silent - is performed with the default settings predefined by the vendor.
Note
When updating a dbForge tool from the command line in the Silent or Very Silent mode, the installation will preserve the settings used during the initial installation rather than applying the default ones.
Installation via PowerShell
To install the tool via PowerShell, run the following command:
Start-Process -FilePath $installerPath -ArgumentList $arguments -Wait
where:
$installerPathis the variable containing the path to the installer file.$argumentsis the variable containing command-line arguments for installing in silent mode.Start-Processis the PowerShell command to start a process that includes the installer path and command-line arguments.Waitis the command to wait for the installation to complete.
Optionally, you can include the /verysilent parameter to install without displaying any messages and without any user intervention.
For example, the PowerShell command could look like this:
Start-Process -FilePath "D:\dbforgeoracle.exe" -ArgumentList "/verysilent" -Wait
Note
To install the 32-bit version of the Studio in the very silent mode from PowerShell, run the following command:
Start-Process -FilePath "D:\dbforgeoracle.exe" -ArgumentList "/verysilent /settings=D:\Settings.txt" -Wait
Custom installation
If you want to apply custom installation settings, you need to prepare the installation script and save it to the .inf file by running the /saveinf command:
dbforgeoracle.exe /saveinf="dbForge Studio for Oracle.inf"
The Setup wizard will walk you through the configuration steps, and the settings you’ve adjusted will be saved in a script.
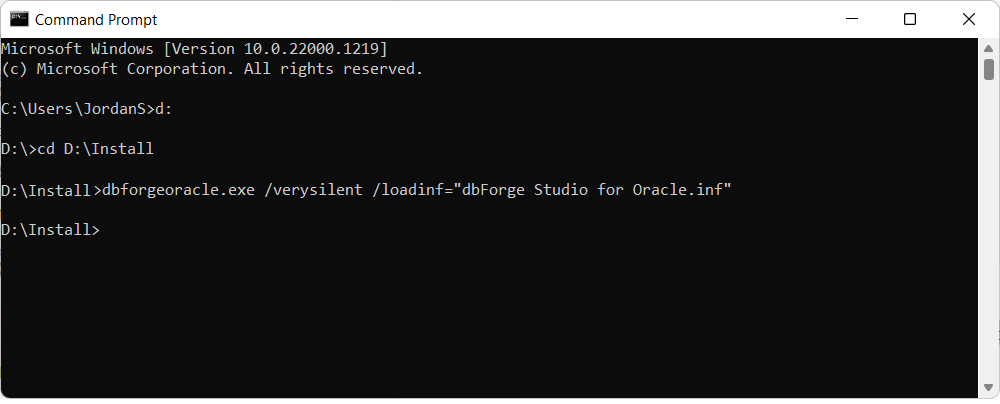
After that, you can launch the installation with custom settings by running the dbforgeoracle.exe file with the /loadinf command:
dbforgeoracle.exe /loadinf="dbForge Studio for Oracle.inf"