ODBC Driver for ServiceNow

Connecting to ServiceNow via ODBC Driver

Windows DSN Configuration

After installing the driver, create a DSN for ServiceNow in the ODBC Data Source Administrator.

  1. Open the ODBC Data Source Administrator in one of the following ways:
    • In the Windows search box, enter ODBC Data Sources, then choose the application that matches the bitness of the third-party application (32-bit or 64-bit).
    • In Control Panel, select System and Security > Windows Tools, then double-click ODBC Data Sources (32-bit) or ODBC Data Sources (64-bit). Note that before Windows 8, the icon was named Data Sources (ODBC).
    • Run C:\Windows\SysWOW64\odbcad32.exe to create a 32-bit DSN or C:\Windows\System32\odbcad32.exe to create a 64-bit DSN.
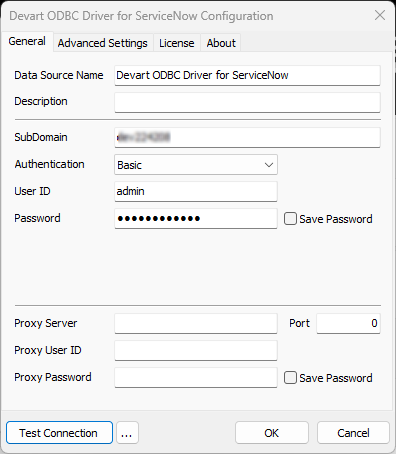
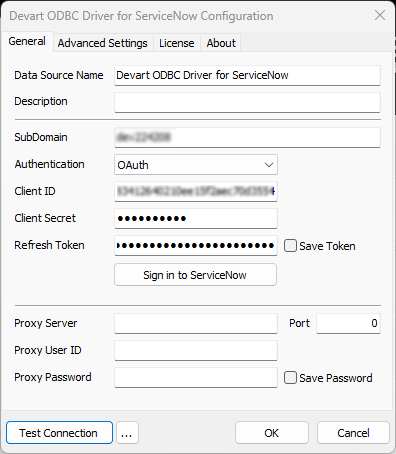
  2. Select the User DSN or System DSN tab. Most applications work with both types, yet some applications require a specific type of DSN.
  3. Click Add. The Create New Data Source dialog opens.
  4. Select Devart ODBC Driver for ServiceNow, then click Finish. The driver configuration dialog opens.
  5. Enter the connection information in the appropriate fields for Basic authentication.
  6. If you want to authenticate via OAuth, click Sign in to ServiceNow.
  7. Log in to your ServiceNow account and proceed. The details will autopopulate the corresponding fields.
  8. Optional: Click Test Connection to verify the connection settings.
  9. Click OK.

See Also

Connection String Parameters

© 2015-2026 Devart. All Rights Reserved. Request Support ODBC Forum Provide Feedback