ODBC Driver for QuickBooks Desktop

Connecting to QuickBooks Desktop via ODBC Driver

Windows DSN Configuration

Before setting up DSN, please ensure that both driver and your tool of choice are running in the same rights category: if QuickBooks Desktop is running as Administrator, the tool of choice should also be launched as Administrator - otherwise connection might fail. Generally, there is no specific message error upon mismatching the rights. To ensure that you are running both programs in the same rights mode, and to avoid errors and connections issues when creating a connection, do the following:

  1. Launch the program in Administrator mode by right-clicking it and selecting Run as Administrator option in the context menu. If it worked, that means the other program had been running as Administrator, and the rights were mismatched.
  2. To understand whether the program and/or ODBC Driver for QuickBooks Desktop is running as Administrator, right-click it, go to Properties > Compatibility tab > Privelege Level section. In this case, the option Run this program as Administrator will be enabled.
  3. Please note that it may be so that the program is launched as Administrator automatically, to deal with some right disrepancies or launch errors. Usually it is not a user's error.

After installing the driver and setting up the appropriate rights, create a DSN for QuickBooks Desktop in the ODBC Data Source Administrator.

  1. Open the ODBC Data Source Administrator in one of the following ways:
    • In the Windows search box, enter ODBC Data Sources, then choose the application that matches the bitness of the third-party application (32-bit or 64-bit).
    • In Control Panel, select System and Security > Windows Tools, then double-click ODBC Data Sources (32-bit) or ODBC Data Sources (64-bit). Note that before Windows 8, the icon was named Data Sources (ODBC).
    • Run C:\Windows\SysWOW64\odbcad32.exe to create a 32-bit DSN or C:\Windows\System32\odbcad32.exe to create a 64-bit DSN.
  2. Select the User DSN or System DSN tab. Most applications work with both types, yet some applications require a specific type of DSN.
  3. Click Add. The Create New Data Source dialog opens.
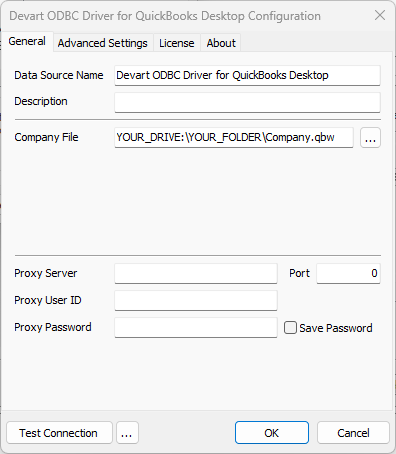
  4. Select Devart ODBC Driver for QuickBooks Desktop, then click Finish. The driver configuration dialog opens.
  5. Enter the Connection Name and Connection Description.
  6. Specify the the direct path to the Company File of the .QBW or .QBA extension by selecting it via File Explorer or by entering it manually.
  7. Optional: Click Test Connection to verify the connection settings.
  8. Click OK.

See Also

Connection String Parameters

© 2015-2026 Devart. All Rights Reserved. Request Support ODBC Forum Provide Feedback