Create a DSN in the odbc.ini file
A sample DSN named DEVART_SALESFORCE is created during the driver installation. You can configure and adjust the DSN parameters as needed.
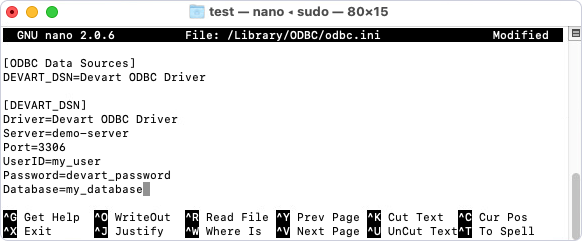
Modify the odbc.ini file
1. Open the odbc.ini file in a text editor, for example, nano.
Use the following command to edit the system-wide DSN.
sudo nano /Library/ODBC/odbc.ini
Use the following command to edit the user-specific DSN:
sudo vi ~/.odbc.ini
2. Add the configuration for your DSN in the odbc.ini file.
[DEVART_SALESFORCE]
Driver=Devart ODBC Driver for Salesforce
Data Source=https://login.salesforce.com
UserID=your_salesforce_user_id
Password=your_salesforce_password
SecurityToken=your_security_token
3. Save and close the file:
3.1. Press CTRL + O to save the file.
3.2. Press CTRL + X to exit the editor.
4. Optional: Test the DSN configuration with isql, a command-line tool for executing SQL interactively or in batches.
isql -v DEVART_SALESFORCE
Once connected, you can run SQL queries to retrieve data from Salesforce.
Note
If you’re using Login and Password authentication when connecting to a data source and the password isn’t saved in the DSN, you’ll be prompted to enter it at runtime. If the password is saved in the DSN, or if you’re using OAuth 2.0 authentication, leave the Login and Password fields empty.