Creating Model Using Database-First Approach

The following walkthrough describes how to generate a LinqConnect model from the existing database, manually add and edit classes and relationships, generate C# code for the model.

We will use the crm_demo database, which is created and used in the CRM sample, provided with each dotConnect.


ExpandedToggleIcon        Prerequisites

In order to complete this walkthrough, you will need access to the database server you are using. You will also need dotConnect for the corresponding server installed. The crm_demo database should be created on the server. You can create it using the CRM sample from dotConnect if you have enough privileges. In Microsoft Visual Studio, you should create a new project that will be used for the purpose of this walkthrough.


ExpandedToggleIcon        Creating a Model from the Existing Database

To create a model from your existing database, perform the following sequence of actions:

1.In the Solution Explorer window, right-click the name of your project.
2.From the shortcut menu, select the Add command and then select the New Item option.

note Note

In the standalone application click the Create New Model button on the Entity Developer toolbar.

Images_AddNewItemLC

3.In the Installed Templates column of the Add New Item window, select Data.
4.In the central column of the Add New Item window, select Devart LinqConnect Model.

note Note

In the standalone application in the displayed New Model dialog select Devart LinqConnect Model and click Create.

5.Click Add.

Images_T_EF_DBF_CMW1

6.In the first page of the wizard select the Database First option and click Next.

Images_ef_wizard_second

7.Select the dotConnect provider in the Provider drop-down list and set the server connection parameters. You can use the Test Connection button to verify the entered parameters.
8.Click Next.

Images_CreateNewModel3

9.In the Choose Model Contents page select Generate From Database and click Next.

Images_ef_wizard_third

10. In the Choose source tree of the Select database objects page select the objects to be included in the model and click Next. If you don't see the crm_demo database, select the Show all databases check box (for MySQL and SQLite, or Show all users for Oracle, or Show all schemas for PostgreSQL and MS SQL Server).

Images_CreateNewModel5

11. Set naming rules for classes, methods and properties and click Next.

Images_CreateModelWizardLinqModelProperties

12. Specify the namespace for the generated classes, enter the name for DataContext.

Keep the Preserve schema name in storage check box selected to preserve schema name in the storage part.

Keep the Use database comments check box selected to indicate that comments for database objects, if supported by DBMS, should be used for model objects Documentation initialization and taken into account when executing model or database update operations.

Keep the Detect ManytoMany associations check box selected to automatically detect many-to-many associations. If this check box is not selected, a class with two one-to-many associations will be generated for an intermediate table instead of a many-to-many association.

Keep the Save connection settings in App.Config as: check box selected to save the connection string in App.Config (or Web.Config in case of a web application), or deselect this check box to keep the connection string hardcoded in the Data Context constructor.

13. Click Next.

Images_CreateModelWizardLinqModelDiagramContents

14. In the Choose Model Diagram Contents page, select the entities to be displayed on the diagram. There are three options: All Entities (all entities are displayed on the diagram), Split by Users (entities of a user are displayed on a separate diagram), or Custom (manually select the required entities).
15. Click Next.

Images_CreateModelWizardLinqCodeGenerationTemplate

16. The Choose Code Generation page allows you to select code generation templates you want to add to the new model. By default this page contains the most frequently used template; the properties area of this page allows you to configure the properties of the selected template. Three buttons at the top of this page allow you to add more templates from gallery, add existing templates from disk and remove templates from the list.
17. Click the Add template button.

Images_CreateModelWizardLinqCodeGenerationTemplate2

18. The Add Template dialog box lists all predefined and shared templates. Choose the required one and click OK. The selected template will be added to the list on the Choose Code Generation page together with all related templates (without which the template would work incorrectly).
19. After all the required templates are added to the list on the Choose Code Generation page of the wizard, click Next.
20. In the final page of the wizard click Finish.

note Note

If you work with a Devart LINQ to SQL model, the sequence of steps is the same.

The model is generated and opened on the diagram:

images_diagram_LC

You may drag classes on the diagram for a better view.


ExpandedToggleIcon        Context and Code Generation

This section explains how to set up context and code generation in LinqConnect models.

For the purpose of context and code generation, you may need to create and define folders, into which context and generated code will be saved, as well as other parameters available in the Properties window of the selected template.

The definition of output folders for context and code generation is optional, if such folders are of no importance for you, go directly to Step 9 of the procedure.

To define folders for context and code generation, perform the following sequence of actions:
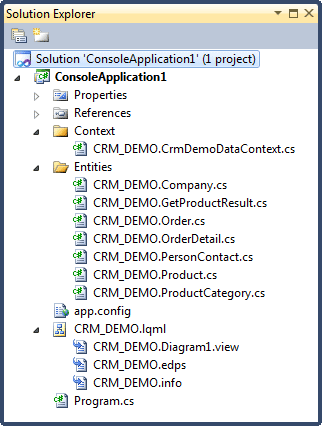
1.In your project in the Solution Explorer window, create a folder for context (for example, Context) and a folder for generated code (for example, Entities).
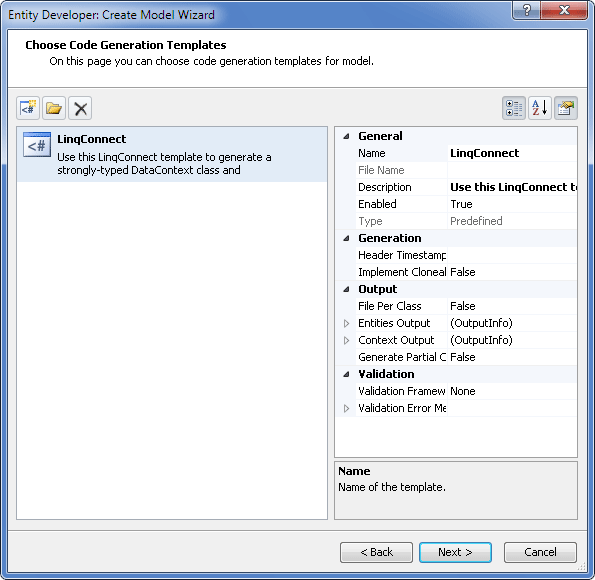
2.Navigate to the Model Explorer window, select the template and click to display the Properties window for the selected template.
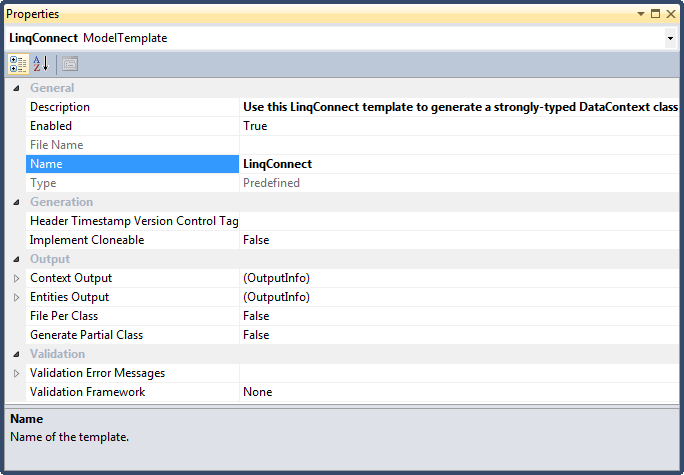
Images_TemplatePropertiesLC

3.In the Output section of the model properties, click the Context Output line and then click the displayed three-dotted button.
4.In the Select Project Folder dialog box, select the appropriate folder for the context (for example, the Context folder that was created in Step 1 of this procedure) and click OK.
5.In the Output section of the model properties, click the Entities Output line and then click the displayed three-dotted button.
6.In the Select Project Folder dialog box, select the appropriate folder for entities (for example, the Entities folder that was created in Step 1 of this procedure) and click OK.
7.Select an appropriate value for the File Per Class property: if different folders are specified for the context and entities, the File Per Class parameter must be set to True.
8.Set the Generate Partial Class property to True define that for each class of the model a partial class should be generated, in which it will be possible to add code that won't be overwritten by the designer. The property can be used, if File Per Class is set to True.
9.To enable the entity property validation mechanism in the Validation section locate the Validation Framework row and select the appropriate framework; use the Validation Error Messages row to apply error messages stored in the application resources. For details on validation refer to Entity Property Validation.
10. To generate code, save the model, or in the Solution Explorer docking window right-click the model and in its context menu select Run Custom Tool.

note Note

To generate code in the standalone application, click the Generate Code button on the application toolbar.

Entities and context files are successfully generated and stored in the specified folders:

Images_File_GenLC

note Note

In case during validation some errors are found, they are displayed in the Error List docking window and code is not generated.

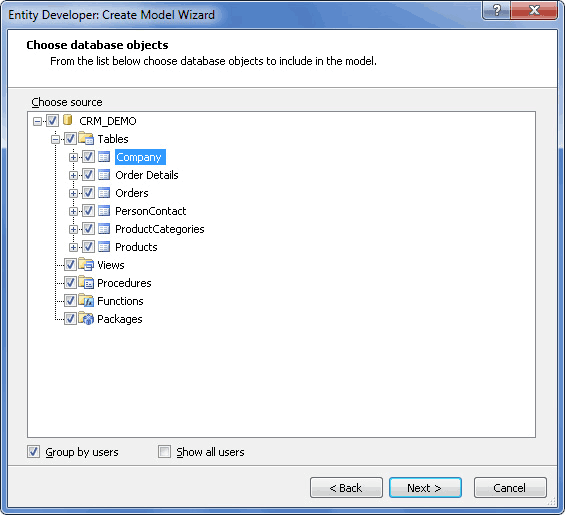
This completes the procedure for creating a model from the existing database.


ExpandedToggleIcon        See Also


Send feedback on this topic

© 2008 - 2024 Devart. All rights reserved.