The Entity Developer application lets you add attributes from existing assemblies to classes, complex types, enum types, properties and the context. Values specified in added attributes are used in code generation later on.
This topic covers the following:
| • | Adding one or more attributes to classes, complex types, enum types, properties and the context; |
| • | Changing added attributes and values of their parameters. |
How to Add Attributes to Classes, Complex Types, Enum Types, Properties or Contexts
The procedure of adding attributes to model objects both in the Visual Studio add-in and the stand-alone application is identical.
| 1. | In the Model Explorer window or in the diagram area right-click the object you want to add one or more attributes to, and select Attributes in its context menu. |
| 2. | (Optional) If there are no attribute types available in the model, a confirmation dialog box is displayed. In the confirmation dialog box, click Yes to proceed, or click No to exit the procedure. |
| 3. | In the Model Settings window, expand the Model node and go to the Attributes node. |
| 4. | In the Attributes tab click Add. |
The Add Assembly dialog box is displayed:
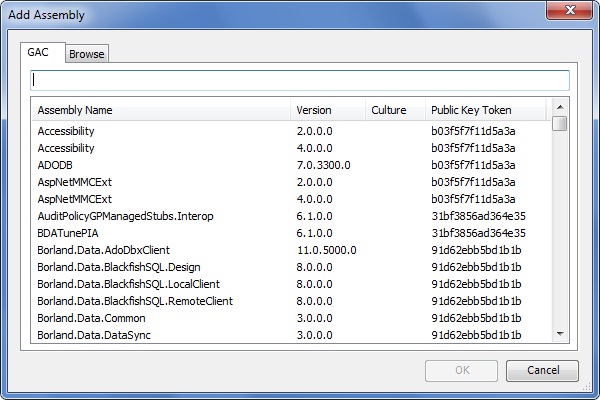
| 5. | In the Add Assembly dialog box, select one or more assemblies with attributes you want to add, and click OK. |
|
|
If the required assembly is not listed in the Add Assembly dialog box, navigate to the Browse tab, click the Browse button, navigate to the folder where your assembly is stored, select it and click Open.
|
The assembly and its attribute types are listed in the Model Settings window.
| 6. | In the Model Settings window, specify the attributes you want to use. |
The selected assembly and its attributes are listed in the Available Attribute Types area of the Attributes dialog box.
| 8. | In the Available Attribute Types area, select the attribute you want to add and click the right arrow. |
The attribute is added to the Selected Attributes area of the Attributes dialog box, while its parameters are displayed below. If necessary, repeat the previous step to add another attribute.
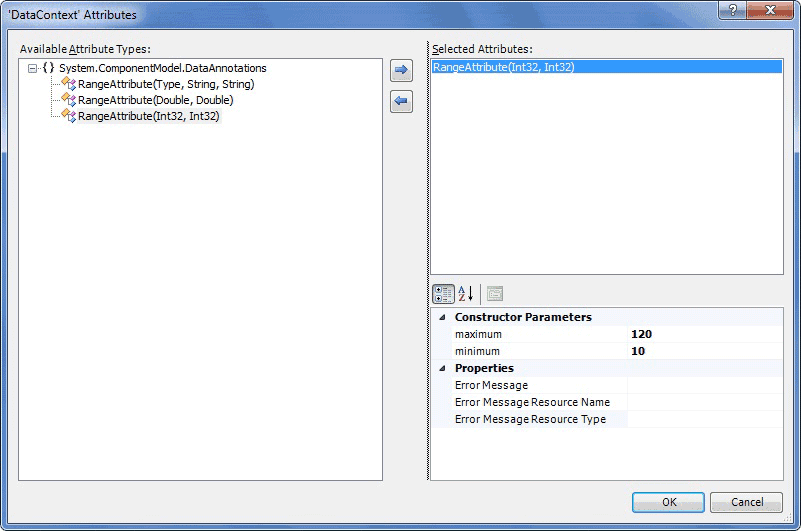
| 9. | In the lower right area of the window, set values for the displayed parameters. |
|
|
If one or more attributes (with their values defined) are added from the same assembly, this assembly is automatically added to your application. This behavior is typical only in Microsoft Visual Studio.
|
How to Add More Assemblies and/or Attribute Types
The procedure of adding more assemblies and/or attribute types both in the Visual Studio add-in and the stand-alone application is identical.
To add more assemblies and/or attribute types using the Model Settings window, do one of the following:
| • | Click the Model Settings icon on the toolbar, or click the Model menu on the main toolbar and select Settings, or right-click in the design surface of the model and select Models Settings from the shortcut menu; |
| • | repeat the steps described in the previous procedure starting from step 3. |
The procedure of changing attributes and values of their parameters both in the Visual Studio add-in and the stand-alone application is identical.
| 1. | In the Model Explorer window right-click the object or context, having attributes you want to change, and select Attributes in its context menu. |
| 2. | In the Selected Attributes area of the Attributes dialog box, select the attribute you want to change. |
| 3. | Do one of the following: |
| o | To remove the selected attribute, click the left arrow button in the Selected Attributes area of the Attributes dialog box; |
| o | To change one or several parameter values of the selected attribute, edit the corresponding value in the lower right area of the Attributes dialog box. |
| 4. | In the Attributes dialog box, click OK. |
|
Send feedback on this topic
© 2008 - 2026 Devart. All rights reserved.
 How to Change Added Attributes and Parameter Values