Database Continuous Integration with dbForge Tools
What You Need to Get Started
First, consider the main software products involved in organizing the CI database development process.
In the first place, we need such tools as:
-
A source control system (GIT, SVN, Mercurial, etc.) to control source code.
-
PowerShell to run cmdlets (minimum version 3.0 required).
dbForge products that are directly involved in the CI process and are indispensable to set up a baseline process:
-
dbForge DevOps Automation for SQL Server helps automate local database builds, using its PowerShell cmdlets.
-
dbForge Schema Compare enables to create databases and run scripts.
-
dbForge Unit Test is used to run unit tests.
Products that can be employed in the CI process as they greatly widen capabilities when organizing the process:
-
dbForge Data Generator allows filling in a database with test data.
-
dbForge Data Pump is used for filling in the database with test data from files (∗.csv, ∗.xml, or others).
-
dbForge SQL Complete helps format scripts and find invalid objects.
-
dbForge Source Control allows version-controlling schemas.
When setting up a CI process, the following files are also required:
-
PowerShell script file (∗.ps1). Cmdlets that allow creating a database and testing it; other CI operations will be called from this file.
-
Script folder with database creation scripts (∗.sql files).
-
Unit test creation scripts (∗.sql files).
If it is necessary to fill the database with realistic data, then the following file is needed:
- Data generator project file (∗.dgen file) or data files (∗.csv, ∗.xml, or others) that can be used to populate the database.
It is important to keep these files in the source control and have an option to save them to disk every time you run Database CI.
CI Pipeline With dbForge Tools
The following figure shows the database CI workflow using dbForge tools.
As you can deduce from the figure, the CI Database process starts after the changes made by developers.
The CI process can be initiated in different ways:
-
On Commit - the process starts every time changes are made to the database. The main advantage of this method is fast feedback.
-
Scheduled - the process starts at a certain time, e.g., at night or several times a day at some intervals.
-
Manually - manual start if required.
You can choose how often you would like to run CI, depending on your CI process.
The figure also shows that there are mandatory stages in the CI process, such as Build Database, Run Unit Tests, and Publish Package. There are also optional stages, such as Populate With Data and Format Script.
What Happens When Database CI Starts
Every time the CI process starts, we pull the latest file changes into the test machine from the source control repository:
-
Script folder with database creation scripts (∗.sql files) (required)
-
Unit tests (∗.sql files) (required)
-
Data generator project (∗.dgen file) or files with test data (∗.csv, ∗.xml, or others) (optional).
Note
All these files can be stored in one repository or different ones. It depends on you. The folder which you merge all these files into may have the following view:
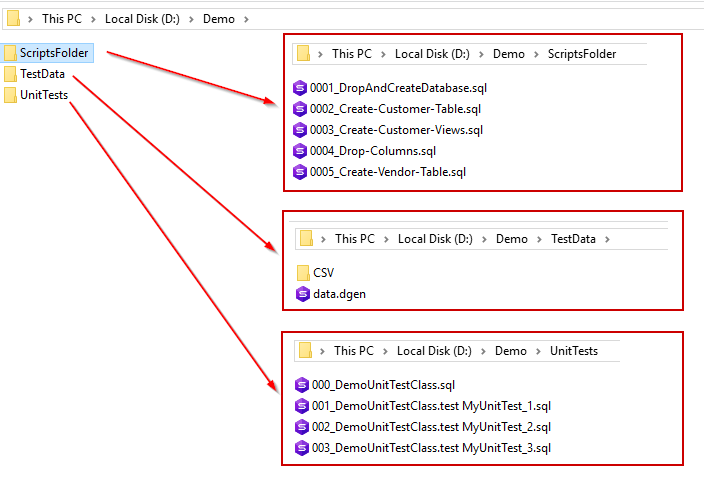
After the database source code has been received, the PowerShell *.ps file opens (for example, with Jenkins) with the necessary cmdlets. These cmdlets create an SQL server database from scripts. If necessary, the database is filled with test data. Next, unit tests are created for the database and then run.
Script Folder With Database Creation Scripts
We assume that before creating Database CI there is already a GIT repository with a database project where developers change the database schema (add new database objects or change the existing ones).
There are several methods for organizing database scripts:
- Migration scripts method
- State-based method
- Hybrid method
Let’s take a closer look at them and the difference between them.
Migration Scripts Method
This method remains to be the most demanded and popular today.
Under this basic approach, the database schema is modified by sequential execution of update scripts: database objects creation (CREATE tables, functions, procedures…), their modification (ALTER…) or deletion (DROP…).
Also, these scripts may contain static data.
All these changes are organized as SQL files; the names of these files are sorted in chronological order.
The figure below shows an example of a folder with migration scripts.
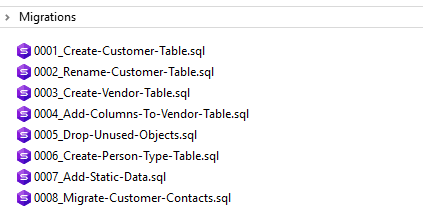
These scripts are run on the database sequentially with the help of the Script Executor functionality of the Schema Compare tool.
State-based Method
This method allows creating (updating) the database using scripts ‘from scratch’, i.e. the database is presented in scripts ‘as it should be’, and almost all scripts are stored as CREATE instructions:
CREATE TABLE [dbo].[Member](
    [MemberId] [INT] IDENTITY(1,1) NOT NULL,
    [MemberFirstName] [NVARCHAR](50) NULL,
    [MemberLastName] [NVARCHAR](50) NULL,
    [MemberEmail] [NVARCHAR](50) NULL,
 PRIMARY KEY (MemberId));
In this case, these scripts are synchronized with the target database with the help of Schema Compare.
Hybrid Scripts Method
This method is a mix of the two above-mentioned methods. But it is rarely used because it requires high accuracy since a part of the scripts (a more manageable process) comes from migration scripts; and then the database is updated using Schema compare or vice versa.
Unit Testing
Unit tests are required for database testing. Unit tests comprise a set of *.sql files, inside which special methods (e.g., AssertEquals, AssertNotEquals, etc.) of the tSQLt framework are called. tSQLt is an open source Database Unit Testing framework for SQL Server. You can find a detailed description of this framework at tsqlt.org.
How to Install tSQLt
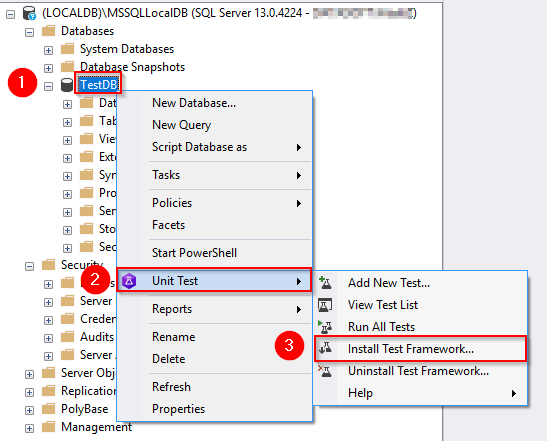
Before starting to manipulate (add, modify, or delete) unit tests for the database, it is necessary to install the unit test framework on the database. To do this, right-click the database and select Install Test Framework:
After that, the tSQLt framework will be installed on the database. In fact, this framework is a tSQLt database schema.
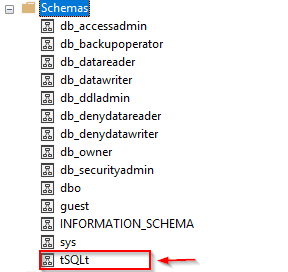
This tSQLt schema contains a set of tables, procedures, functions, etc.

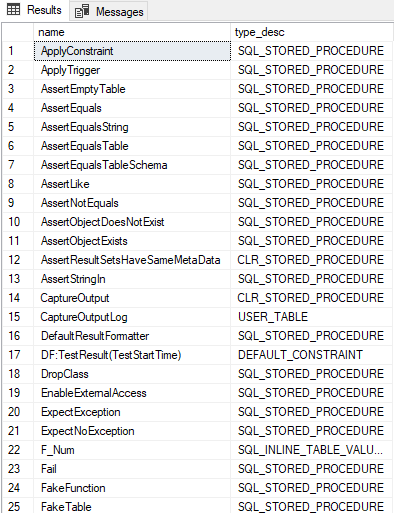
A complete list of these objects can be obtained by running the script:
SELECT name, type_desc
FROM sys.objects sysobj WHERE schema_id = (
SELECT sch.schema_id from sys.schemas sch WHERE NAME='tSQLt' )
ORDER BY sysobj.name
Create a First SQL Unit Test Through tSQLt
Now all the preconditions are met, so you can create unit tests.
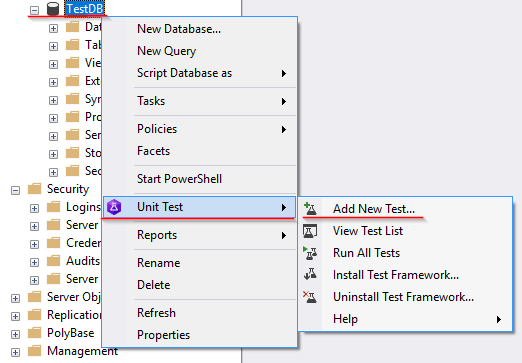
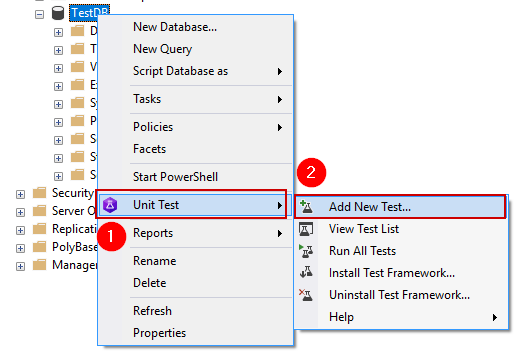
To create unit tests using the user interface, right-click the required database and select Unit Test > Add New Test.
Let us create tests manually using SQL scripts to see how tSQLt tests are arranged.
First, you need to create a test class that will include all test cases. Every developer can create any number of such classes.
The script below creates a new test class named DemoUnitTestClass.
USE TestDB;
GO
EXEC tSQLt.NewTestClass 'DemoUnitTestClass';
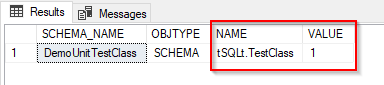
When you create a new test class, in the back of the scene tSQLt creates a schema and adds an extended property with value so that the tSQLt framework can easily figure out that this schema is created for the test class. The following query verifies this statement.
SELECT S.SCHEMA_NAME, E.OBJTYPE, E.NAME, E.VALUE
FROM INFORMATION_SCHEMA.SCHEMATA s
INNER JOIN fn_listextendedproperty (NULL, 'schema', NULL, NULL, NULL, NULL, NULL) e
ON e.objname = s.SCHEMA_NAME COLLATE Latin1_General_CI_AI AND SCHEMA_NAME = 'DemoUnitTestClass'
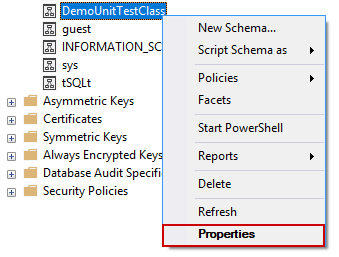
To check the value of the schema in the Extended Properties, click Security > Schemas and then right-click DemoUnitTestClass.
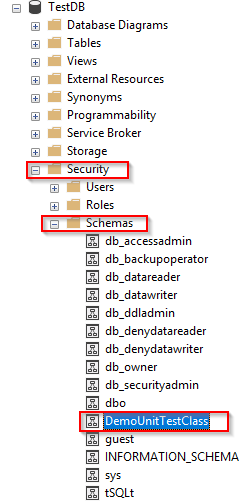
Select Properties on the shortcut menu.
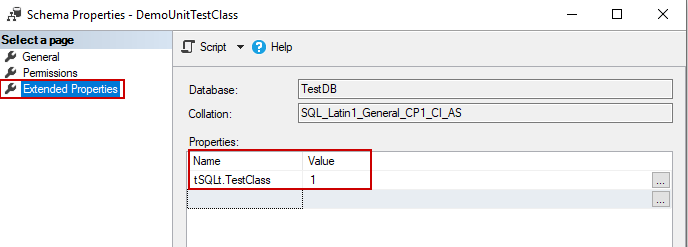
Next, select the Extended Properties page.
Finally, if you want to delete the created test class, you can execute the following stored procedure, which accepts the test class name as a parameter.
EXEC tSQLt.DropClass 'DemoUnitTestClass'
If you run the DropClass procedure, you’ll delete not only the test class (schema) but all the objects associated with this class.
You can also delete a new test in the following way:
Create a First Test Case
After creating the DemoUnitTestClass class, you can create test cases for it.
To create a new test case, right-click the required database in Object Explorer and select Unit Test > Add New Test.

By default, the Test Name is MyUnitTest_1. Click Add Test.
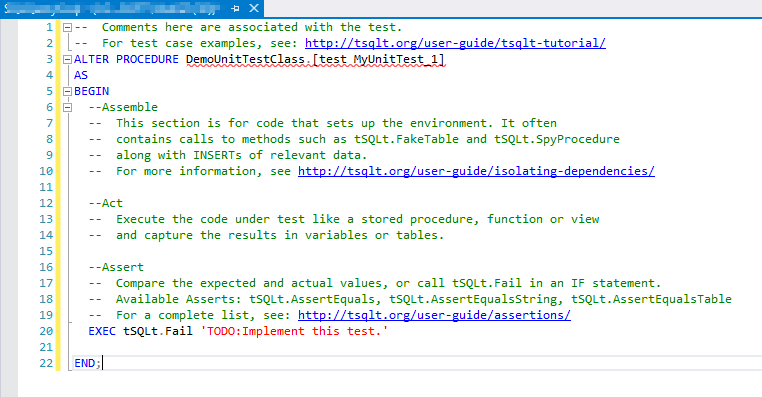
After the wizard is closed, a new skeleton document is automatically created with the body of the stored procedure, where it is requested to write your verification script.
If you follow the suggested link Unit Test Assert Methods to tsqlt.org, you can see a whole list of methods that can be used:
- AssertEmptyTable
- AssertEquals
- AssertEqualsString
- AssertEqualsTable
- AssertEqualsTableSchema
- AssertLike
- AssertNotEquals
- AssertObjectDoesNotExist
- AssertObjectExists
- AssertResultSetsHaveSameMetaData
- Fail
Let us consider the tSQLt.AsserEquals method. This method allows you to compare the expected and actual values and accepts three parameters:
@expected: This parameter defines the expected value.
@actual: This parameter defines the actual value.
@message: This parameter defines the message that will be displayed if the unit test fails. This parameter is optional.
Now let us change the code of our test case in the following way:
ALTER PROCEDURE DemoUnitTestClass.[test MyUnitTest_1]
AS
BEGIN

  DECLARE @actualValue INT;

  SELECT @actualValue = 3 + 2;

  EXEC tSQLt.AssertEquals 5, @actualValue;

END;
Then, press F5 for the changes to take effect.
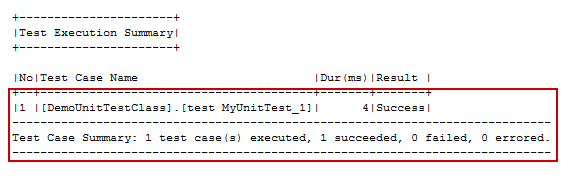
To run test cases, you can use the tSQLt.Run method. It accepts the test class name parameter. The launch of this method runs all unit tests that are tied to this class.
Execute the following script:
EXEC tSQLt.Run 'DemoUnitTestClass';
The output will be as follows:
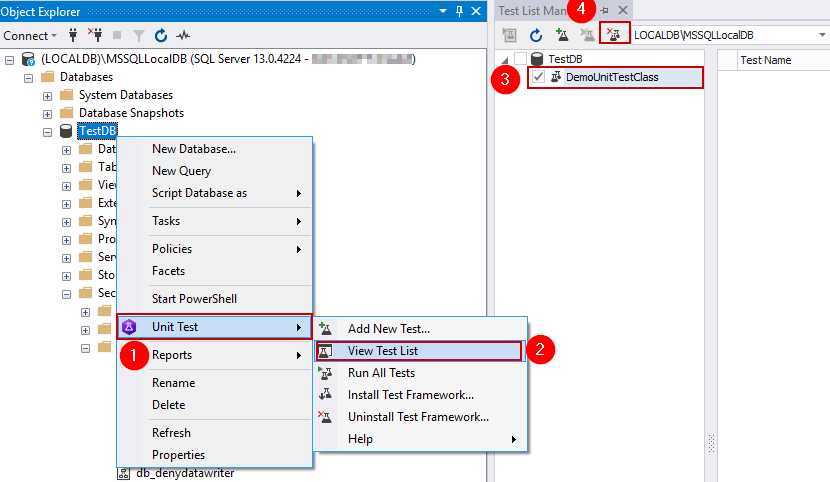
You can also run the tests using the Test List Manager.
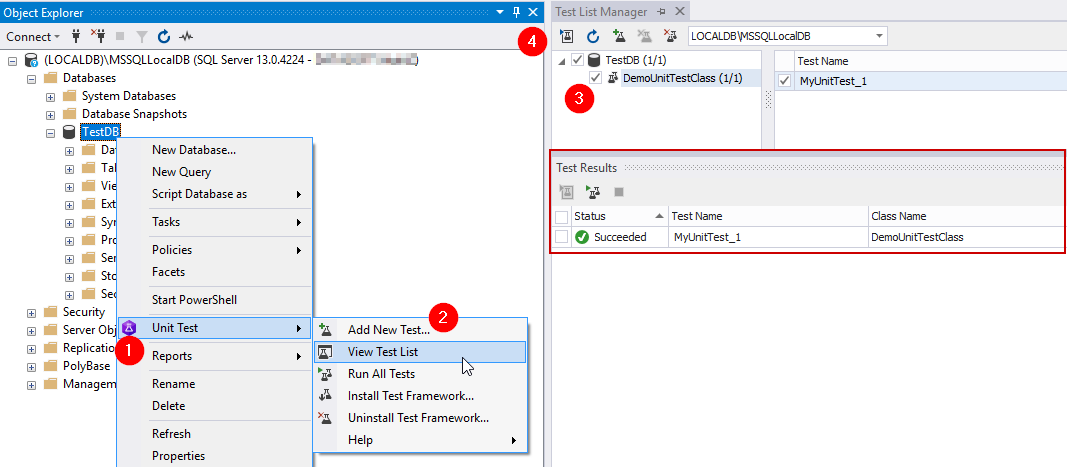
This example displays the order of actions required to create test classes and test cases for them. As a result, you can use the script and Task List Manager to create and modify tests.
Save Unit Tests to Drive
After the tests are created, you need to save them and then place them in the central Source Control repository. It is important to save tests to disk because every time when a database is created during the Database CI process these tests will also be created on the database for their subsequent launch and unit tests verification.
You need to save the tests to files in alphabetical order. The order is as follows: the classes at the beginning, then - test cases of these classes.
For example, if there is a class DemoUnitTestClass and three test cases for it, then the folder with the scripts will look like this:
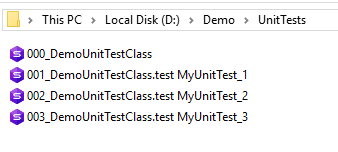
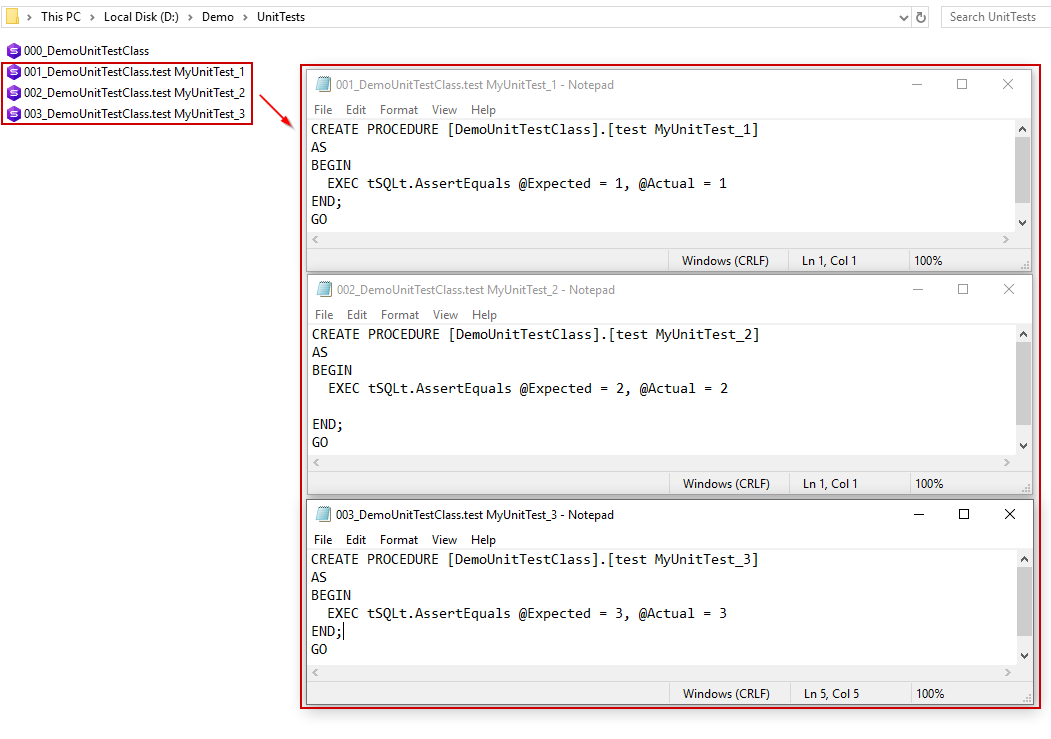
The content of these files:
000_DemoUnitTestClass.sql contains a script for creating a test class.
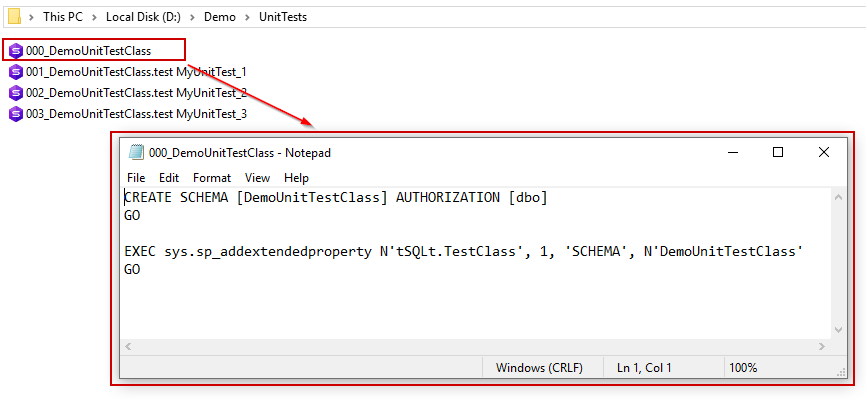
001_DemoUnitTestClass.test MyUnitTest_1.sql, 002_DemoUnitTestClass.test MyUnitTest_3.sql, and 003_DemoUnitTestClass.test MyUnitTest_3.sql are the test cases for the DemoUnitTestClass class and look like this:
Test Data
You can populate the database in several ways.
The first method involves using dbForge Data Generator, which can fill all or selected database tables with almost an unlimited amount of realistic data.
The second way is to use dbForge Data Pump, which allows filling in a specific table from the data file (*.csv, *.xml, etc.).
Since dbForge Data Generator is a preferred method, we will consider an example of its use.
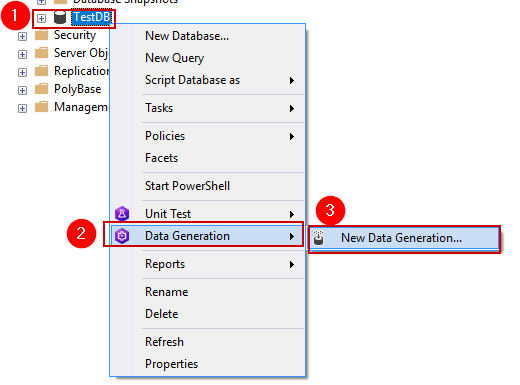
Select the database for which you want to create a .dgen project and click New Data Generation.
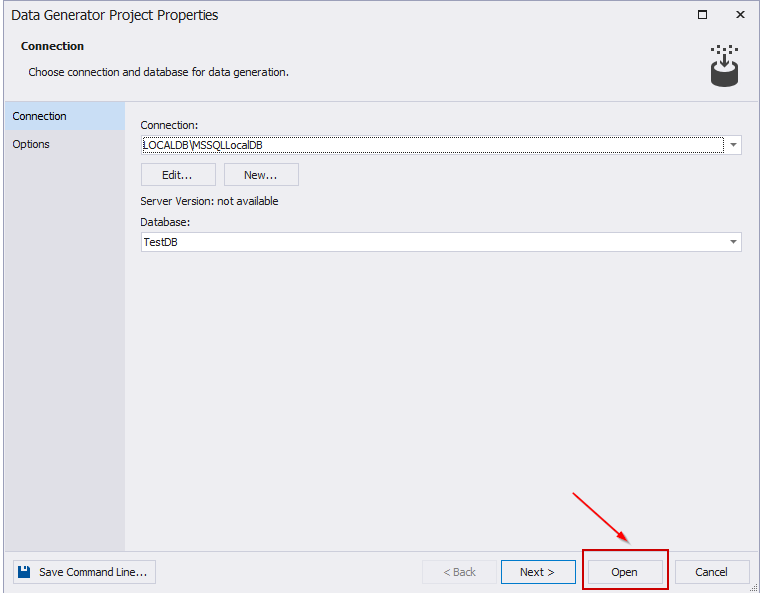
Click Open in the wizard that appears.
The project window appears, where you can make all the necessary settings.
Next, save the project to the desired folder.
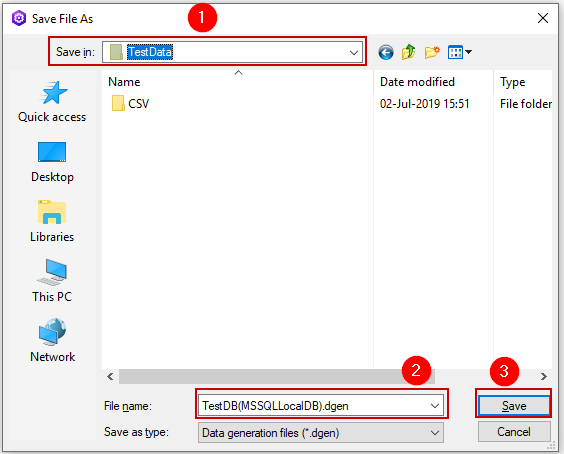
Now the project for database population is ready, you can add it to the central repository of Source Control.
Final PowerShell Script
It is time to write a final PowerShell script, which actually organizes the CI Database pipeline.
To do this, create a new PowerShell file, for example, DemoPipeline.ps1 and write a script in it. This script will invoke cmdlets.
clear;

$serverName = "(LocalDb)\MSSQLLocalDB"
$databaseName = "TestDB"


$migrationScriptsFolder = "D:\Demo\ScriptsFolder\"
$unitTestsFolder = "D:\Demo\UnitTests\"


$generatorFile = "D:\Demo\TestData\TestDB(MSSQLLocalDB).dgen"

$publishFileName = "Test.DevOpsAutomation.Database"
$publishOutputFolder = "D:\Demo\NuGet\Repository"


Function check {
    param($result)

    if ($result) {
        Write-Host "Success" -ForegroundColor Green; Write-host ""
    }
    else {
        Write-Host "Failed" -ForegroundColor Red;
        Exit(1)
    }
}


# Create database connection
Write-Host "Creating database connection..."
$connection = New-DevartSqlDatabaseConnection -Server $serverName -Database $databaseName -WindowsAuthentication $true


# Test database connection
Write-Host "Testing database connection..."
$result = Test-DevartDatabaseConnection -Connection $connection;
check($result)


# Recreating database
Write-Host "Recreating database..."
$result = Invoke-DevartExecuteScript -Input $migrationScriptsFolder -Connection $connection
check($result)


# Restore unit tests on the database
Write-Host "Restoring unit tests..."
$result = Invoke-DevartExecuteScript -Input $unitTestsFolder -Connection $connection
check($result)


# Fill database with sample data and run unit tests
Write-Host "Filling database with sample data and running unit tests..."
$result = Invoke-DevartDatabaseTests -InputObject $connection -InstalltSQLtFramework -IncludeTestData -DataGeneratorProject $generatorFile
check($result)


# Publish project
Write-Host "Publishing project..."
$project= New-DevartDatabaseProject $migrationScriptsFolder
Set-DevartPackageInfo -Project $project -Id $publishFileName -Version 3.0.0
Publish-DevartDatabaseProject -Project $project -Repository $publishOutputFolder -AutoIncrementVersion
check($result)
After executing this script the result will be as follows:
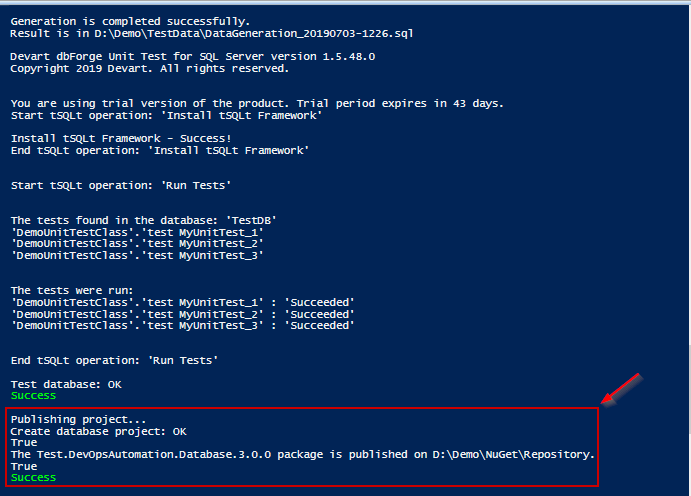
As you can see from the result, we have received a NuGet package with a database project, which can be used later on for the Delivery Integration process.
Additionally, watch these videos to discover how dbForge products can boost database development.
- How dbForge SQL Complete is involved in the Database DevOps process
- How to import data to SQL Server database with dbForge Data Pump during the DevOps process
- Creating database documentation during the Continuous Integration workflow
- How to automate database schema changes for the CI process during database deployment
- dbForge Source Control in the DevOps pipeline
- How dbForge SQL Complete is involved in the Database DevOps process
- Unit Testing for SQL Server Database in DevOps process